Build a Truly RESTful API using NodeJS & ExpressJS-The Ultimate Tutorial
— REST API, Tutorial — 130 min read
Introduction
The REST architecture for APIs was introduced by Roy Fielding as a part of his doctoral dissertation and has since revolutionized the web and the way that web applications communicate with each other. If you have no prior knowledge about REST, then the REST architecture basics blog post is a good starting point where we discuss the foundational concepts of the REST architecture and what APIs, Web APIs and REST APIs are.
A truly RESTful API is one that adheres to the 6 REST architectural constraints.
This tutorial aims to equip you with all the foundational concepts, guidelines, standards, conventions, tips and tricks that will enable you to design a truly RESTful API.
We'll learn all of this with the help of a step-by-step tutorial which will walk you through building a REST API for a very minimal note-taking app called Thunder Notes⚡. We'll also be looking at examples of real-life APIs designed by Github, Twitter, Slack, etc. to get an idea of how the big names out there design their APIs.
This may sound a little cliched but this is the tutorial I wish someone had written and I had read, before I implemented my very first REST API.
Here is the list of contents we'll be covering as a part of this tutorial.
- HTTP Request Methods or HTTP Verbs
- HTTP Response Status Codes
- Identification of Resources
- Setting up the Project
- Starting the API server
- Exploring the starter files
- GET
- POST
- PUT
- PATCH
- DELETE
- Hypermedia As The Engine Of Application State(HATEOAS)
- Authentication and Authorization
- Caching
- Layered System
- Code-On-Demand
- Versioning
- Pagination
- Searching and Filtering
- Sorting
This is a comprehensive list and the article is probably big enough to qualify as a course which is intentional because I want this tutorial to serve as a one-stop solution for everything you need to know in order to build REST APIs that make your heart swell with pride💖.
Let's have a look at some of the concepts and terminologies that you need to know before getting started with the actual design.
HTTP Request Methods or HTTP Verbs
The HTTP specification defines several HTTP request methods that indicate a certain action to be performed on a requested resource. Since they represent an action, they are also referred to as HTTP verbs.
Some of the main HTTP verbs we'll cover in this tutorial are:
- GET
- POST
- PUT
- PATCH
- DELETE
Safety and Idempotency
Safety and Idempotency are properties of HTTP methods.
A safe HTTP method is one which does not alter the server state meaning we can only perform a read-only operation with it.
An idempotent HTTP method is one which has the same effect on the server state even if it is used for making multiple identical requests.
Since safe methods do not have any effect on the server state, all safe methods are inherently also idempotent.
Let's see how these properties are associated with our selected HTTP methods. We'll look more into the rationale behind some of these associations as we progress with the tutorial so don't worry if you don't completely understand what this means as of now.
| HTTP Method | Safe? | Idempotent? |
|---|---|---|
| GET | Yes | Yes |
| POST | No | No |
| PUT | No | Yes |
| PATCH | No | No |
| DELETE | No | Yes |
You need to keep these associations in mind while using HTTP methods for our API endpoints because clients or API consumers will expect their HTTP requests to behave as per these properties.
In real-world applications, API services may need to log messages or perform some statistical updates even for safe methods. This may be debatable but is generally allowed since this is not an unintended side-effect but an intentional feature implemented by the API developers on the server and does not concern the client.
HTTP Response Status Codes
While HTTP verbs enable the client to indicate to the server what operation needs to be performed on the resource, HTTP status codes enable the server to indicate the status of the request to the client.
These status codes are categorized into 5 classes:
100 - 199: Informational responses
200 - 299: Successful responses
300 - 399: Redirection messages
400 - 499: Client Error responses
500 - 599: Server Error responses
Below is a list of the some of the HTTP status codes which we'll be using in this tutorial.
200 OK: Request has succeeded.
201 Created: Resource has been created. The response body should contain the new resource and the URL of the resource should be provided in the Location header.
204 No Content: Indicates that the response body has no content. Typically sent as a response status code for PUT and DELETE HTTP requests.
301 Moved Permanently: Indicates that the resource is now identified by a new URI. The response should contain the new URI as a best practice.
400 Bad Request: Indicates that there is something wrong with the request in terms of its format or input parameters and cannot be processed by the server. The client should modify the request before retrying.
401 Unauthorized: Indicates that the resource being requested is protected and requires authorization for being accessible. Repeating the request with proper authentication credentials may help in gaining access.
403 Forbidden: Indicates that the API understands the request but prohibits access to the resource. Authencation will not help gain access so request should not be repeated.
404 Not Found: Indicates that the requested URI cannot be mapped to an existing resource. The resource may exist at a later point in time so retrying the request is allowed.
405 Method Not Allowed: Indicates that the server recognizes the HTTP method but the target resource doesn't support it. The server must set the Allow header in the response.
500 Internal Server Error: This is a generic status code which indicates that an unexpected condition has occurred on the server and has halted the processing of the request. This code is used when no other 5XX code is found suitable. The client can retry the request.
For your reference, here is the full list of all the status codes.
Identification of Resources
You should aim to organize the design of your API around resources. So the first step in designing a REST API is identifying the resource entities and associating them with unique URIs.
A resource can either be a:
- Collection resource like projects, todo-lists or todos.
- Singleton resource like an individual project, todo-list or todo.
Let's look at how we can construct URIs for these resources.
URIs for collection resources can simply be:
/projects/todo-lists/todosURIs for singleton resources can be formed as:
/projects/{id}/todo-lists/{id}/todos/{id}Best Practice: Always try to use plural nouns for naming resources i.e
/projects,/todo-lists/{id}or/todos/{id}. Refrain from using single resource names like/project,/todo-list/{id}or/todo/{id}.
So how'd we design the URI to retrieve all todo-lists in a project?
/projects/{id}/todo-listsWhat about retrieving info about a todo in a particular todo-list?
/projects/{pId}/todo-lists/{tlId}/todos/{tId}For the Thunder Notes API, we need to identify just one resource for now i.e. notes. We'll use the following URIs for this resource:
/notes/notes/{id}We can match the URIs with the HTTP verbs and make a list of the API endpoints we're going to implement.
GET /notesPOST /notes
GET /notes/{id}PUT /notes/{id}PATCH /notes/{id}DELETE /notes/{id}Always use nouns to name resources and HTTP verbs to indicate the action to be performed on those resources. For example, avoid using URIs like
/notes/{id}/deletewhere the action to be performed is included in the URI and instead design this asDELETE /notes/{id}. It is best to rely on HTTP verbs to indicate the action to be performed on the resource.
By identifying our resources, we have successfully tackled a sub-constraint of the core REST constraint: Uniform Interface.
Setting up the Project
For the tutorial, we'll be using NodeJS and ExpressJS to implement our API server. Don't worry in case you're not familiar with these technologies and their syntax because our primary focus will be on learning how to design REST APIs. This approach will enable you to use the concepts taught in this article and apply the same using any language, framework or library of your choice.
This article assumes some basic familiarity with Git, Github and terminal commands. We'll also be using Postman for testing our API services. My preference is the Postman Desktop app but you can use the browser extensions also if you want.
Go to the tutorial Github repo and either clone or download it.
You'll see a few folders inside the repo folder but the one we're interested in right now is the starter-files folder.
The starter-files folder contains boilerplate code and serves as a basic skeleton upon which we can build our app and finally reach the version in the finished-files folder. The finished-files folder serves as a reference and contains the completed code for the entire tutorial.
Rename the starter-files folder to thunder-notes. We'll be working off of this folder for the majority of this tutorial.
Inside this newly renamed thunder-notes folder, you'll find two folders, one named client that will hold the API client/consumer codebase and the other one named server that will hold the API server codebase.
The client folder only has an index.html file for reference. In real-world applications, this folder will contain the application's front-end codebase and will be concerned with the user experience side of things along with communicating with the API server to perform CRUD operations on the data. But in this tutorial we'll use Postman to act like a mock client and make API requests on its behalf.
Our tutorial, right out of the box, enables the implementation of the Client-Server core REST constraint since it separates the application's presentation layer into the client folder and the business logic and database interactions into the API layer in the server folder.
Starting the API server
First off, rename the file .env.sample to .env. This file contains private and sensitive data like API keys, database passwords and other environment specific settings and is typically not committed into a git repo. Instead, a .env.sample file which contains dummy values for these settings is committed to serve as a template that can be used to generate the .env file later. For this tutorial, you can leave the values as is in the renamed .env file.
Now open command prompt and cd into the folder thunder-notes/server . Run npm install. This command will install the dependencies for our api server.
Once the installation is over, run npm start.
You'll get an output on the console that says:
👂 Listening on port 3000Awesome! This means that our API service is ready to serve requests at localhost:3000.
If you visit localhost:3000 in your browser, you'll be sending a GET request to the root API endpoint. You'll notice that the browser is unable to load anything. This is because there is no route handler definition for our root API endpoint.
Let's remedy that quickly. Paste this code into your handlers/rootHandler.js file.
exports.handleRoot = ( req, res ) => { res.json({ "message": "Welcome to the Thunder Notes API." });}Let's quickly go over what this route handler does. ExpressJS encapsulates information about the request like headers, payload, etc. into a request object and exposes various options for sending a response in a response object. Both these objects are passed automatically to the above route handler as input arguments and we reference them as req and res. The response object exposes the method json() which returns a JSON response to the client. The default status code returned is 200 OK.
Did you also notice that as soon as you saved your changes, the server restarted automatically. This is a pre-built configuration in the tutorial codebase so you don't have to manually restart the server every time you make a change.
If you visit localhost:3000 in your browser this time, you'll see the JSON response.
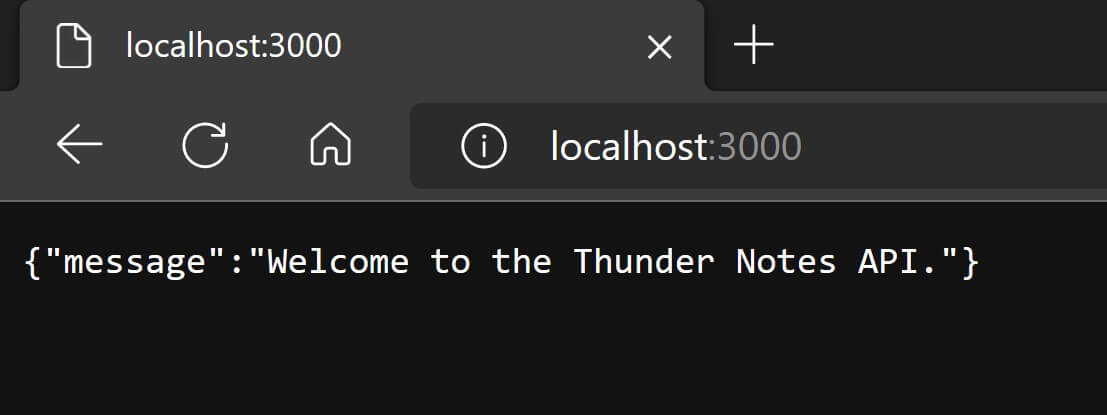
Let's also test this endpoint in the Postman app. Enter the URL to send the request to, which in this case is http://localhost:3000/ and hit the "Send" button and you should see the same response.

Please Note: You may be using the Postman browser extension so there may be a few differences in the UI but the basic usage will remain the same.
Congrats!🎉 Our API server is up and running and we're all set to get started with building the Thunder Notes API.
Exploring the starter files
Let's quickly walkthrough the files and the boilerplate code. I have added verbose comments about what these files and functions within them are used for so feel free to explore the code in them along with reading this article.
app.js: This file contains code for initializing our API server. This is NodeJS specific stuff so no need to worry if you don't understand this immediately but the comments should make it clear what each block of code does.
data/data.js: To keep things simple, we are not using an actual database for this tutorial. Instead we are simply using JavaScript objects. One for storing all the notes and another for storing all the users. Both these data sets are then exported as properties on a single object called data which is then used in all places where we need to access this data. As an analogy, if we'd have been using a relational database then these would have been the tables.
routes.js: This file contains the URI routes that our app will respond to. We have discussed these in the previous section and you'll notice that we are calling methods on the router object called get(), post(), put(), patch() and delete() which are exposed by ExpressJS. These methods correspond to the HTTP verbs we have discussed.
We specify the URI slug as the first argument to these methods and then pass in a route handler function as the second argument. This function is invoked whenever a request for the corresponding "URI slug-HTTP verb" combination comes in.
We define these functions within handlers/noteHandlers.js and handlers/rootHandler.js. The purpose of these files is to implement the routing logic for API endpoints. If you look at these two files right now you'll see that the definitions are missing. That is intentional and we are going to fill in those blanks as we progress with this tutorial.
controllers/notesController.js and controllers/usersController.js: The purpose of these files is to implement business-logic as well as communicate with the database which in this case is our data object exported by data/data.js.
controllers/notesController.js exposes methods that perform CRUD operations on data.notes. These operations are implemented while keeping immutability in mind.
controllers/usersController.js exposes methods that deal with fetching user information.
Most of our API endpoints will only interact with the notes resource. The concept of users will come into play only for learning about user authentication in REST APIs. This is why I have intentionally skipped operations like user registration, user profile udpates or user deletion because these operations will be similar to what we'll learn for the notes resource and I don't want to make this tutorial any longer than it already is or needs to be.
Also, the reason I have included these controller functions in the starter files is so that you don't need to worry about how the data is being stored which is an implementation detail and not directly related to REST API design.
package.json and package.lock.json contain metadata about our API server as a NodeJS project, NPM dependencies and scripts to initialize our server.
Great🙌! Now that we have a good idea about the code included in the starter files, let's proceed with implementing the routes we had discussed in the previous section.
GET
You might already be familiar with the GET HTTP verb but let's look into its usage in the context of REST APIs.
The
GETmethod requests a representation of the specified resource. Requests usingGETshould only retrieve data. - MDN Docs
In the previous section, we've already seen how to handle GET requests on the root endpoint using router.get().
Now we'll handle GET requests on the notes resource endpoints i.e. /notes and /notes/{id}.
Open the noteHandlers.js file and import the notesController.js file at the very top using this statement.
const notesCtrl = require( "../controllers/notesController" );After this, add the below route handler function definition to getNotes() inside noteHandlers.js.
exports.getNotes = ( req, res ) => { // get all the notes in the database const notes = notesCtrl.getAllNotes(); // send a `200 OK` response with the note objects in the response payload res.json( notes );}So what we're doing here is using the controller function getAllNotes() to retrieve a collection of all the note objects and then returning a JSON representation of this payload in the response.
Let's check the response in Postman. Enter the url as http://localhost:3000/notes and send a GET request. You should see a response as shown below:
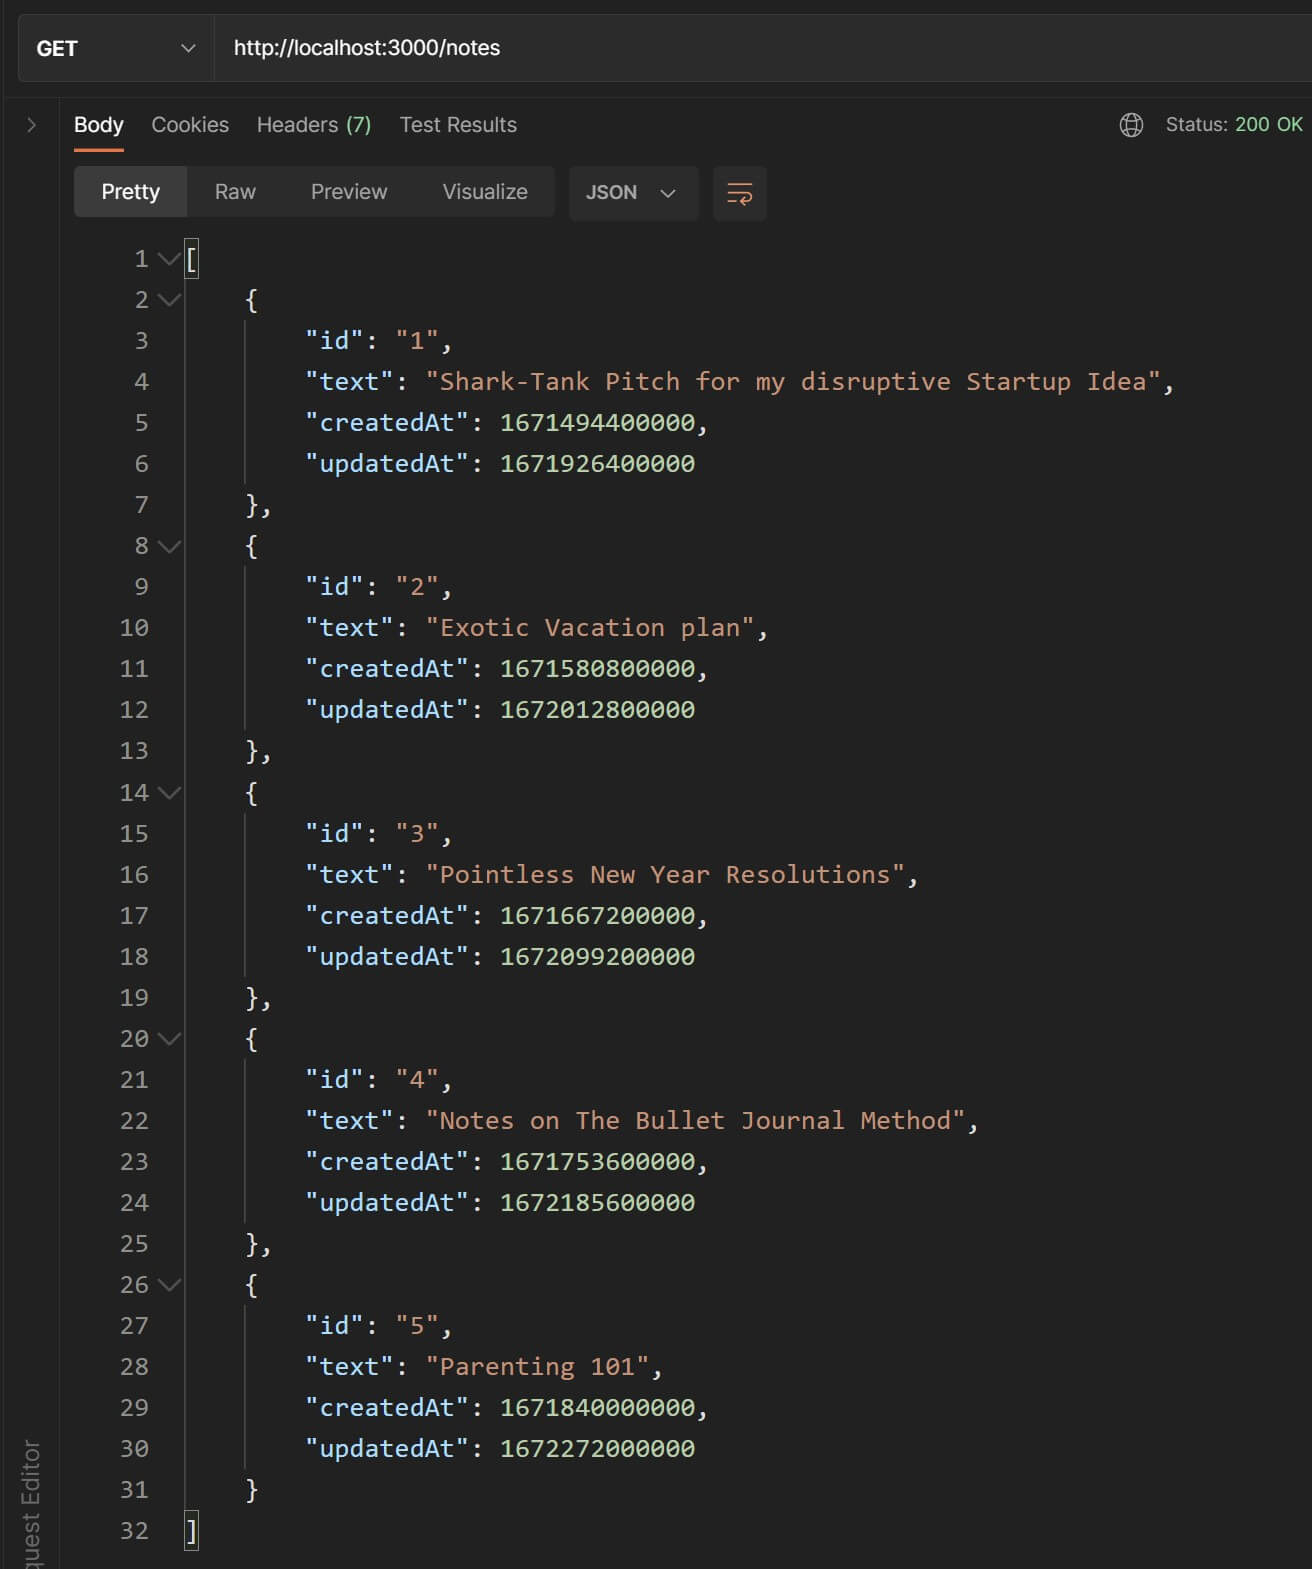
Awesome🤘! Our GET /notes endpoint is working.
Now for handling GET requests on the /notes/{id} endpoint, use the below route handler function definition for getNote().
exports.getNote = ( req, res ) => { // {id} value from the URI is stored in `req.params.id`. const note = notesCtrl.getNoteById( req.params.id ); // send a `200 OK` status code with the note object in the response payload res.json( note );}ExpressJS takes the dynamic :id value from the URI and stores it in req.params with the same name i.e. req.params.id. We pass this in to a different controller function this time, getNoteById() which accepts a single ID and returns a single note object.
Let's test this out in Postman. Enter the URL as http://localhost:3000/notes/1 where 1 is the ID of the first note object in data.js.
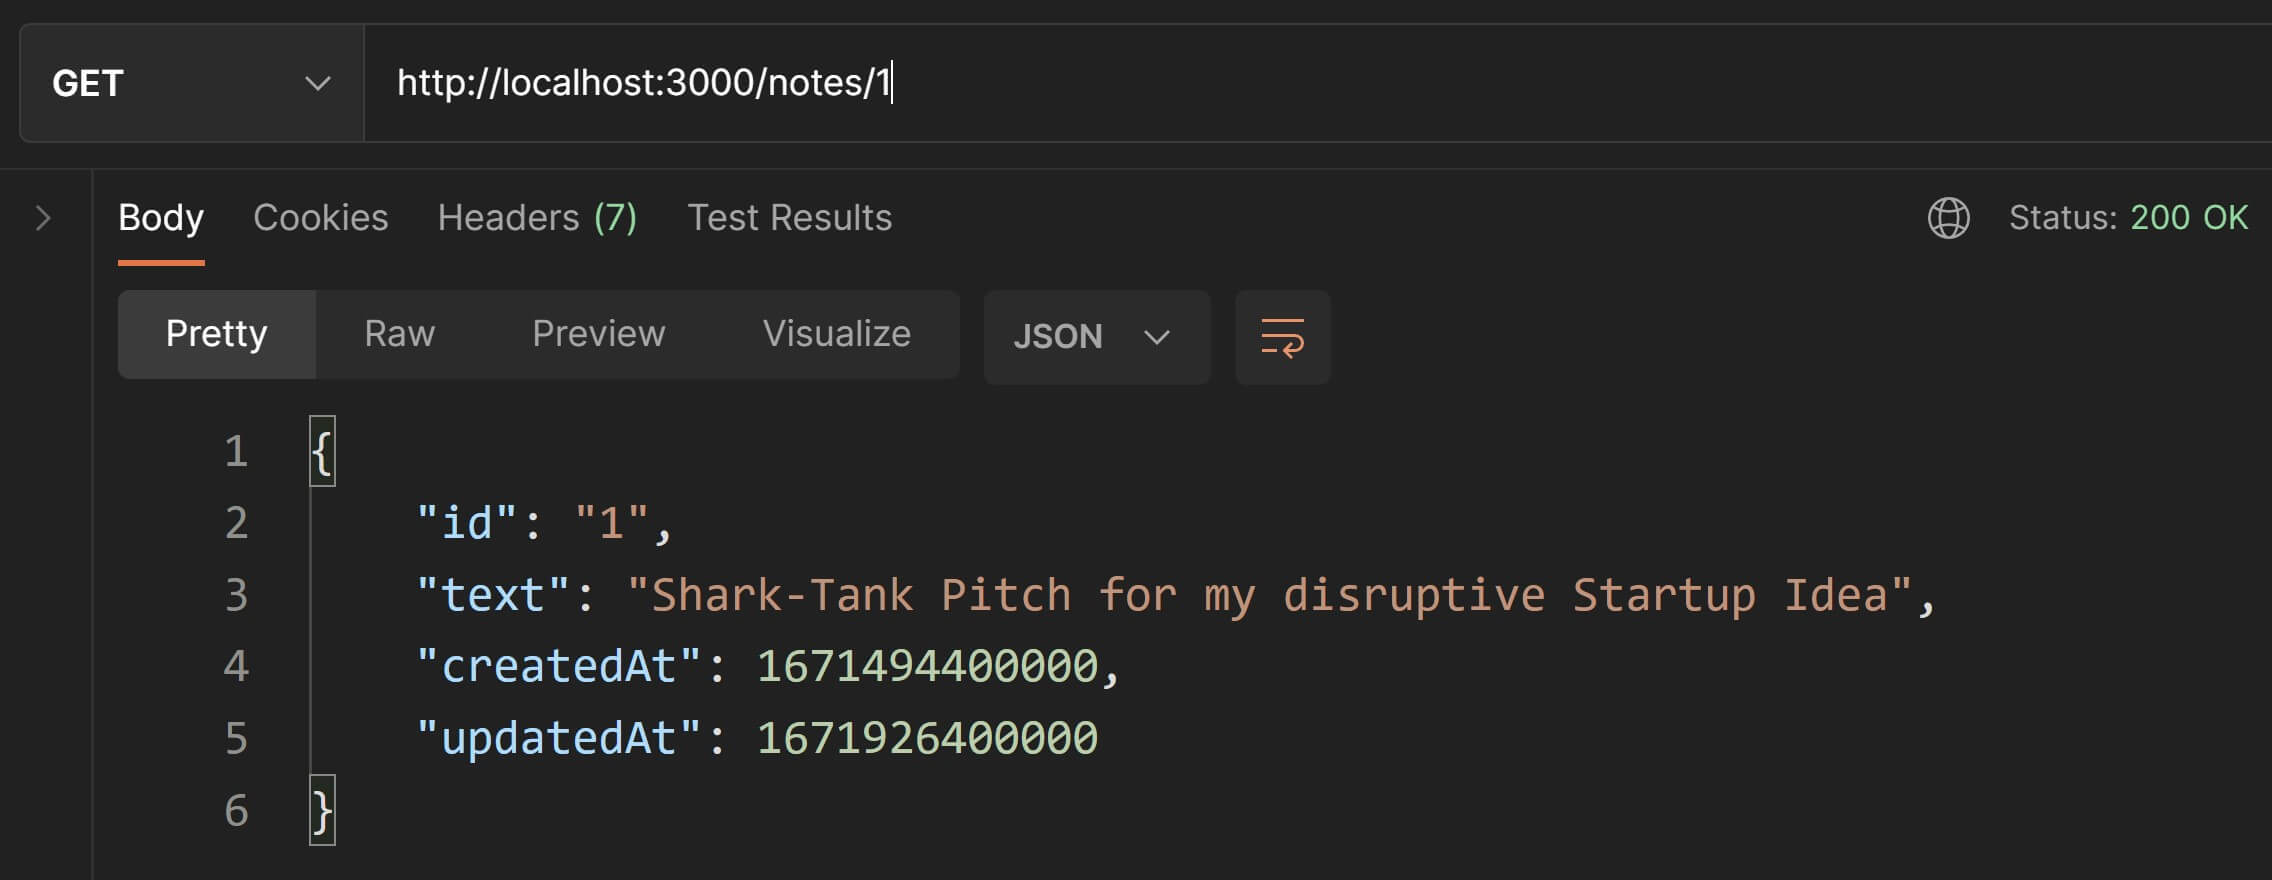
Wonderful🌟! Our endpoint for fetching a single note is also working.
But what if the input :id value doesn't correspond to an existing note. In that case, we must return a 404 Not Found status code.
Copy-paste this new function definition for the getNote() handler to implement this validation.
exports.getNote = ( req, res ) => { // {id} value from the URI is stored in `req.params.id`. const note = notesCtrl.getNoteById( req.params.id );
// if the note does not exist then throw `404 Not Found`. const noteExists = typeof note !== "undefined"; if( !noteExists ) { res.status( 404 ).json({ "message": `Note with ID '${req.params.id}' does not exist.` }); return; }
// send a `200 OK` status code with the note object in the response payload res.json( note );}Notice that while sending the 404 Not Found response, we explicitly call status() because we don't want to send the default 200 OK status code.
Back in Postman, let's test this validation by using a non-existent ID like 123.

Done✅! We have successfully implemented the GET endpoints for the Thunder Notes API.
Also notice that these GET endpoints perform a read-only operation and do not change the server state. This is why GET requests are considered safe which implies that they are also idempotent.
POST
Generally, POST is used to send a payload of data along with the HTTP request. So technically, you can use POST for creating or updating resources.
But as a convention in REST APIs, POST is used only for creating a new resource.
This also implies that POST is typically used on collection resources and not on singleton resources because URIs of singleton resources require an {id} like /notes/{id} but the client does not have the ID of a resource before it has been created on the server.
This means that for this tutorial, we'd only need to implement one POST endpoint for our /notes collection resource as:
POST /notesLet's define the handler function for this route in noteHandlers.js.
exports.createNote = ( req, res ) => { // ExpressJS extracts the note's `text` from the request body and stores // it in `req.body`. If no `text` is provided, return `400 Bad Request`. if( !( "text" in req.body ) ) { return res.status( 400 ).json({ "message": "Invalid request" }); } const { text } = req.body; // create the new note // The first argument in the controller function `createNote()` is `userId`. // We'll deal with user authentication later so for now, // just use a hardcoded value of "1" for userId. // "1" happens to be the ID of a pre-defined user in "data/data.js". const newNote = notesCtrl.createNote( "1", text );
// Add the new note URI in the `Location` header as per convention const newNoteURI = `/notes/${ newNote.id }`; res.setHeader( "Location", newNoteURI ); // send success response to the client with status code `201 Created`. // Also include the new note object in the response payload. res.status( 201 ).json( newNote );}Let's test this out in Postman. We'll first send a POST request without a body so that we can test the 400 Bad Request validation.

Great👍! The validation works.
Let's try adding a new note. This time, we'll need to send a payload along with the request body. To do that in Postman, select the "Body" tab in the Request pane, select the type of data as "raw" and sub-type as "JSON". Specify a JSON with a single property text as shown in the screenshot below and you'll receive a 201 Created response with the note object in the body.
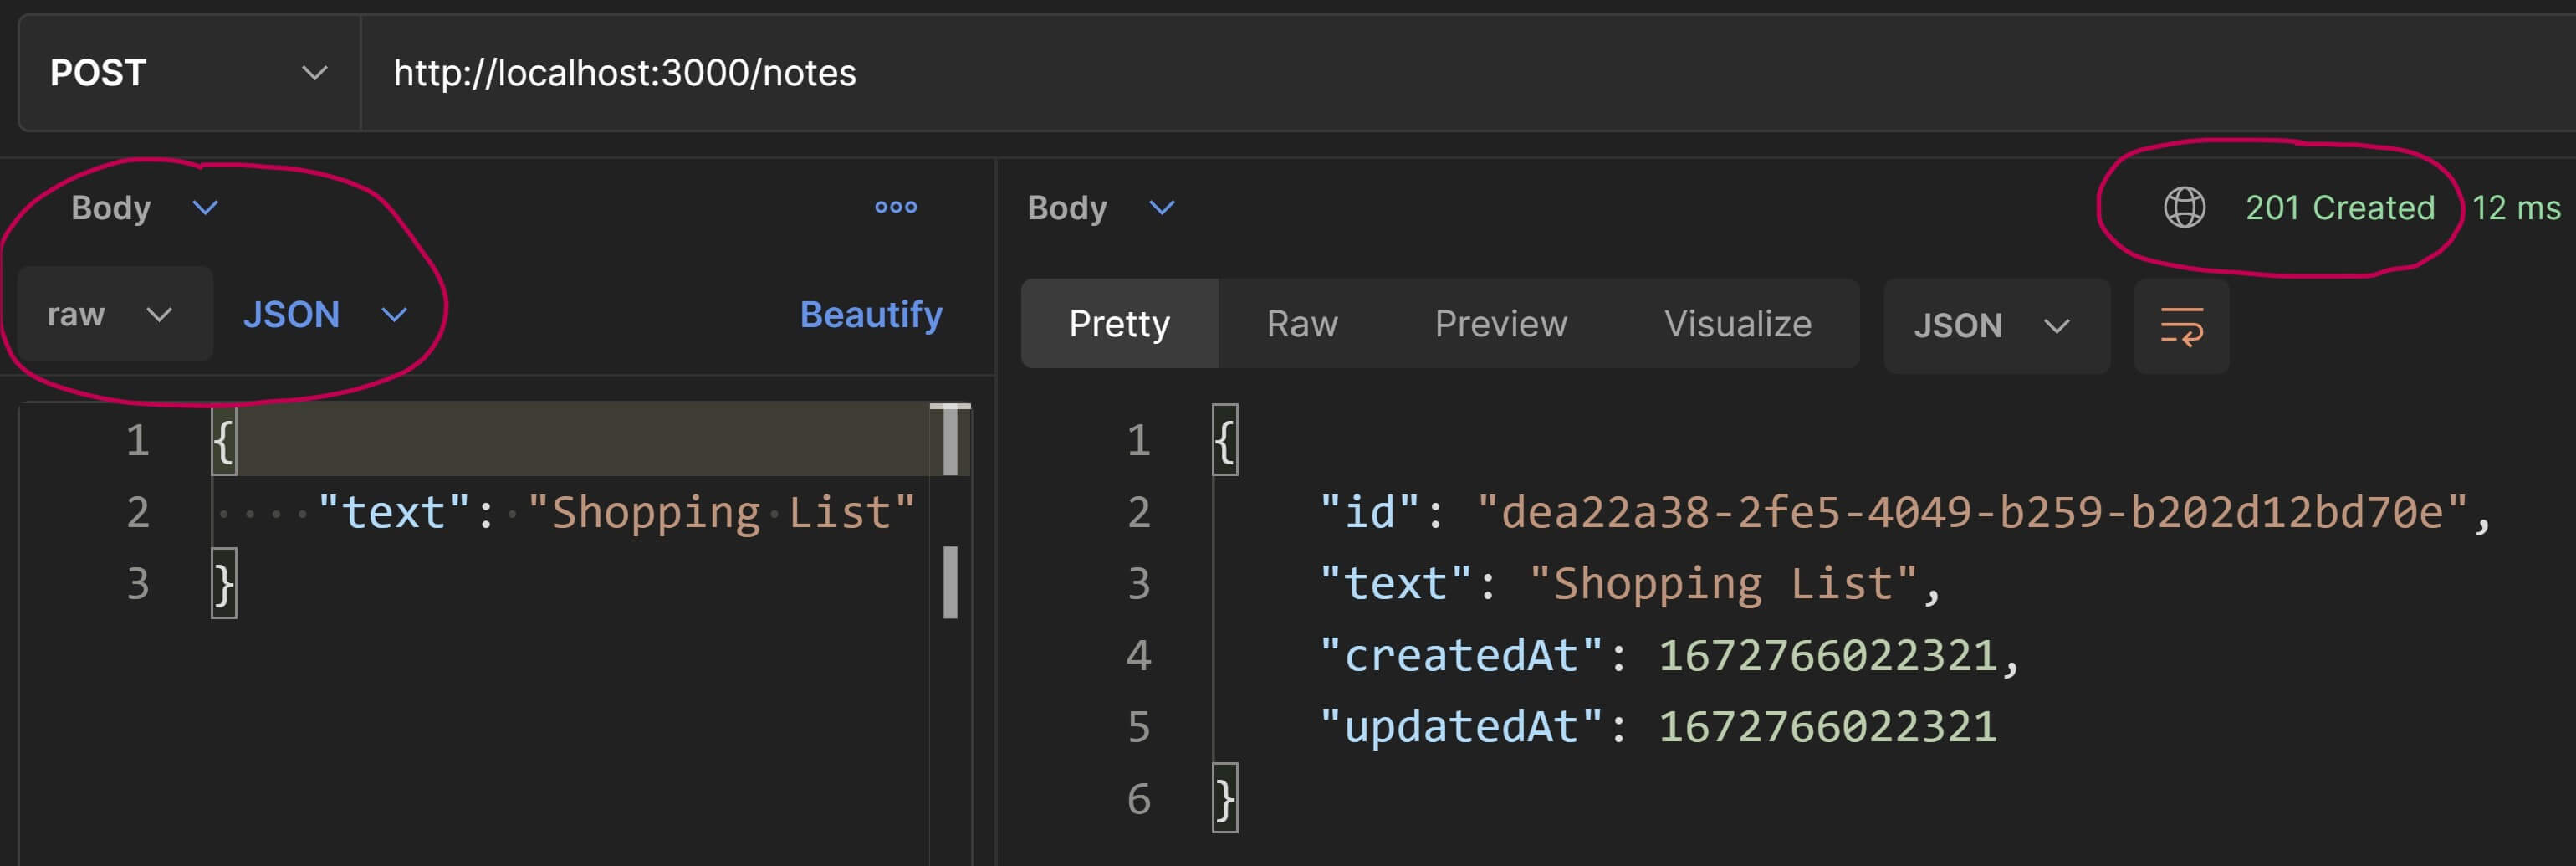
Also, if you switch to the "Headers" section in the Response pane in Postman, you'll see the URI of this new note in the Location header and you can use that to fetch the new note's detailed info.
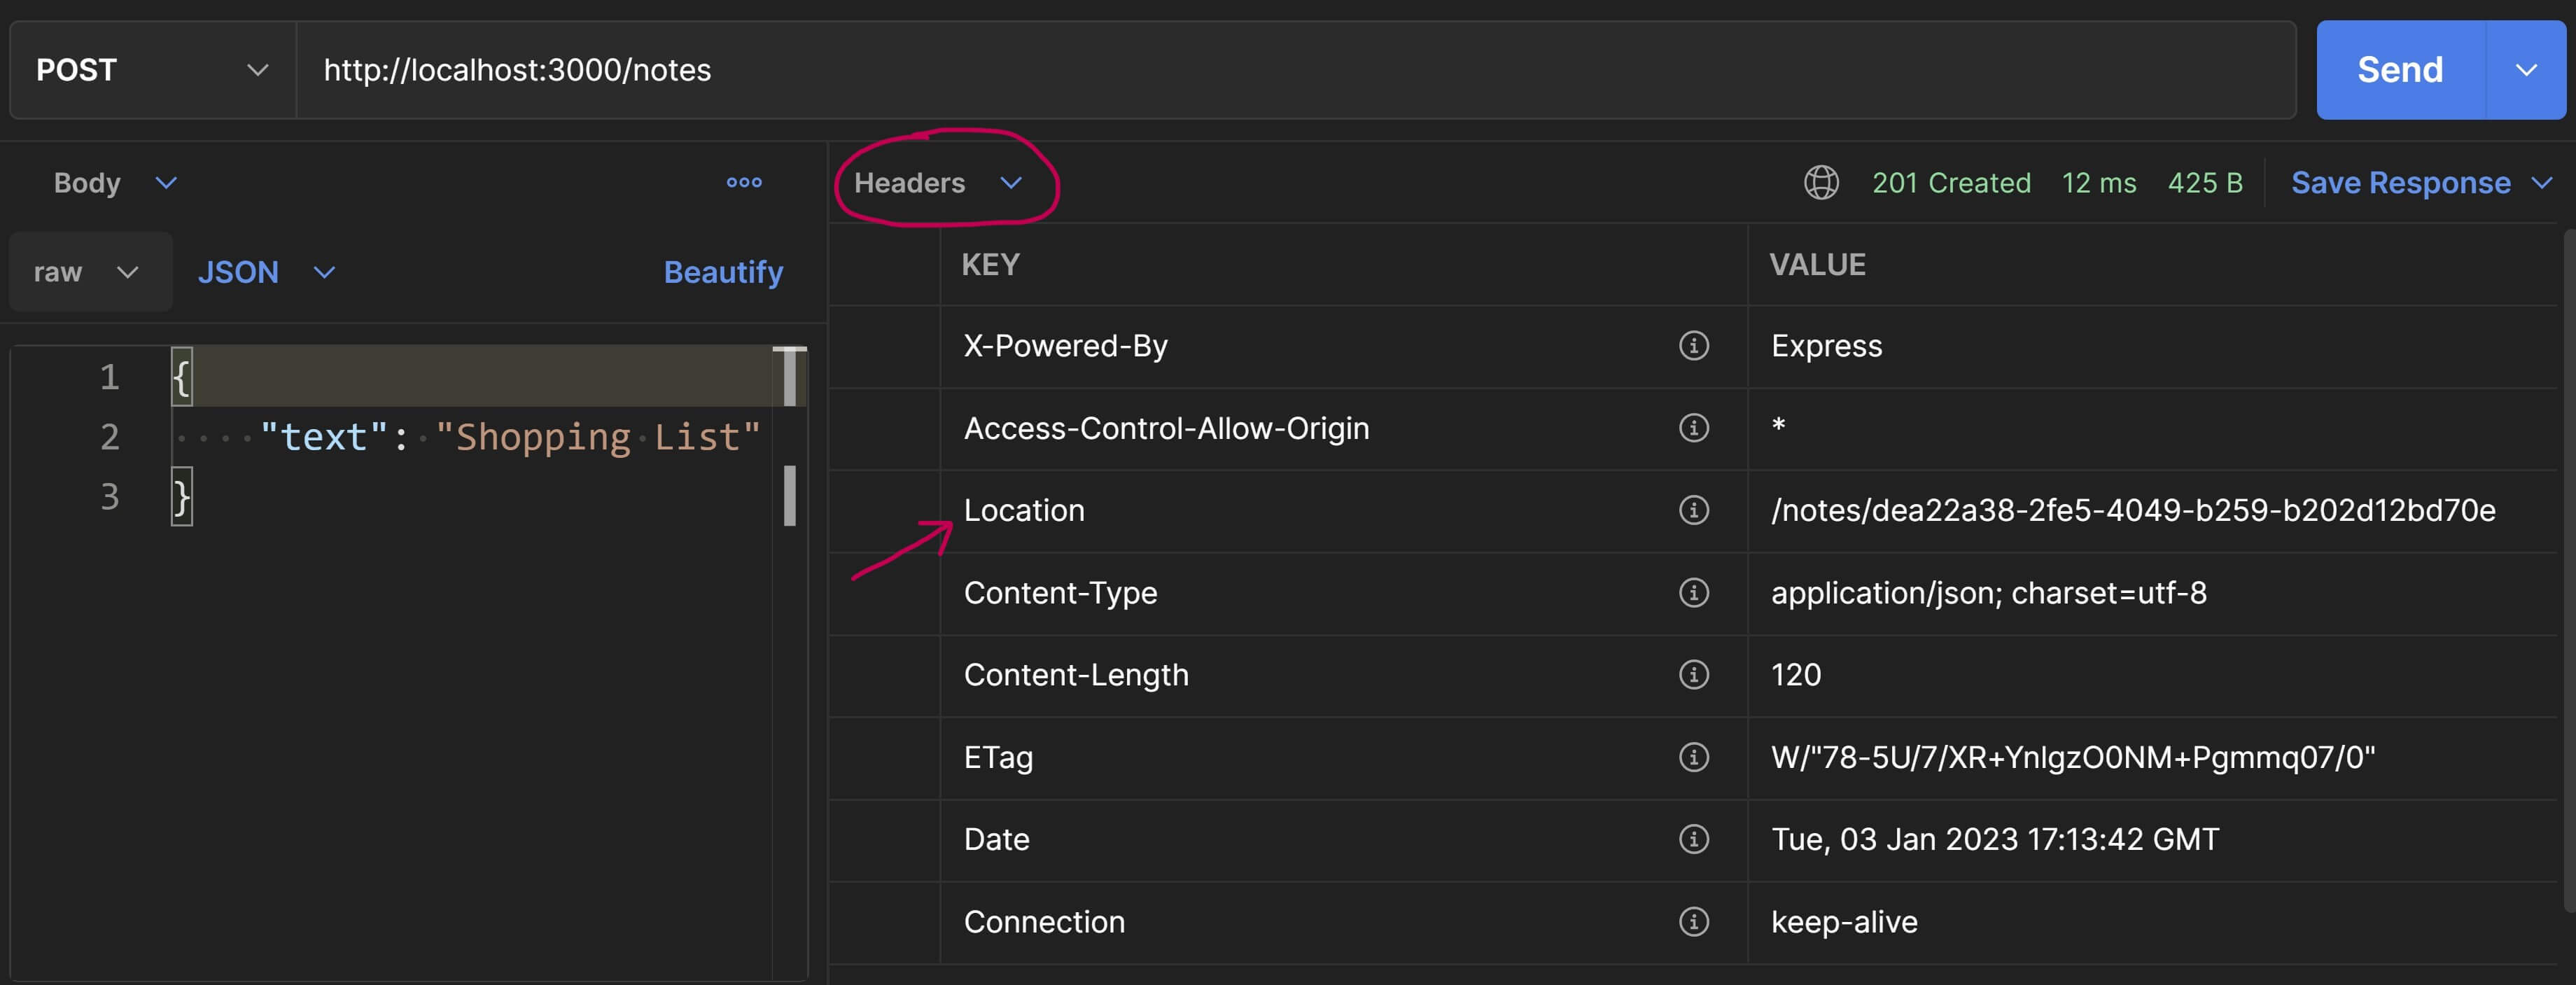
Done✅! We have successfully implemented the POST endpoint for the Thunder Notes API.
Since POST requests create a new resource, they change the server state and so are not safe. Also, multiple identical POST requests will end up creating the same resource multiple times so they are also not considered idempotent.
PUT
PUT is also used to send data to the server in the form of a payload in the request body and this data can technically be used for creating or updating a resource.
But as a convention, we use PUT to update a resource on the server and not to create one.
With PUT, the client sends the entire resource representation in the request body and the server replaces the existing representation with this new one. This is why PUT is typically used on singleton resources like /notes/{id} and not on collection resource like /notes because it is rare that an entire collection will be replaced by what has been sent in the request body.
For example, in our tutorial, the resource representation of a note object is:
{ id: "2", text: "Exotic Vacation plan", createdAt: 1671580800000, updatedAt: 1672012800000 }Suppose the client wants to update this note, say for example, change the text from "Exotic Vacation Plan" to "Europe Trip". In order to perform this update with a PUT request, the client will update the text and updatedAt fields in the note object and then include the entire updated note object as JSON in the request body.
But suppose the client only sends the updated text field as JSON like this:
PUT /notes/{id}
{ "text": "Exotic Vacation plan"}Then the server will replace the existing note object with this one meaning the new note object will not have the fields id, createdAt and updatedAt resulting in data loss.
This is why when using PUT, clients must remember to first fetch the resource representation via GET, modify the required fields and then send the entire resource representation in a PUT request.
We'll implement two endpoints for PUT requests in the Thunder Notes API. One will be for the collection resource /notes which will serve as an example of how to disallow certain HTTP verbs on selected resources. The other will be for /notes/{id} which will update the entire note object.
PUT /notes // throw 405 Method Not AllowedPUT /notes/{id} // replace the resourceLet's define these routes in our app.
PUT /notes - Allow Header and 405 Method Not Allowed
We'll first handle the invalid route meaning PUT on the /notes collection.
We already have a route defined for this in routes.js like this:
router.put( "/notes", noteHandlers.handleInvalidRoute );Head over to the rootHandler.js file and add the below function definition to the handleInvalidRoute() route handler.
exports.handleInvalidRoute = ( req, res ) => { // set `Allow` header to indicate which HTTP methods are allowed for this resource res.setHeader( "Allow", "GET, POST" );
// return 405 Method Not Allowed res.status( 405 ).send();}Back in Postman, let's set the request method to PUT and the URI to http://localhost:3000/notes and hit Send. You'll see the Allow header in the response like in the screenshot below:
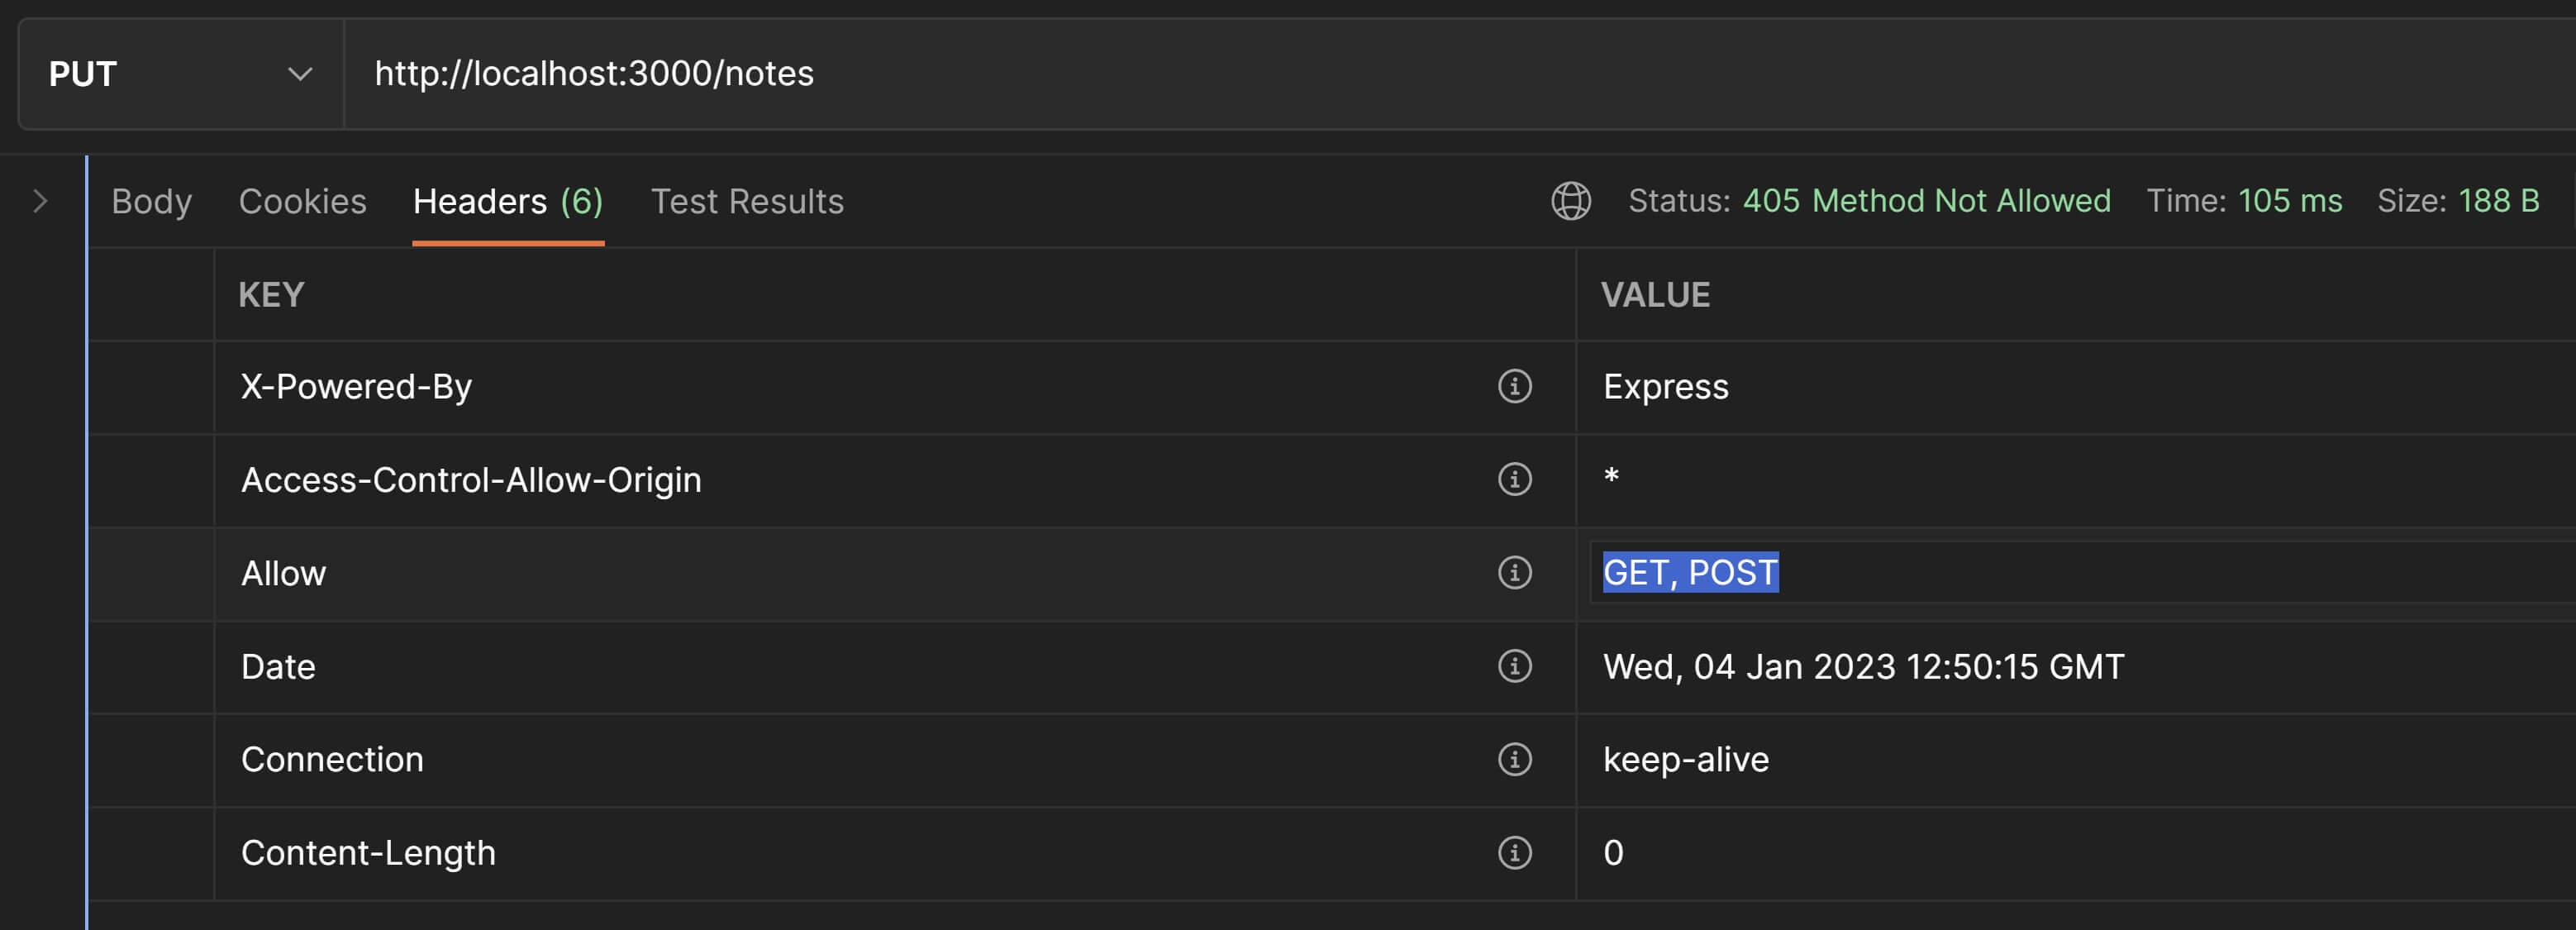
Fantastic😎! We now have a mechanism to inform API clients that the /notes collection only serves GET and POST requests and disallow all other HTTP verbs.
PUT /notes/{id}
Now we'll look at how to handle PUT requests on /notes/{id}. Use the below function definition for the updateNote() route handler function.
exports.updateNote = ( req, res ) => { // Request body should contain the complete representation of a note resource // If it doesn't, then return a `400 Bad Request` error. if( !( "id" in req.body ) || !( "text" in req.body ) || !( "createdAt" in req.body ) || !( "updatedAt" in req.body ) ) { return res.status( 400 ).json({ "message": "Invalid request" }); }
// update the note const { id, text, createdAt, updatedAt } = req.body; notesCtrl.updateNote( id, text, createdAt, updatedAt );
// send success response to the client res.status( 204 ).send();}The controller function updateNote() replaces the existing note resource representation with the new one.
If the update was successful, then we can:
- either send a
200 OKstatus code along with the updated note in the response body or - send a
204 No Contentstatus code with no response body. I have chosen to use this one for our example above.
Let's test this in Postman. Request method still set to PUT, enter the URI as http://localhost:3000/notes/2 and in the request body, enter the JSON given below.
{ id: "2", text: "Europe Trip", createdAt: 1673010766307, updatedAt: 1673010766307 }This is the updated representation of the note with id 2. We have changed the text from "Exotic Vacation Plan" to "Europe Trip". Also, just to drive this concept home that the entire resource representation is updated, we've also updated the createdAt and updatedAt timestamps. If you hit Send, you'll get the response as shown below:
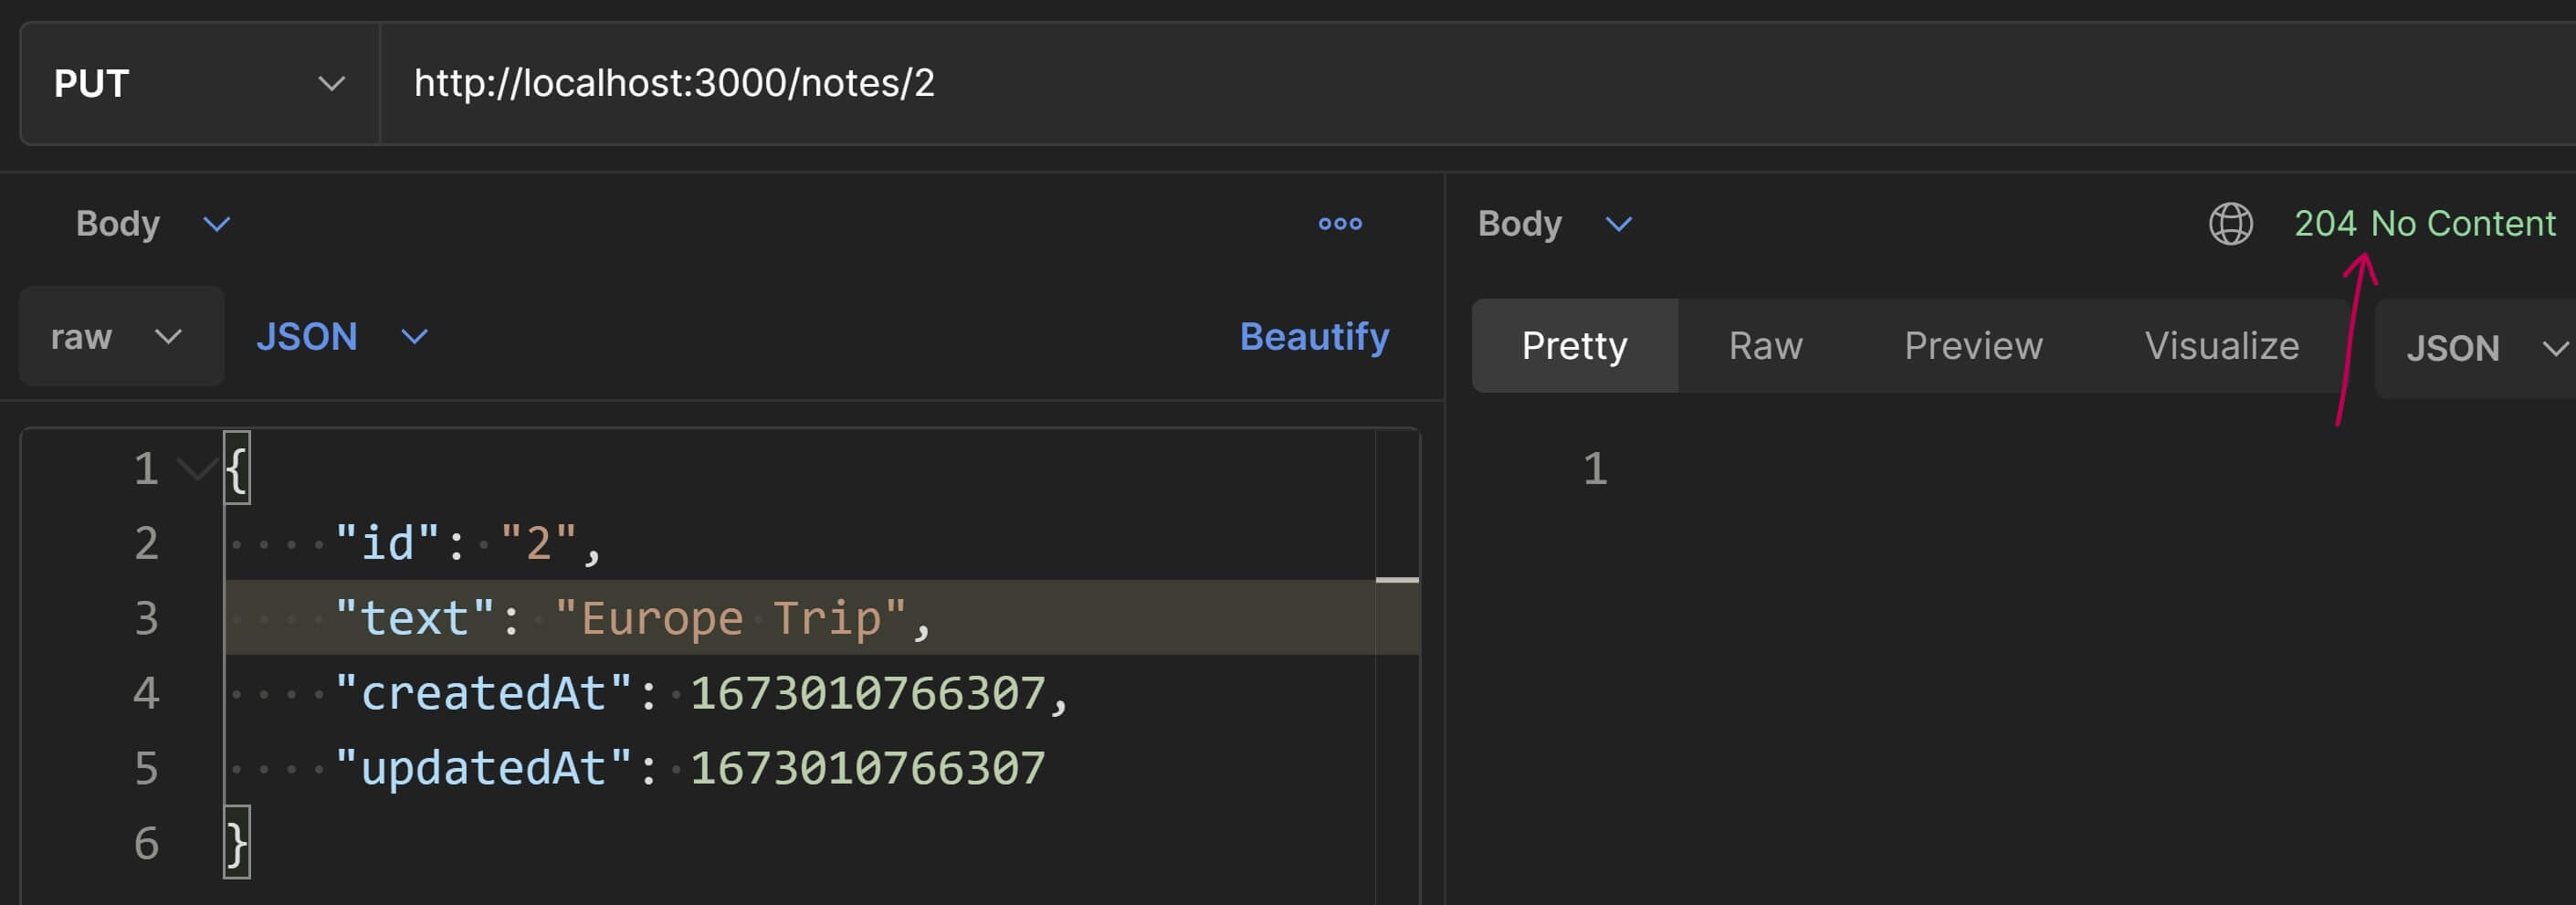
We can confirm that the note was updated by invoking another GET request to the same URI.
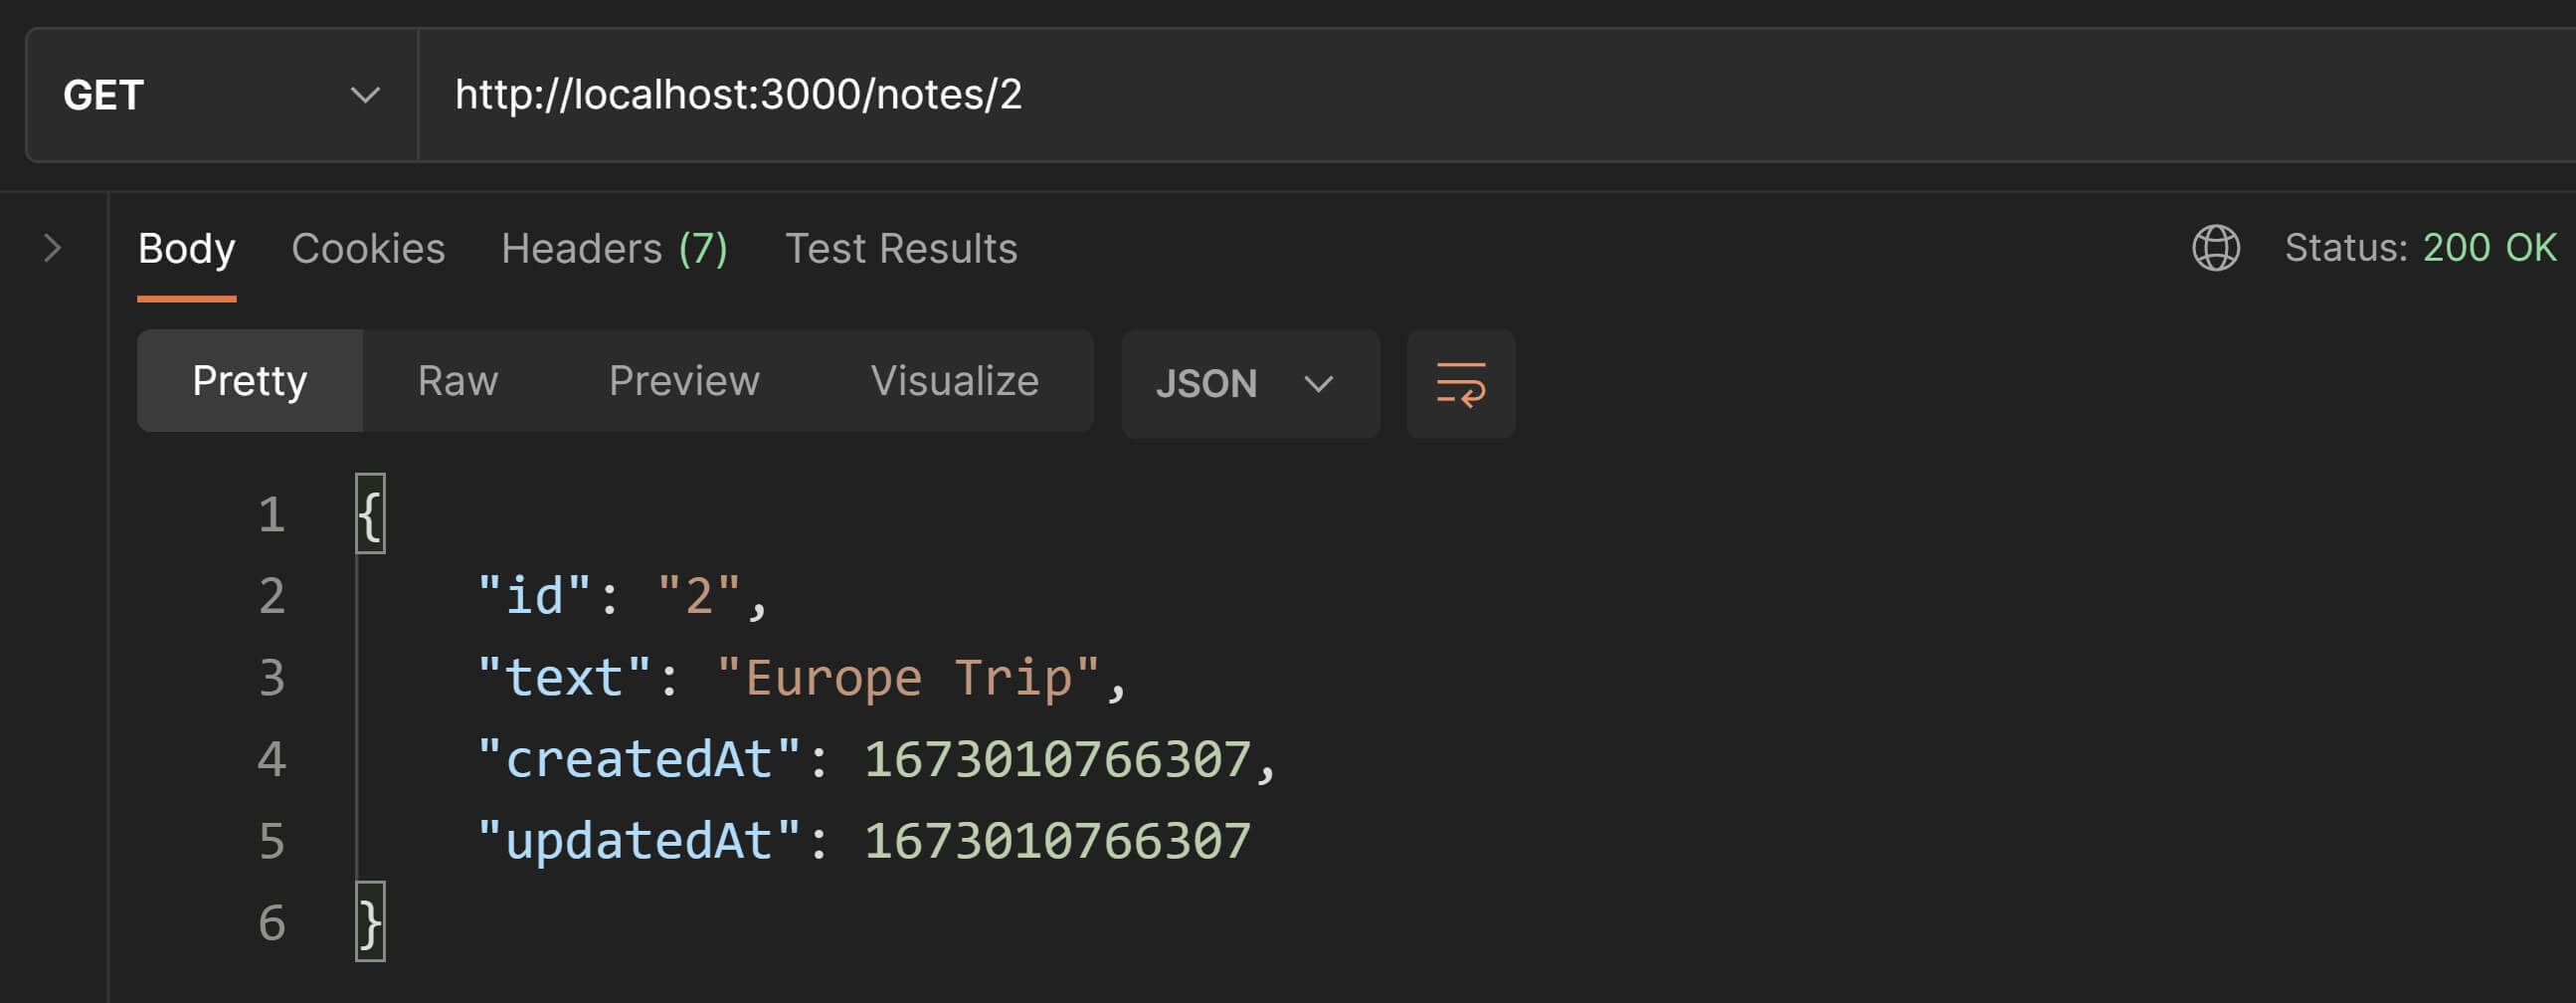
Done✅! Our PUT endpoints are working.
But what if the {id} in the URI does not correspond to an existing note like for example: /notes/123? In that case we need to validate the note's existence in the same way we did for the getNote() route handler.
Since this validation is going to be used by multiple route handlers in this tutorial, we'll refactor it into a re-usable function using middlewares.
Organize validation logic using Middlewares
Visualize an assembly line where the parts of a machine to be assembled move along the conveyer belt and at each checkpoint, some kind of part is fitted, removed, etc.
ExpressJS uses the concept of middlewares in a similar way. Middlwares are functions with access to the request object(req) and the response object(res). The request is routed through a chain of middleware functions(checkpoints). Each of these functions perform some kind of processing on the request or the response object. Once they are done, they invoke the next middlware or route handler function from the chain.
In our case, we'll implement a middleware which will check whether the {id} being requested for a single note resource i.e. /notes/{id}, exists or not. If it doesn't exist, we'll return a 404 Not Found. If it does exist, the middleware will invoke the route handler function.
First up, create a directory called middlewares inside the server folder. Create a file in it called noteValidation.js. Use the below code and save it in this new file.
const notesCtrl = require( "../controllers/notesController" );
/* This middleware function will perform some common validation steps for single "note" resources such as - Making sure the note exists else throw `404 Not Found`.
If all is well, then it will store the entire note object in `res.locals` and make it available for future middlewares.*/module.exports = function validateNote( req, res, next ) { // find the note with the input note ID in the database. // if the note does not exist, `undefined` will be returned. const note = notesCtrl.getNoteById( req.params.id ), noteExists = typeof note !== "undefined"; // if the note does not exist, then throw `404 Not Found`. if( !noteExists ) { res.status( 404 ).json({ "message": `Note with ID '${ req.params.id }' does not exist.` }); return; }
// if validation is successful, store the note for future use // in `res.locals.note` and call the next middleware. res.locals.note = note;
// invokes the next middleware next();}Did you notice that we are storing the matching note object in res.locals.note? This is so that subsequent middlewares can use this note object and do not have to re-fetch it from the database.
To use this middleware, open routes.js and import the new middleware at the top.
const validateNote = require( "./middlewares/noteValidation" );Now add this new middleware before the route handler functions of all singleton /notes/{id} resource routes.
// singleton `note` endpointsrouter.get( "/notes/:id", validateNote, noteHandlers.getNote );router.put( "/notes/:id", validateNote, noteHandlers.updateNote );router.patch( "/notes/:id", validateNote, noteHandlers.editText );router.delete( "/notes/:id", validateNote, noteHandlers.deleteNote );We can now remove the validation from the getNote() route handler so that the new definition is much more compact.
exports.getNote = ( req, res ) => { // Use the `res.locals` object to get the note provided by the // `noteValidation` middleware. res.json( res.locals.note );}Let's test everthing we have implemented so far. I'll leave the testing for the getNote() handler function to you since we've already covered that. We've also covered testing the happy-path scenario for PUT.
So now, we're only going to test whether this new middleware throws a 404 Not Found for invalid PUT requests or not.

Woo Hoo🎉! The middleware works as expected and intercepts the PUT request to the invalid note with ID 123 and throws a 404 Not Found.
Now back to PUT.
Since PUT updates a note resource, it modifies the state of the server which makes it not safe BUT it is idempotent. This is because it'll have the same effect on the server irrespective of the number of identical requests the client makes. For example, consider our previous Postman test for PUT /notes/2 with the new resource representation in the request body. Even if you invoke it multiple times, the note object will always be replaced by the same representation from the request body.
Does anybody ever use PUT?
If you're wondering that replacing entire resource representations is a rare scenario and will almost never be used, you may be right but there are scenarios where PUT becomes the obvious choice. Let's look at a real-life implementation of PUT with Github's Lock an Issue API service.
PUT /repos/{owner}/{repo}/issues/{issue_number}/lock
{ "lock_reason":"off-topic"}Here, lock is a singleton resource. The JSON payload in the above request is actually the complete representation for the lock resource and it is replaced completely everytime this API service is invoked.
PATCH
The PATCH HTTP verb is also used to update a resource but unlike PUT which updates the resource in its entirety, PATCH only updates it partially.
So instead of sending the entire resource reprensentation, the client only needs to send the fields that need to be updated in the request body. The ID of the resource that needs to be updated is sent in the URI just like in a PUT request.
Similar to PUT, PATCH is also conventionally used only on singleton resources like /notes/{id} and not on collection resource like /notes.
We'll implement a single endpoint for PATCH in our Thunder Notes API.
PATCH /notes/{id}This endpoint will be used to edit the note's text only.
routes.js already has a route defined for this:
router.patch( "/notes/:id", validateNote, noteHandlers.editText );Let's define the corresponding route handler function: editText()
exports.editText = ( req, res ) => { // throw `400 Bad Request` if `text` is not provided in the request payload. if( !( "text" in req.body ) ) { return res.status( 400 ).json({ "message": "Invalid request" }); }
// everything seems fine, let's update the note text. notesCtrl.editText( res.locals.note, req.body.text );
// send success response to the client. No response body required. res.status( 204 ).send();}The validation that returns a 400 Bad Request is the same one we tested for POST so I'm not going to test that again but you can check that for yourself.
Also, you'll notice we return a 204 No Content with no response payload on success but you can also send a 200 OK with the updated resource in the response payload.
We'll now test the happy-path scenario i.e. editing the note's text. Let's make a PATCH request in Postman and test this out. We'll use the same URI and request body as the example from the previous PUT section.

Change the request method to GET to confirm whether the edit was performed or not. Notice that the updatedAt timestamp has also been updated. That happens automatically in the editText() controller function.
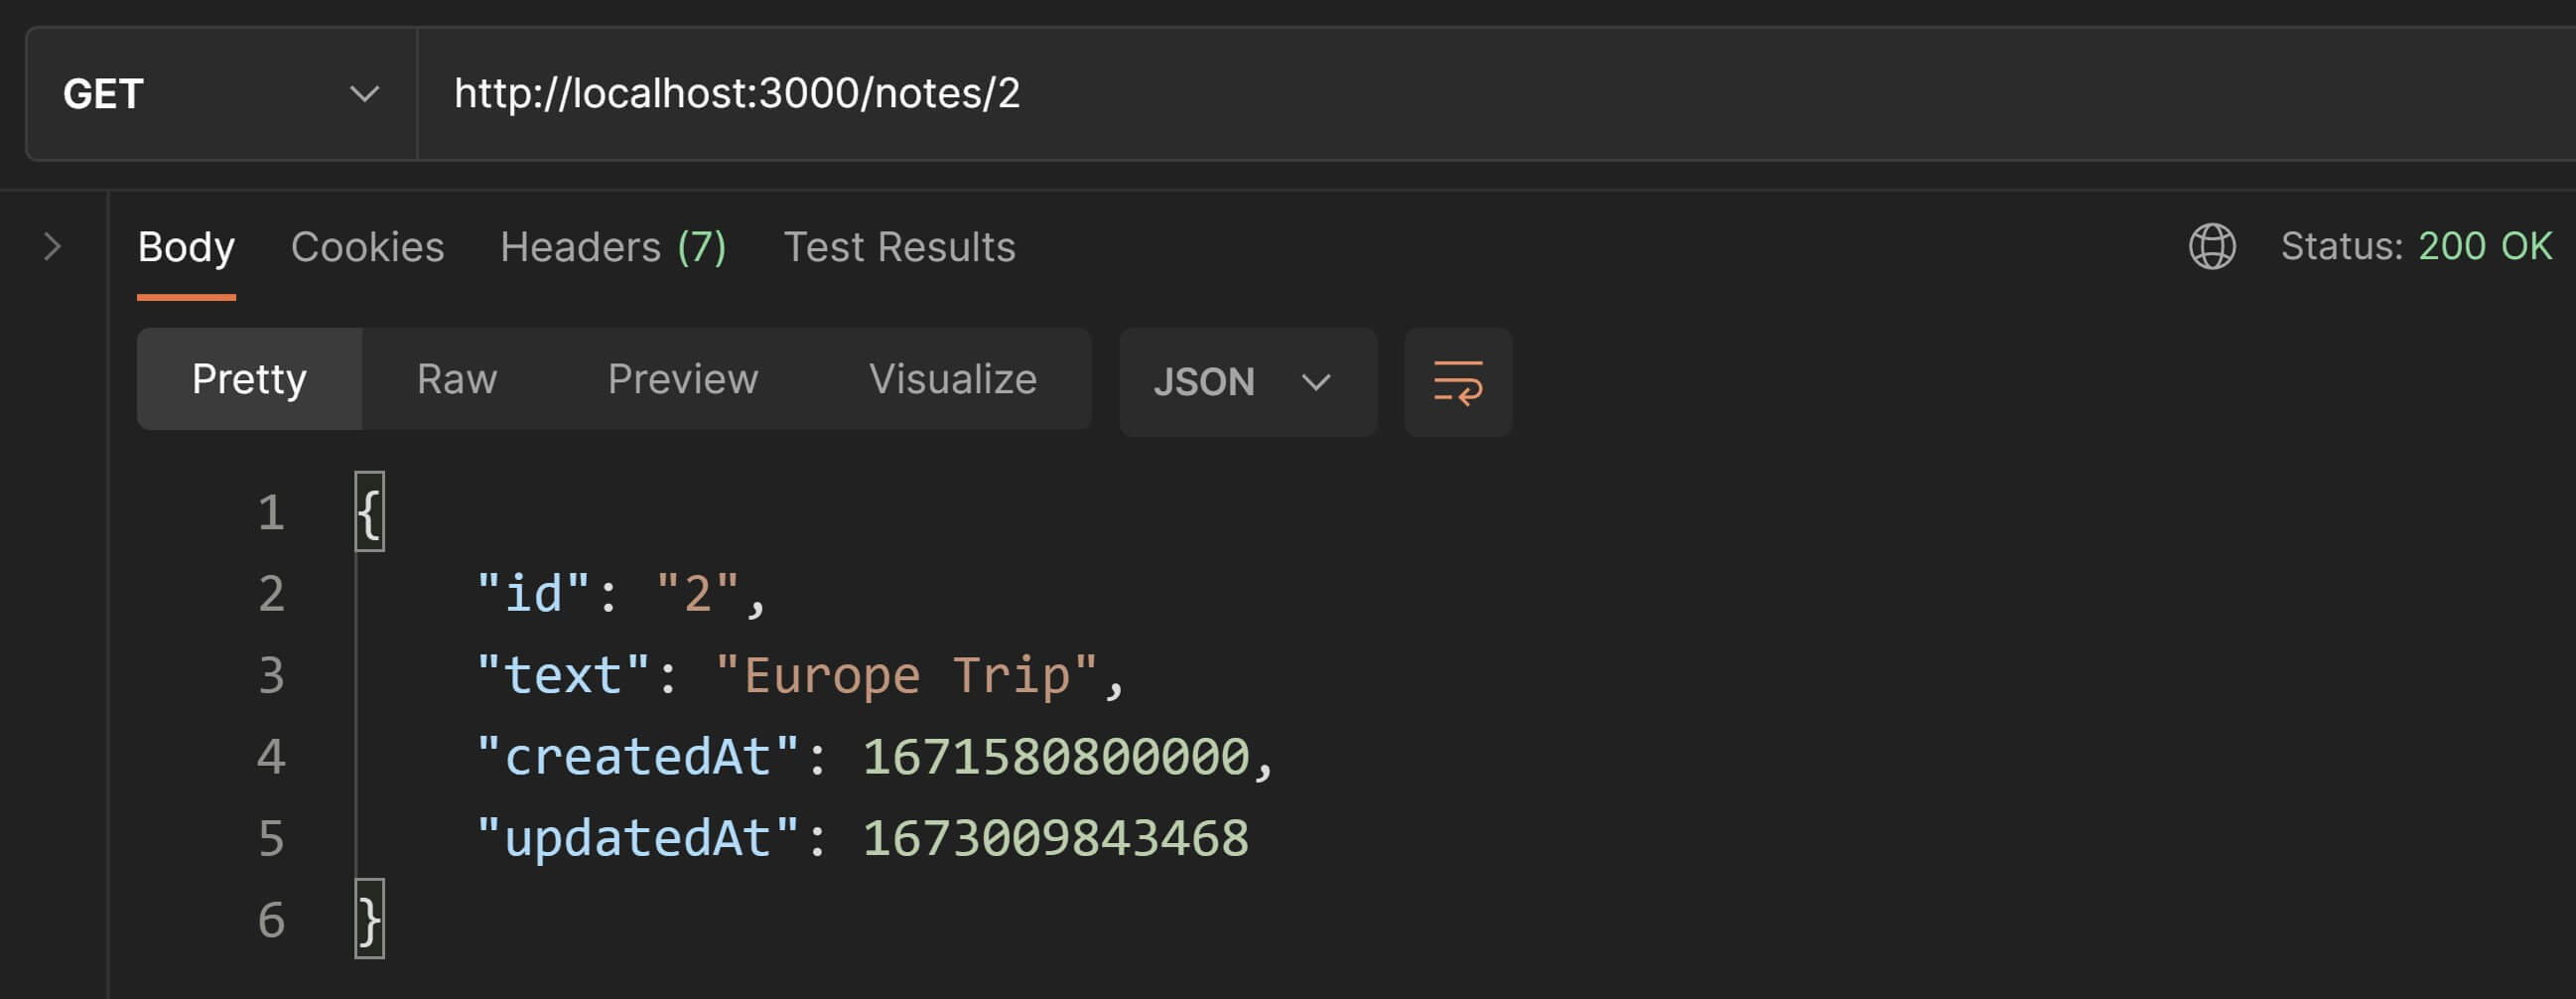
Booyah🥳! Our PATCH request is working as expected.
Since PATCH updates the state of the server, it is not safe. But PATCH is technically also not idempotent. Let's see why that is the case in a little more detail.
The proper way to PATCH
The way we have sent and handled PATCH in our example is easy and practical but not the proper way to do it.
PATCH can be used to do much more than just partially update values in the resource. It can technically be used to add or remove or even move a resource.
It can do all this when the client sends a list of operations that need to be performed in the request body as a JSON Patch Document. Don't get scared with that terminology. It is just an array of objects with each object representing an operation that should be performed on the specified resource on the server.
It looks something like this:
[ { "op": "test", "path": "/a/b/c", "value": "foo" }, { "op": "remove", "path": "/a/b/c" }, { "op": "add", "path": "/a/b/c", "value": [ "foo", "bar" ] }, { "op": "replace", "path": "/a/b/c", "value": 42 }, { "op": "move", "from": "/a/b/c", "path": "/a/b/d" }, { "op": "copy", "from": "/a/b/d", "path": "/a/b/e" }]So we send this list of operations in the PATCH request body and the server performs each operation in sequence.
The possibility of performing operations like these makes PATCH a non-idempotent method.
So should we use PATCH in the easy way or the not-so-easy proper way?
It depends on your personal preference or project requirements.
For example, Netflix's Genie REST API uses PATCH the proper way with the list of operations in the request body.
The Github API and the WIX API on the other hand use the simpler approach using PATCH to partially update the resource.
In my opinion, the easy way seems fine for most scenarios.
We can also skip using PATCH all together and just use PUT to update the entire resource.
Whatever you do, don't use PUT to make partial updates because remember that PUT is idempotent and PATCH is non-idempotent.
For more information on how to properly use PATCH, read Please. Don't Patch Like That.
DELETE
The DELETE HTTP method is used to delete a resource on the server.
DELETE is typically used on singleton resources and not on collection resources since deleting an entire collection of resources is a rare scenario.
The client only specifies the ID of the resource to be deleted in the URI. A payload is usually not required in the request body.
We'll implement a single DELETE endpoint for our Thunder Notes API.
DELETE /notes/{id}routes.js already has a route defined for this:
router.delete( "/notes/:id", validateNote, noteHandlers.deleteNote );Let's define the corresponding handler function: deleteNote()
exports.deleteNote = ( req, res ) => { // delete the note from the database // The first argument in the controller function `deleteNote()` is `userId`. // We'll deal with user authentication later so for now, // just use a hardcoded value of "1" for userId. // "1" happens to be the ID of a pre-defined user in "data/data.js". notesCtrl.deleteNote( "1", res.locals.note );
// send success response to the client res.status( 204 ).send();}Here also, we're sending a 204 No Content with no response payload on success but you can also send a 200 OK with the deleted resource in the response payload if needed.
Let's test this in Postman. Set the request method to DELETE and the URI to http://localhost:3000/notes/2 and hit Send.

Now to confirm whether the delete worked, change the request method to GET and hit Send. You should receive a 404 Not Found which confirms that the note has been deleted.

Since DELETE updates the state of the server, it is not safe BUT, it is idempotent.
How can DELETE be idempotent since the first time we call it, it'll delete the resource and return a 204 No Content but subsequent DELETE calls with the same ID will return a 404 Not Found since the resource has already been deleted. That doesn't seem like being idempotent, does it? 🤔
Remember that idempotency doesn't depend on the HTTP status code being returned but refers to the state of the system after the request has been processed completely. When the 1st DELETE operation completes, the resource doesn't exist on the system. Subsequent DELETE invocations on the same resource don't change the state and the resource still doesn't exist. So the state of the server remains the same even after multiple identical DELETE calls.
Done✅! We've successfully implemented the DELETE endpoint for our Thunder Notes API.
To recap, we'd already covered the sub-constraint, Identification of Resources which falls under the Uniform Resource core REST constraint. Now we've also seen how to send complete resource representations in the responses of our API services along with proper headers set and how to manipulate resources through their representations in our PUT and POST calls. This means we've successfully implemented two more sub-constraints namely Self-descriptive messages and Manipulation of resources through representations.
We'll now have a look at how to implement the last remaining sub-constraint which is HATEOAS.
Hypermedia As The Engine Of Application State(HATEOAS)
HATEOAS stands for Hypermedia As The Engine Of Application State. This is also a sub-constraint categorized under the Uniform Interface core REST constraint.
It's a feature that enables clients to browse your API in much the same way as you'd browse a web page. When you visit a web page, you read the page content which also has relevant links to other web pages that provide more information about a specific topic. In much the same way, HATEOAS enabled APIs provide relevant links to other API endpoints in the response body, that allow clients to navigate the API.
I have explained the concept behind HATEOAS in detail in the previous article in this series. In this article, we'll look at how we can actually implement HATEOAS in a REST API.
From a high-level, the implementation will deal with the inclusion of a property called links for each resource within the API response.
HATEOAS for a singleton resource
Consider the example of an e-commerce shopping app where we fetch details about a product.
GET /products/21A sample response from the above request would look something like this:
{ "product_id": 21, "name": "Dell XPS 7590" "price": "₹150000", "category": "Laptop", "in_stock": true, ... ...}Let's make this response HATEOAS-compliant.
{ "product_id": 21, "name": "Dell XPS 7590" "price": "₹150000", "category": "Laptop", "in_stock": true, ... ... "links": [ { "rel": "self", "href": "/products/21", "method": "get" }, { "rel": "reviews", "href": "/products/21/reviews", "method": "get" }, { "rel": "add-to-cart", "href": "/users/112/cart/items", "method": "post" }, { "rel": "add-to-favs", "href": "/users/112/favorites", "method": "post" }, { "rel": "add-review", "href": "/products/112/reviews", "method": "post" } ]}Apart from the usual data fields, we have a links property which is an array of objects that contains relative URIs. Each URI either indicates other API endpoints the client can invoke to fetch more information related to the current resource or further actions a client is allowed to perform on the current resource. For example, the client can fetch reviews for the product using rel: "reviews" or the client can perform an action like add the product to cart using rel: "add-to-cart".
The rel property stands for relation and indicates the relation between the resource in the response and the URI link. The href property specifies the URI slug and the method property specifies the corresponding HTTP verb. A rel value of "self" represents the URI slug of the current resource.
So while anchor tags and links on web pages enable humans to browse web pages, this links property enables client applications to browse APIs.
What's more, with HATEOAS, the API can control what links and actions are available to the user dynamically. For example, if the product is not in stock, the user should not be able to add the product to the cart. In that case, the API can simply omit the rel: "add-to-cart" link from the links array in the response.
{ "product_id": 21, "name": "Dell XPS 7590" "price": "₹150000", "category": "Laptop", "in_stock": false, ... ... "links": [ { "rel": "self", "href": "/products/21", "method": "get" }, { "rel": "reviews", "href": "/products/21/reviews", "method": "get" }, { "rel": "add-to-favs", "href": "/users/112/favorites", "method": "post" }, { "rel": "add-review", "href": "/products/112/reviews", "method": "post" } ]}The client can read this response and implement the UI accordingly and not expose the ADD TO CART option to the end-user.
HATEOAS for a collection resource
Let's analyze a HATEOAS-compliant response for a collection resouce.
In continuation of the previous example, let's suppose the client invokes the rel: "reviews" URI to retrieve all the reviews for a product.
GET /products/21/reviewsLet's see how a HATEOAS-enabled response for the above request might look like.
{ "reviews": [ { "review_id": 35, "user_id": 84, "rating": 5, "content": "Awesome Laptop", "links": [ { "rel": "self", "href": "/products/21/reviews/35", "method": "get" }, { "rel": "like", "href": "/products/21/reviews/35", "method": "post" } ] }, { "review_id": 36, "user_id": 629, "rating": 4.5, "content": "Great Performance", "links": [ { "rel": "self", "href": "/products/21/reviews/36", "method": "get" }, { "rel": "like", "href": "/products/21/reviews/36", "method": "post" } ] } ], "links": [ { "rel": "self", "href": "/products/21/reviews", "method": "get" }, { "rel": "product", "href": "/products/21", "method": "get" }, { "rel": "add-review", "href": "/products/112/reviews", "method": "post" } ]}For collection resources, the response is usually structured as an array. But here, it's no longer an array but an object with two main properties: reviews and links. The reviews property has the actual collection array. The links property has the URIs to perform further actions in the context of the reviews collection.
So for example, rel: "self" is the URI to the current reviews collection. rel: "product" is like a BACK TO PRODUCT DETAILS link to go back one step and fetch the product details again. rel: "add-review" is an action that the user can take.
But apart from this, did you notice that each individual review inside the reviews array also has a links property? There are two rel URIs for each review. The rel: "self" URI allows the user to fetch more details about that particular review. rel: "like" allows the user to mark the review as helpful.
This is how HATEOAS enables clients to explore an API. A response from any API endpoint allows them to explore the API further and also presents options to go back a step if needed.
What is the advantage of implementing HATEOAS?
So what is the advantage of doing all of this? It seems useful but certainly tedious to implement.
The answer is Independent Evolvability.
If HATEOAS is implemented properly on both the server and the client side, then the client no longer needs to invoke APIs using harcoded URIs. Instead, it uses the URIs associated with the rel properties to invoke other API endpoints.
If at a later point in time, the API designers for whatever reason decide to change the URI structure, the clients will remain unaffected because they do not rely on the URIs directly.
From our previous example of product reviews, let's suppose that the API designers decide to change the resource name from reviews to ratings like this:
GET /products/21/ratingsSince the server and client have both implemented HATEOAS properly, this change won't cause any breaking changes on the client-side because the clients would have used the URIs associated with rel properties.
Also, it's not just about the URIs. The API can even change the logic behind exposing certain actions to the end-user and if the clients have followed HATEOAS properly, then nothing will break on the front-end.
Again referring to the previous example of products, we know that the current logic dictates that if the product is not in stock, then the rel: "add-to-cart" URI will not be included in the links array in the response.
But suppose the API designers decide to restrict the current authenticated user from ordering a product if the person resides in a quarantine zone due to Corona virus restrictions, they can simply omit the rel: "add-to-cart" URI from the response even though the product is in stock. Again, if the client has followed HATEOAS properly, then nothing will break on the client-side.
This way, the client and the API server can continue to evolve independently.
Implementing HATEOAS in the Thunder Notes API
We'll first target our singleton note resource i.e. /notes/{id}.
HATEOAS for /notes/{id} endpoints
We'll create a new controller file called hateoasControllers.js where we'll store the logic behind making our responses, HATEOAS-compliant. Go ahead and create that file inside the controllers folder and add the below function definition in it.
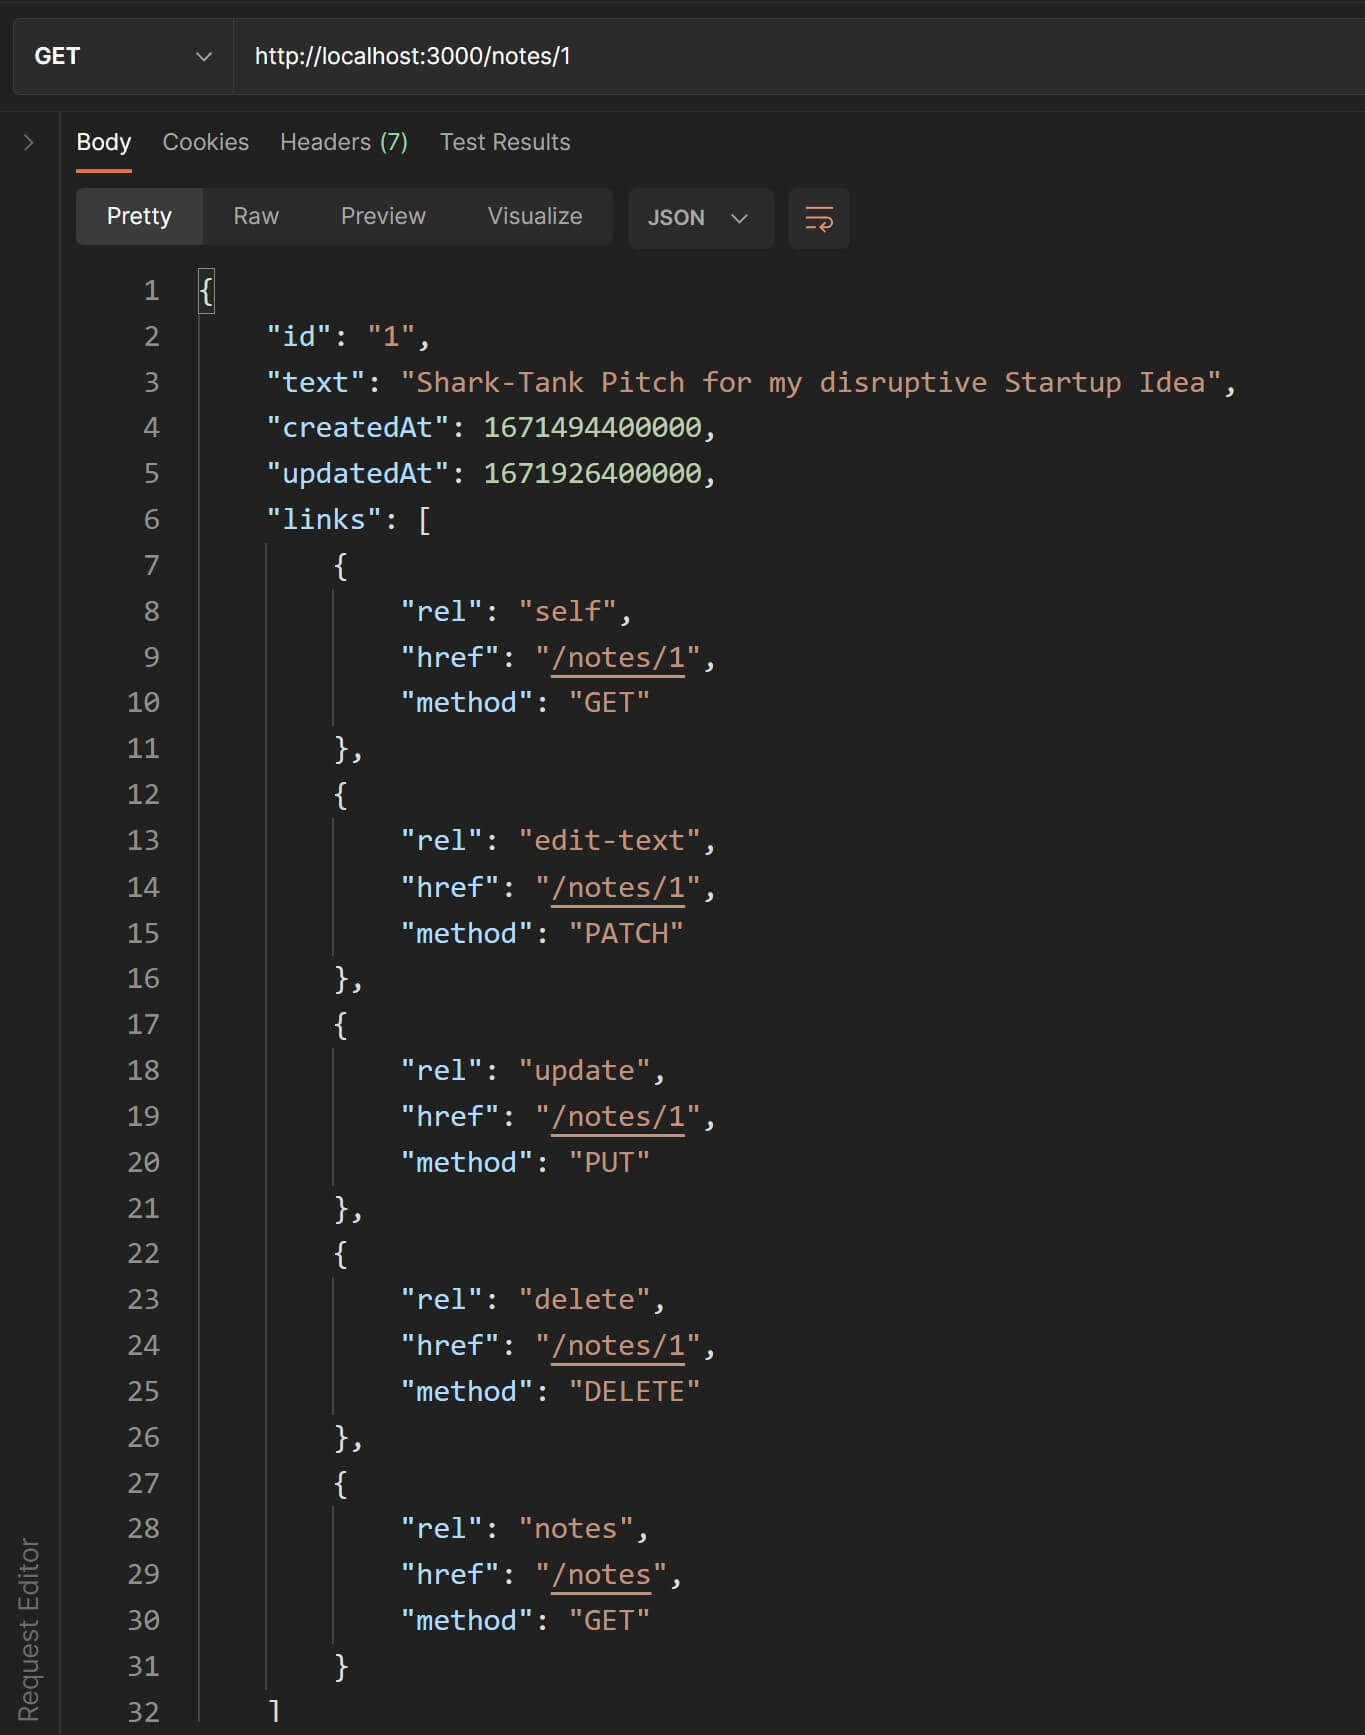
/* Adds the `links` property to a note object */exports.hateoasify = responseNote => { const links = [ { rel: "self", href: `/notes/${responseNote.id}`, method: "GET" }, { rel: "edit-text", href: `/notes/${responseNote.id}`, method: "PATCH" }, { rel: "update", href: `/notes/${responseNote.id}`, method: "PUT" }, { rel: "delete", href: `/notes/${responseNote.id}`, method: "DELETE" }, { rel: "notes", href: `/notes`, method: "GET" } ];
return { ...responseNote, links };}This method will take a note object as an input and add a property called links to it. This property will point to an array of relative-URIs which will expose options like updating or deleting the note.
Let's import this new method at the top in noteHandlers.js
const { hateoasify } = require( "../controllers/hateoasControllers" );Now in the getNote() handler function, before returning the note object in the response, pass it as an argument to the hateoasify() method that we've defined just now.
exports.getNote = ( req, res ) => { // Use the `res.locals` object to get the note provided by the // `noteValidation` middleware. res.json( hateoasify( res.locals.note ));}Do the same thing for the createNote() handler function.
exports.createNote = ( req, res ) => { ... ... res.status( 201 ).json( hateoasify( newNote ));}Back in Postman, let's test the GET request to /notes/1. Notice the links property in the response JSON.
Now let's try to send a POST request to create a new note. The new note object in the response will contain the same HATEOAS links as in the previous GET request.
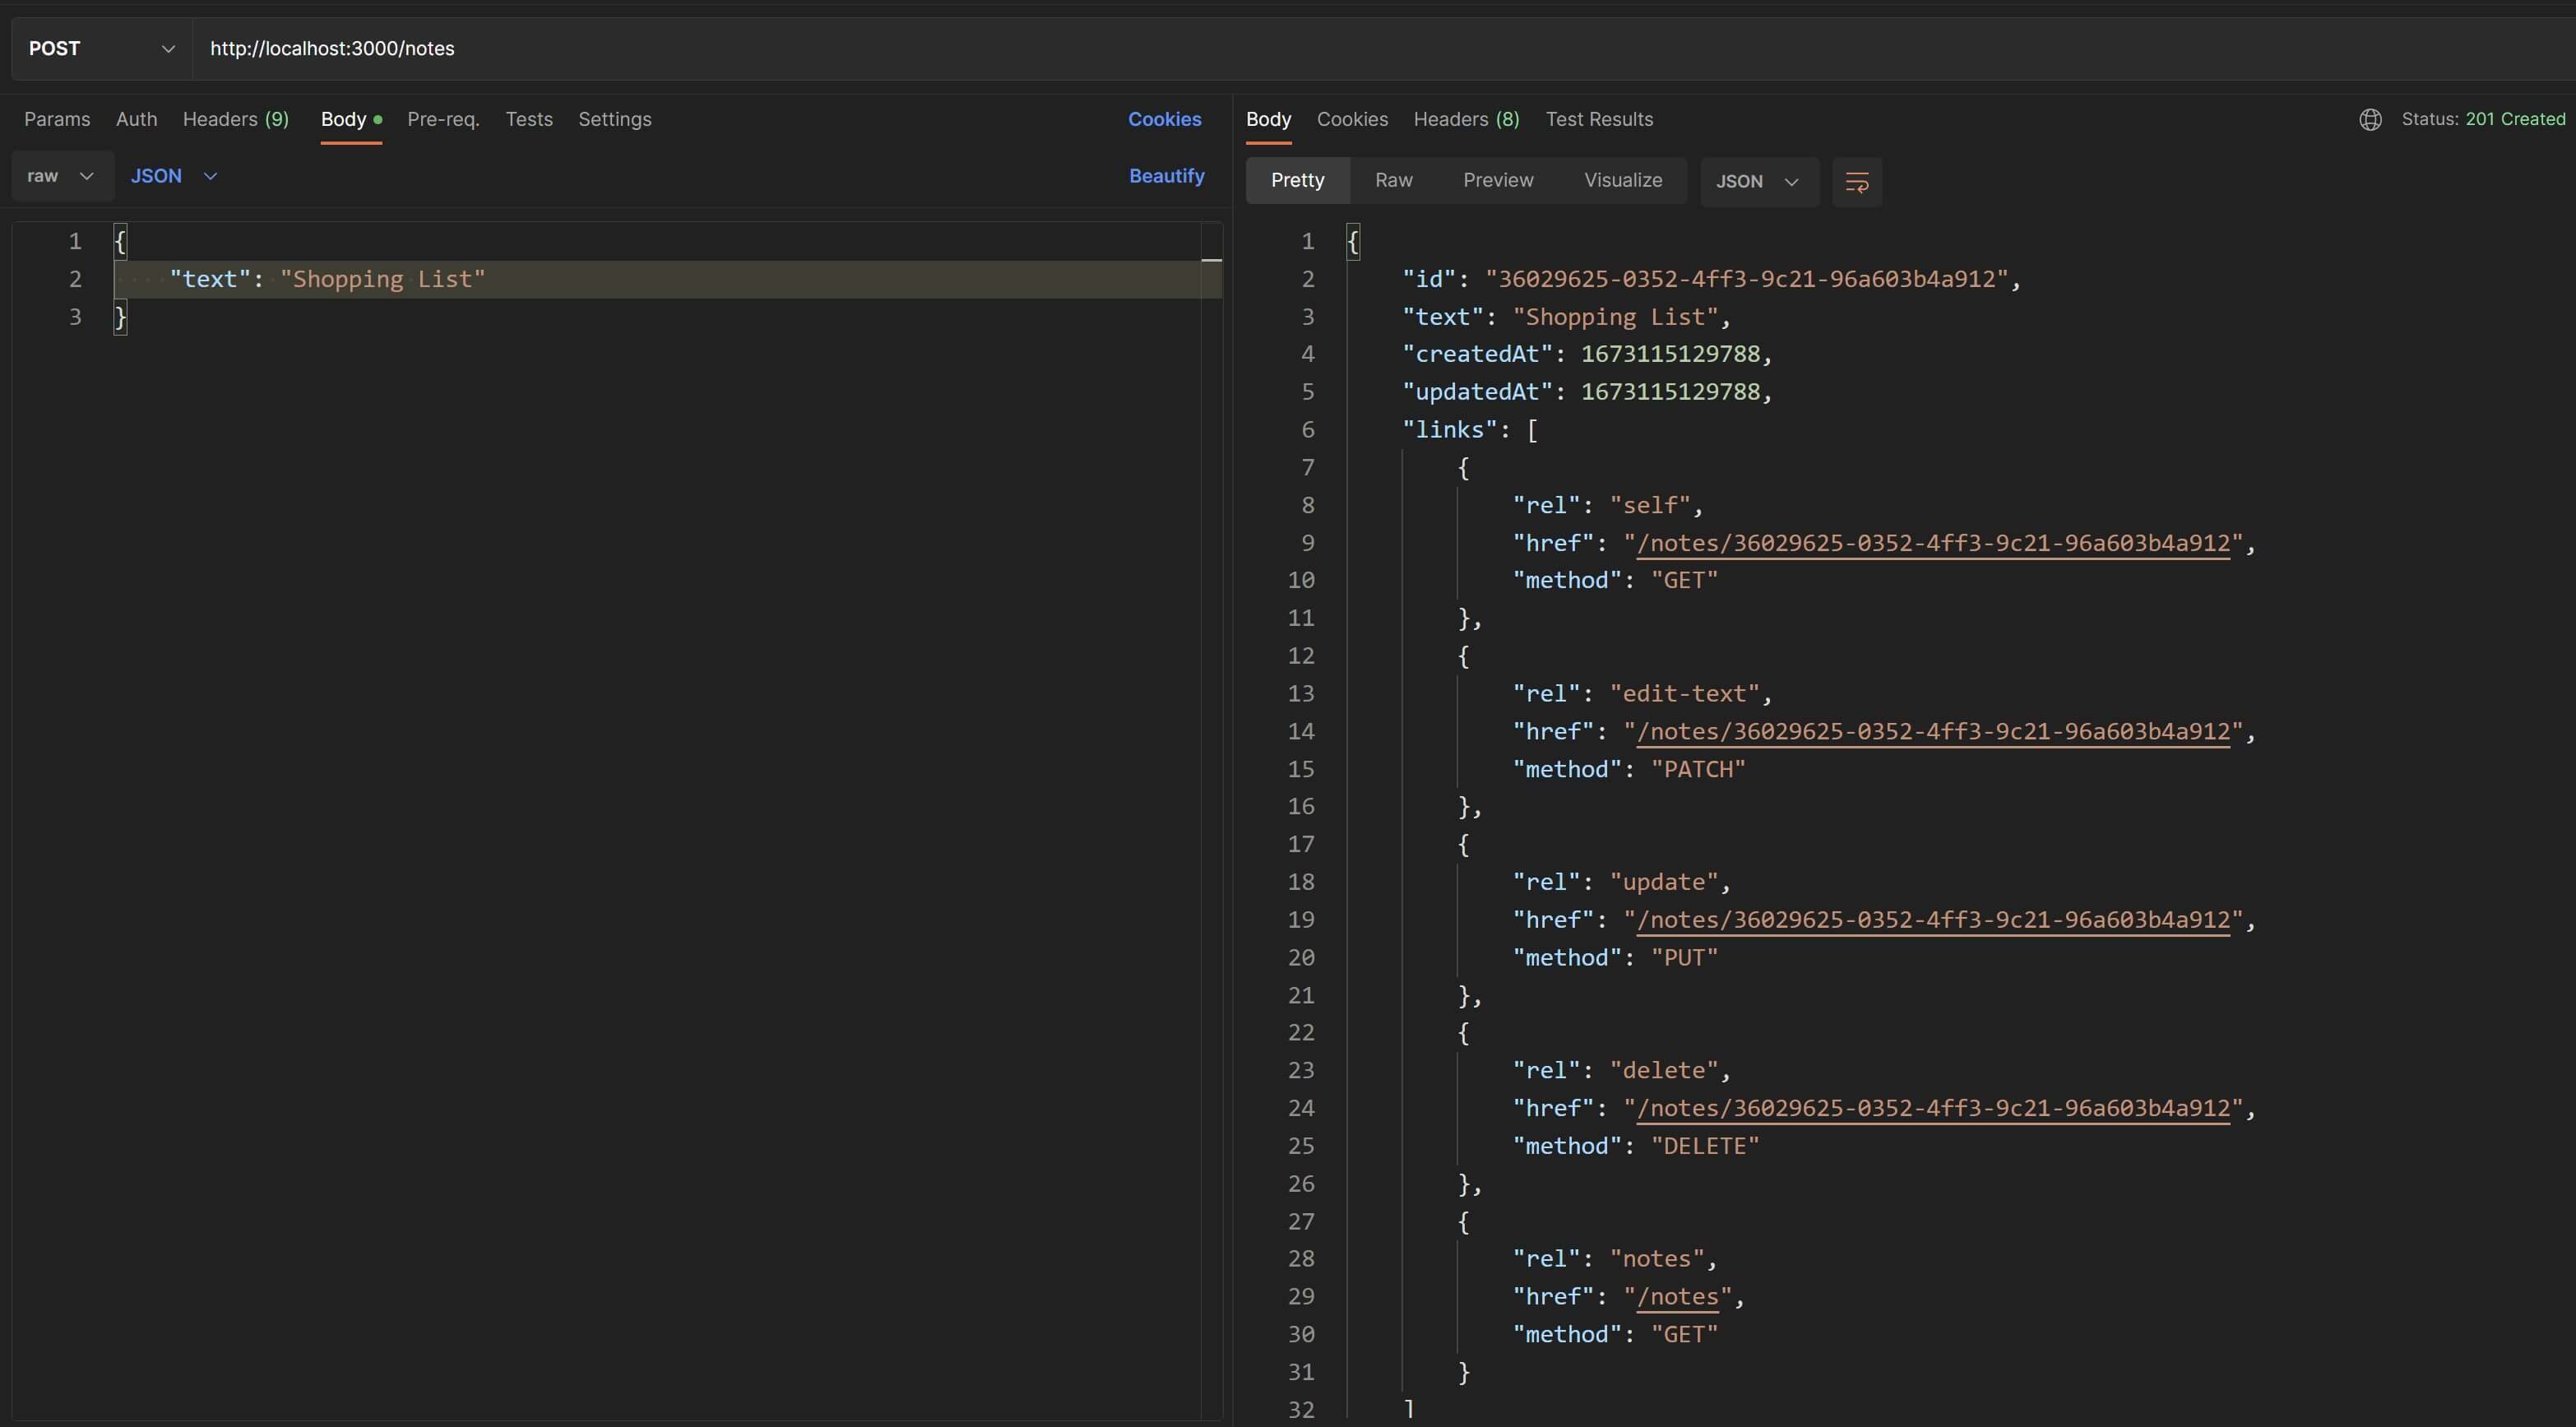
Great🤘! We have made our /notes/{id} endpoints HATEOAS compliant.
HATEOAS for the /notes endpoint
Since we have to treat singleton and collection resources differently while making their representations HATEOAS-compliant, we'll rename the previous method from hateoasify() to hateoasifyNote() and create a new method called hateoasifyNotes() for collection resources.
We'll still have a hateoasify() method which will simply call the above two functions, depending upon the type of resource i.e. an array(collection) or an object(singleton).
Let's define these three functions in hateoasControllers.js.
Rename the hateoasify() method to hateoasifyNote(). Also, we'll no longer need to export this function so convert it to a simple function declaration. The rest of the function definition will remain the same.
function hateoasifyNote( responseNote ) { ... ...}Next, we'll add a hateoasifyNotes() method. This method will add a links property to the response for the entire collection as well as a links property for each note within the collection. We'll not export this function either.
/* Adds the `links` property for a collection of notes and for each note within it.*/function hateoasifyNotes( responseNotes ) { // Add a `links` array to each individual note object within the collection. // The `self` URI can be used to fetch more info about the note. responseNotes.forEach( n => { n.links = [{ rel: "self", href: `/notes/${n.id}`, method: "GET" }] });
// Add a "links" array for the entire collection of notes. const links = [ { rel: "self", href: `/notes`, method: "GET" }, { rel: "add-note", href: "/notes", method: "POST" }, ];
return { notes: responseNotes, links };}Now we'll add the new hateoasify() method which will simply invoke either hateoasifyNote() or hateoasifyNotes() depending on whether the input argument is an object or an array. Note that this is the only method we are going to export.
/* Adds HATEOAS links to a collection of notes or an individual note. */exports.hateoasify = ( response ) => { const isCollection = Array.isArray( response );
return isCollection ? hateoasifyNotes( response ) : hateoasifyNote( response );}Now back in noteHandlers.js, there will be no changes to getNote() and createNote() because the call to hateoasify() will correctly call hateoasifyNote() and add links for the singleton note resource endpoint.
But now that we have implemented hateoasifyNotes(), let's make the response of the /notes collection endpoint HATEOAS-compliant as well by calling hateoasify().
Replace the method definition for getNotes() handler function with this:
exports.getNotes = ( req, res ) => { // get all the notes in the database const notes = notesCtrl.getAllNotes(); // send a `200 OK` response with the note objects in the response payload res.json( hateoasify( notes ) );}Since this is a collection, hateoasify() will in turn invoke hateoasifyNotes().
Let's test this out in Postman. If you send a GET request to the /notes endpoint, you should see a response like the one below(no screenshot since the response is quite lengthy).
{ "notes": [ { "id": "1", "text": "Shark-Tank Pitch for my disruptive Startup Idea", "createdAt": 1671494400000, "updatedAt": 1671926400000, "links": [{ "rel": "self","href": "/notes/1","method": "GET" }] }, ... ... ... { "id": "5", "text": "Parenting 101", "createdAt": 1671840000000, "updatedAt": 1672272000000, "links": [{ "rel": "self", "href": "/notes/5", "method": "GET" }] } ], "links": [ { "rel": "self","href": "/notes","method": "GET" }, { "rel": "add-note","href": "/notes","method": "POST" } ]}Awesome🙌! We've successfully implemented HATEOAS for the /notes collection endpoint.
HATEOAS links in error responses
You can also choose to include HATEOAS links in error responses.
For example, the 404 Not Found response for GET /notes/{id} can include a rel: "notes" URI that will serve as a BACK TO ALL NOTES link if the client or user tried to access a note that doesn't exist.
{ "message": "Note with ID '123' does not exist.", "links": [ { "rel": "notes", "href": "/notes", "method": "GET" } ] }This response not only informs the client that the requested resource was not found, but also provides a URI to follow next.
HATEOAS Specifications
While you can certainly structure HATEOAS-compliant API responses in the format that we have seen in our examples or extend or customize it to better fit your personal or project requirements, there are some specifications that define certain standards and guidelines for structing HATEOAS-compliant responses. Some of these are:
For example, Netflix's Genie REST API uses the HAL approach.
For reference, check out this article with more information on choosing a hypermedia format.
HATEOAS using frameworks/libraries/plugins
Our HATEOAS implementation in the Thunder Notes API works well for our little tutorial demo but when building a real-life full-scale API, you may need to use a plugin, framework, library, etc. that will be able to simplify the process of making your API HATEOAS-compliant.
For example, there is an NPM-package called express-hateoas-links that extends ExpressJS functionality and makes it easier to append HATEOAS links to API responses.
The language or API framework that you decide to use for your API may have similar extensions to achieve this.
Irrespective of which HATEOAS specification or library or framework you choose, the purpose will always remain the same, which is to enable explorability and discoverability in the API.
Congratulations🥳! HATEOAS was the last remaining sub-constraint and by successfully applying it to the Thunder Notes API, we have completely implemented one of the most important core REST constraints i.e. Uniform Interface. To recap, so far we have implemented two main REST constraints, Client-Server and Uniform Interface.
Authentication and Authorization
In most cases you'll need some form of security mechanism in order to protect your API resources from unauthorized access unless you plan to design a public API that provides unrestricted access to its resources.
This is where authentication and authorization come into play.
Authentication involves verifying the identity of the user/client and confirming that the user is who he/she claims to be. For example, when you login to your email account, you provide your username and password and prove that you are the owner of your account.
Authorization means making sure the user/client has access to a particular resource. For example, you may be able to login as a customer on a website but you still won't have access to their admin backend because that would require elevated authorized access.
In the context of APIs, authorization becomes mandatory for protected resources. Authentication will be required if the entire application supports the notion of user accounts(registrations and logins).
Also, an API server needs to authorize access not just for the users of the client applications but also for the clients themselves. This is typically done to ensure that a malicious "Evil Co." client app cannot call and use private APIs without first registering and verifying its identity.
The Stateless core REST constraint mandates that REST APIs not store any information pertaining to the current user session and that user sessions should be managed at the client-side. Every request, even from the same authenticated user, is treated as a new request. This means that every request must carry all the necessary information to authenticate and authorize the user and enable access to the API resource. All the approaches we'll study next will be based around this central idea.
There are different ways in which an API server can implement authentication and authorization to verify the identity of client applications and its users. They are:
- Basic Authentication
- API Keys
- Bearer authentication
- OAuth( 2.0 )
- HMAC Authentication
- Others
Let's look at these approaches in more detail.
1. Basic Authentication
As the name suggests, this is a very simple authentication mechanism where the client sends the username and the password of the user with every API request in the form of a base64 encoded string in the request header.
The API server reads this string and authenticates the user and if the credentials are valid, it allows access to the protected resource.
For example, if the username is saurabh and password is 123456, then the client will encode the string saurabh:123456 using base64 and place it in the Authorization request header as
Authorization: Basic c2F1cmFiaC8xMjM0NTY=Since base64 is not difficult to decode, this scheme should always be used over an HTTPS connection.
As a real-life usage example, Github's API makes use of basic authentication for testing in a non-production environment.
Also, Twitter's API makes use of basic authentication for some of their API services.
2. API Keys
An API key is a long string of alpha-numeric characters which may also contain special characters and which seems cryptic to a human.
In this mechanism, the API server generates and assigns an API key to a client that needs access.
The client can then send this API Key with every request in order to authenticate itself.
Please note that API keys are typically used to authenticate API client applications like websites or mobile apps and NOT their customers or users. Customer/users of API consumer applications are typically authenticated using token-based mechanisms which we'll check out next.
Reference: https://cloud.google.com/endpoints/docs/openapi/when-why-api-key
The API key can be included in the request in many ways like:
- Query string parameter
X-Api-Keycustom request header- Bearer token
- Request Body
2.1. Query string parameter
The simplest way is including the API key as a query string parameter:
GET "https://example.com/api/resource?api_key=505000a6-deca-43a1-b6f1-5766ff5e030e"The drawback of this method is that it increases the risk of the API key being exposed.
The Trello API uses this approach for its API services.
2.2. X-Api-Key custom request header
One of the most popular choice by convention is to use this custom header in the request and set its value to your API key.
GET "https://example.com/api/resource"X-Api-Key: 505000a6-deca-43a1-b6f1-5766ff5e030ePlease note that this is not a registered HTTP header but widely used as a convention.
2.3. Bearer token
The API key can also technically be used as a Bearer token in the Authorization header as:
GET "https://example.com/api/resource"Authorization: Bearer 505000a6-deca-43a1-b6f1-5766ff5e030eWe'll learn more about Bearer Authentication after this section.
2.4. Request body🚫
There are some APIs that require that the API key be included in the body of the request. This is not a good practice as it requires that the clients make POST requests even for fetching data. It also mixes authentication with the actual request payload data. For these reasons, you should avoid using this approach.
POST "https://example.com/api/resource"
{ "api_key": "505000a6-deca-43a1-b6f1-5766ff5e030e", ... ...}3. Bearer authentication
Bearer authentication or Token authentication is a mechanism that uses bearer tokens to gain access to protected API resources and is one of the most widely used authentication approaches out there.
Bearer tokens are encrypted strings that are generated by the API server and assigned to a user typically in response to a login attempt at the client-side.
The client then includes the access tokens in every request to the API
GET "https://example.com/api/resource"Authorization: Bearer 505000a6-deca-43a1-b6f1-5766ff5e030eThe word bearer simply means that the "bearer of this token" should be authorized to access the protected resource.
The token that is used as the bearer token can have different formats. One of the most popular choices for token formats is JWT or JSON Web Tokens.
JSON Web Tokens
JWT is a token format or a way of arranging information in an authentication token.
Here is a sample JSON Web Token
eyJhbGciOiJIUzI1NiIsInR5cCI6IkpXVCJ9.eyJzdWIiOiIxMjM0NTY3ODkwIiwibmFtZSI6IkpvaG4gRG9lIiwiaWF0IjoxNTE2MjM5MDIyfQ.SflKxwRJSMeKKF2QT4fwpMeJf36POk6yJV_adQssw5cAs you can see it is comprised of 3 parts that are separated by a period("."):
- Header
- Payload
- Signature
Let's discuss each of these parts in more detail.
Header
The header contains information about the encryption algorithm and the token format. It is Base64 encoded to form the first part of the JWT. Here is the decoded version of the header in the above JWT:
{ "alg": "HS256", "typ": "JWT"}Payload
The payload typically contains some basic properties about the logged in user. Just like the header, the payload is also Base64 encoded to form the second part of the JWT. Here is the decoded version from our sampe JWT:
{ "sub": "1234567890", "name": "John Doe", "iat": 1516239022}There are some standard guidelines in place for the names of the properties inside the header and payload. This is why we have used keys like sub which stand for subject of the JWT which in this case is "the user" and the value for this key is the user's ID. iat stands for time the JWT was issued at. It's ok if you use custom names for keys but as much as possible, you should try and stick to the standardized key names.
Please note that you should never include sensitive user information in the payload.
Signature
The third part requires that you take the header and the payload and sign them with a secret key using the chosen encryption algorithm.
HMACSHA256( base64UrlEncode( header ) + "." + base64UrlEncode( payload ), secret)Once you have the Base64 encoded header, payload and signature strings, you concatenate them with a period and you have yourself a JSON Web Token.
When a user signs in, the API service responsible for authentication is invoked. If the credentials are valid, the API server will generate this token the way we have discussed above i.e. by using a secret key that only the API server knows and send this token back in the response.
Now there is no standard regarding how the server should send this token back to the client but here are some popular choices:
- Custom Response Header(
X-Access-TokenorX-Auth-Token) - The Response body
Custom Response Header( X-Access-Token or X-Auth-Token )
You can choose to put your token as a value in a custom header named X-Access-Token or X-Auth-Token.
X-Access-Token: eyJhbGciOiJIUzI1NiIsInR5cCI6IkpXVCJ9.eyJzdWIiOiIxMjM0NTY3ODkwIiwibmFtZSI6IkpvaG4gRG9lIiwiaWF0IjoxNTE2MjM5MDIyfQ.SflKxwRJSMeKKF2QT4fwpMeJf36POk6yJV_adQssw5cPlease note that these are not a registered HTTP headers but widely used as a convention.
The Response body
You can put the token in the response payload as a JSON object. As a real-life example, the FEDEX API uses this approach.
{ "access_token": "eyJhbGciOiJIUzI1NiIsInR5cCI6IkpXVCJ9.eyJzdWIiOiIxMjM0NTY3ODkwIiwibmFtZSI6IkpvaG4gRG9lIiwiaWF0IjoxNTE2MjM5MDIyfQ.SflKxwRJSMeKKF2QT4fwpMeJf36POk6yJV_adQssw5c", "token_type": "Bearer", "expires_in": 3600}But why not use the Authorization header to send the token from the server to the client?🤔
The Authorization header is typically meant to be used for requests sent by the client to the server and not the other way around.
Here is how MDN defines its purpose:
The HTTP Authorization request header can be used to provide credentials that authenticate a user agent with a server, allowing access to a protected resource.
To see a fantastic demo of what JWTs are and how they work, head over to the JWT debugger.
4. OAuth( 2.0 )
OAuth 2.0 is an authorization protocol that is consided an industry-standard for authorization and is adopted by Google, Twitter and a whole lot of other big names out there.
A good example of OAuth in action is the Stack Overflow login screen.
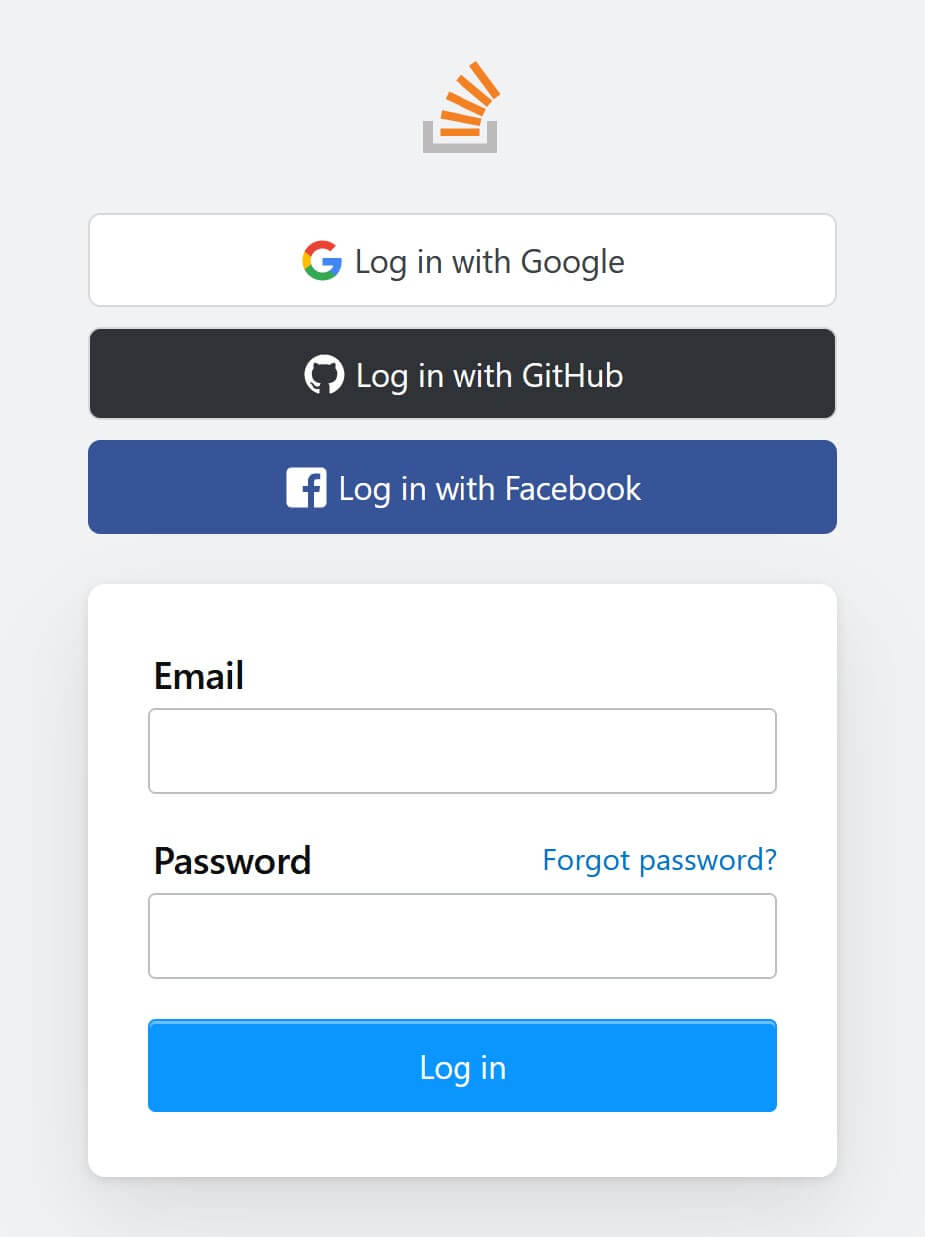
It presents you options to login using either Google, Github or Facebook.
Say for example you choose to login with Google, then you'll be redirected to Google's login page where you'll enter your Google account credentials.
If your credentials are valid, Google will ask for your approval to allow Stack Overflow to gain access to some basic information like your name and email from your Google Account.
If you approve, Google will send this information to Stack Overflow which will in turn allow you to login.
Explaining the full OAuth flow is beyond the scope of this article so I'll try to explain all of that in a future blog post.
Till then, here are some great blog posts that dive into more detail about what OAuth is and how to implement OAuth in a NodeJS project.
5. HMAC Authentication
HMAC stands for Hash-based Message Authentication Code.
The central idea here is that the API server generates and assigns a unique private key to each client.
The client then uses its private key and generates an HMAC value by applying a hashing operation on information such as the username, the request body, a nonce, current timestamp, etc.
This HMAC value is then included in the request along with certain publicly identifiable information such as a username.
The server also generates its own version of the HMAC by using the same private key assigned to the client and if the client's HMAC value matches the one generated by the server, the request stands authenticated.
HMAC authentication is typically used as an additional layer of security along with HTTPS.
For reference, check out this article with more information on implementing authentication using HMAC.
6) Other Authentication Methods
We have discussed the most common authentication methods but for your reference, here is a list of a few alternate options for authentication along with the ones we have seen above.
7) Implementing Authentication using JWT in the Thunder Notes API
It's time to actually see authentication in action in our tutorial REST API. We'll implement authentication using JWT for the purposes of this tutorial.
The functionality for signing and verifying JSON Web Tokens is enabled in our sample API using an NPM library called jsonwebtoken. It's already installed as a part of the starter files and ready to use.
So far, notes was the only data entity and resource we were dealing with but now, we'll introduce the concept of users in the Thunder Notes API. As I had mentioned previously, our data in /data/data.js also has entries for some pre-defined users in the system.
Let's create a new API service that will authenticate the user and generate a JWT token.
Create a new file called authHandler.js within the handlers folder and paste this content into it.
const jwt = require( "jsonwebtoken" );const usersCtrl = require( "../controllers/usersController" );
exports.authenticate = ( req, res ) => { // route handling logic goes here.}We'll add the definition later. Let's hook this up to a route first.
In routes.js, import this authHandler.js file at the top.
const { authenticate } = require( "./handlers/authHandler" );After this add this new route.
router.post( "/auth", authenticate );Let's discuss the logic behind using this specific resource name and URI structure. After all remember, Identification of Resources is one of the first steps in designing a REST API.
As discussed previously in this article, resources should be named as nouns and should be plural. auth stands for authentication and is a noun and has no plural form so simply using the singular form is fine for our purposes.
Some other examples of URI structures we can use are:
POST /users/{id}/session
OR
POST /users/{id}/token
This new API service will accept the user's email and password as inputs. If the user is authenticated successfully, then the service will generate a JSON Web Token and send it to the client. We'll use the X-Access-Token header aproach to send this token from the server to the client in the response.
Let's add the definition for the new route handler function in authHandler.js. Replace the previous declaration with this one.
/** * This is the route handler for the `/auth` route. * Accepts the user's email and password as inputs. * Upon successful validation, returns a JWT token in the response header. * The encrypted token payload contains the user's ID and name. * Also included in the response is a `links` array for the next steps * that the client can take like "add a new note" or "fetch all notes for this user". */exports.authenticate = ( req, res ) => { // throw `400 Bad Request` if either "email" or "password" is not provided. if( !( "email" in req.body && "password" in req.body ) ) { return res.status( 400 ).json({ "message": "Invalid request" }); }
const { email, password } = req.body;
// check whether a user with this email exists. // normally the password will be hashed before the comparison. // but we are storing the password directly without hashing for convenience // while testing and for minimizing implementation details. const user = usersCtrl.getUserByCredentials( email, password ); if( !user ) { return res.status( 401 ).json({ "message": "Invalid credentials" }); }
// Use the private key to sign payload and generate the JWT. // DO NOT INCLUDE any sensitive information in the payload. // Only include some basic info that can identify the user. const token = jwt.sign( { sub: user.id, name: user.name }, process.env.TN_JWT_PRIVATE_KEY ); // Configure a custom header in the response with the token value. res.setHeader( "X-Access-Token", token );
// HATEOAS links const links = [ { "rel": "self", "href": "/auth", "method": "POST" }, { "rel": "notes", "href": "/notes", "method": "GET" }, { "rel": "add-note", "href": "/notes", "method": "POST" } ]
// send a confirmation message, some basic user info and HATEOAS links in the response res.json({ message: "Authentication successful", user: { id: user.id, name: user.name, email: user.email }, links });}The process.env is a NodeJS-specific global variable which holds the environment variables for our API server(the ones we have declared in env.js).
Let's call this API service in Postman.
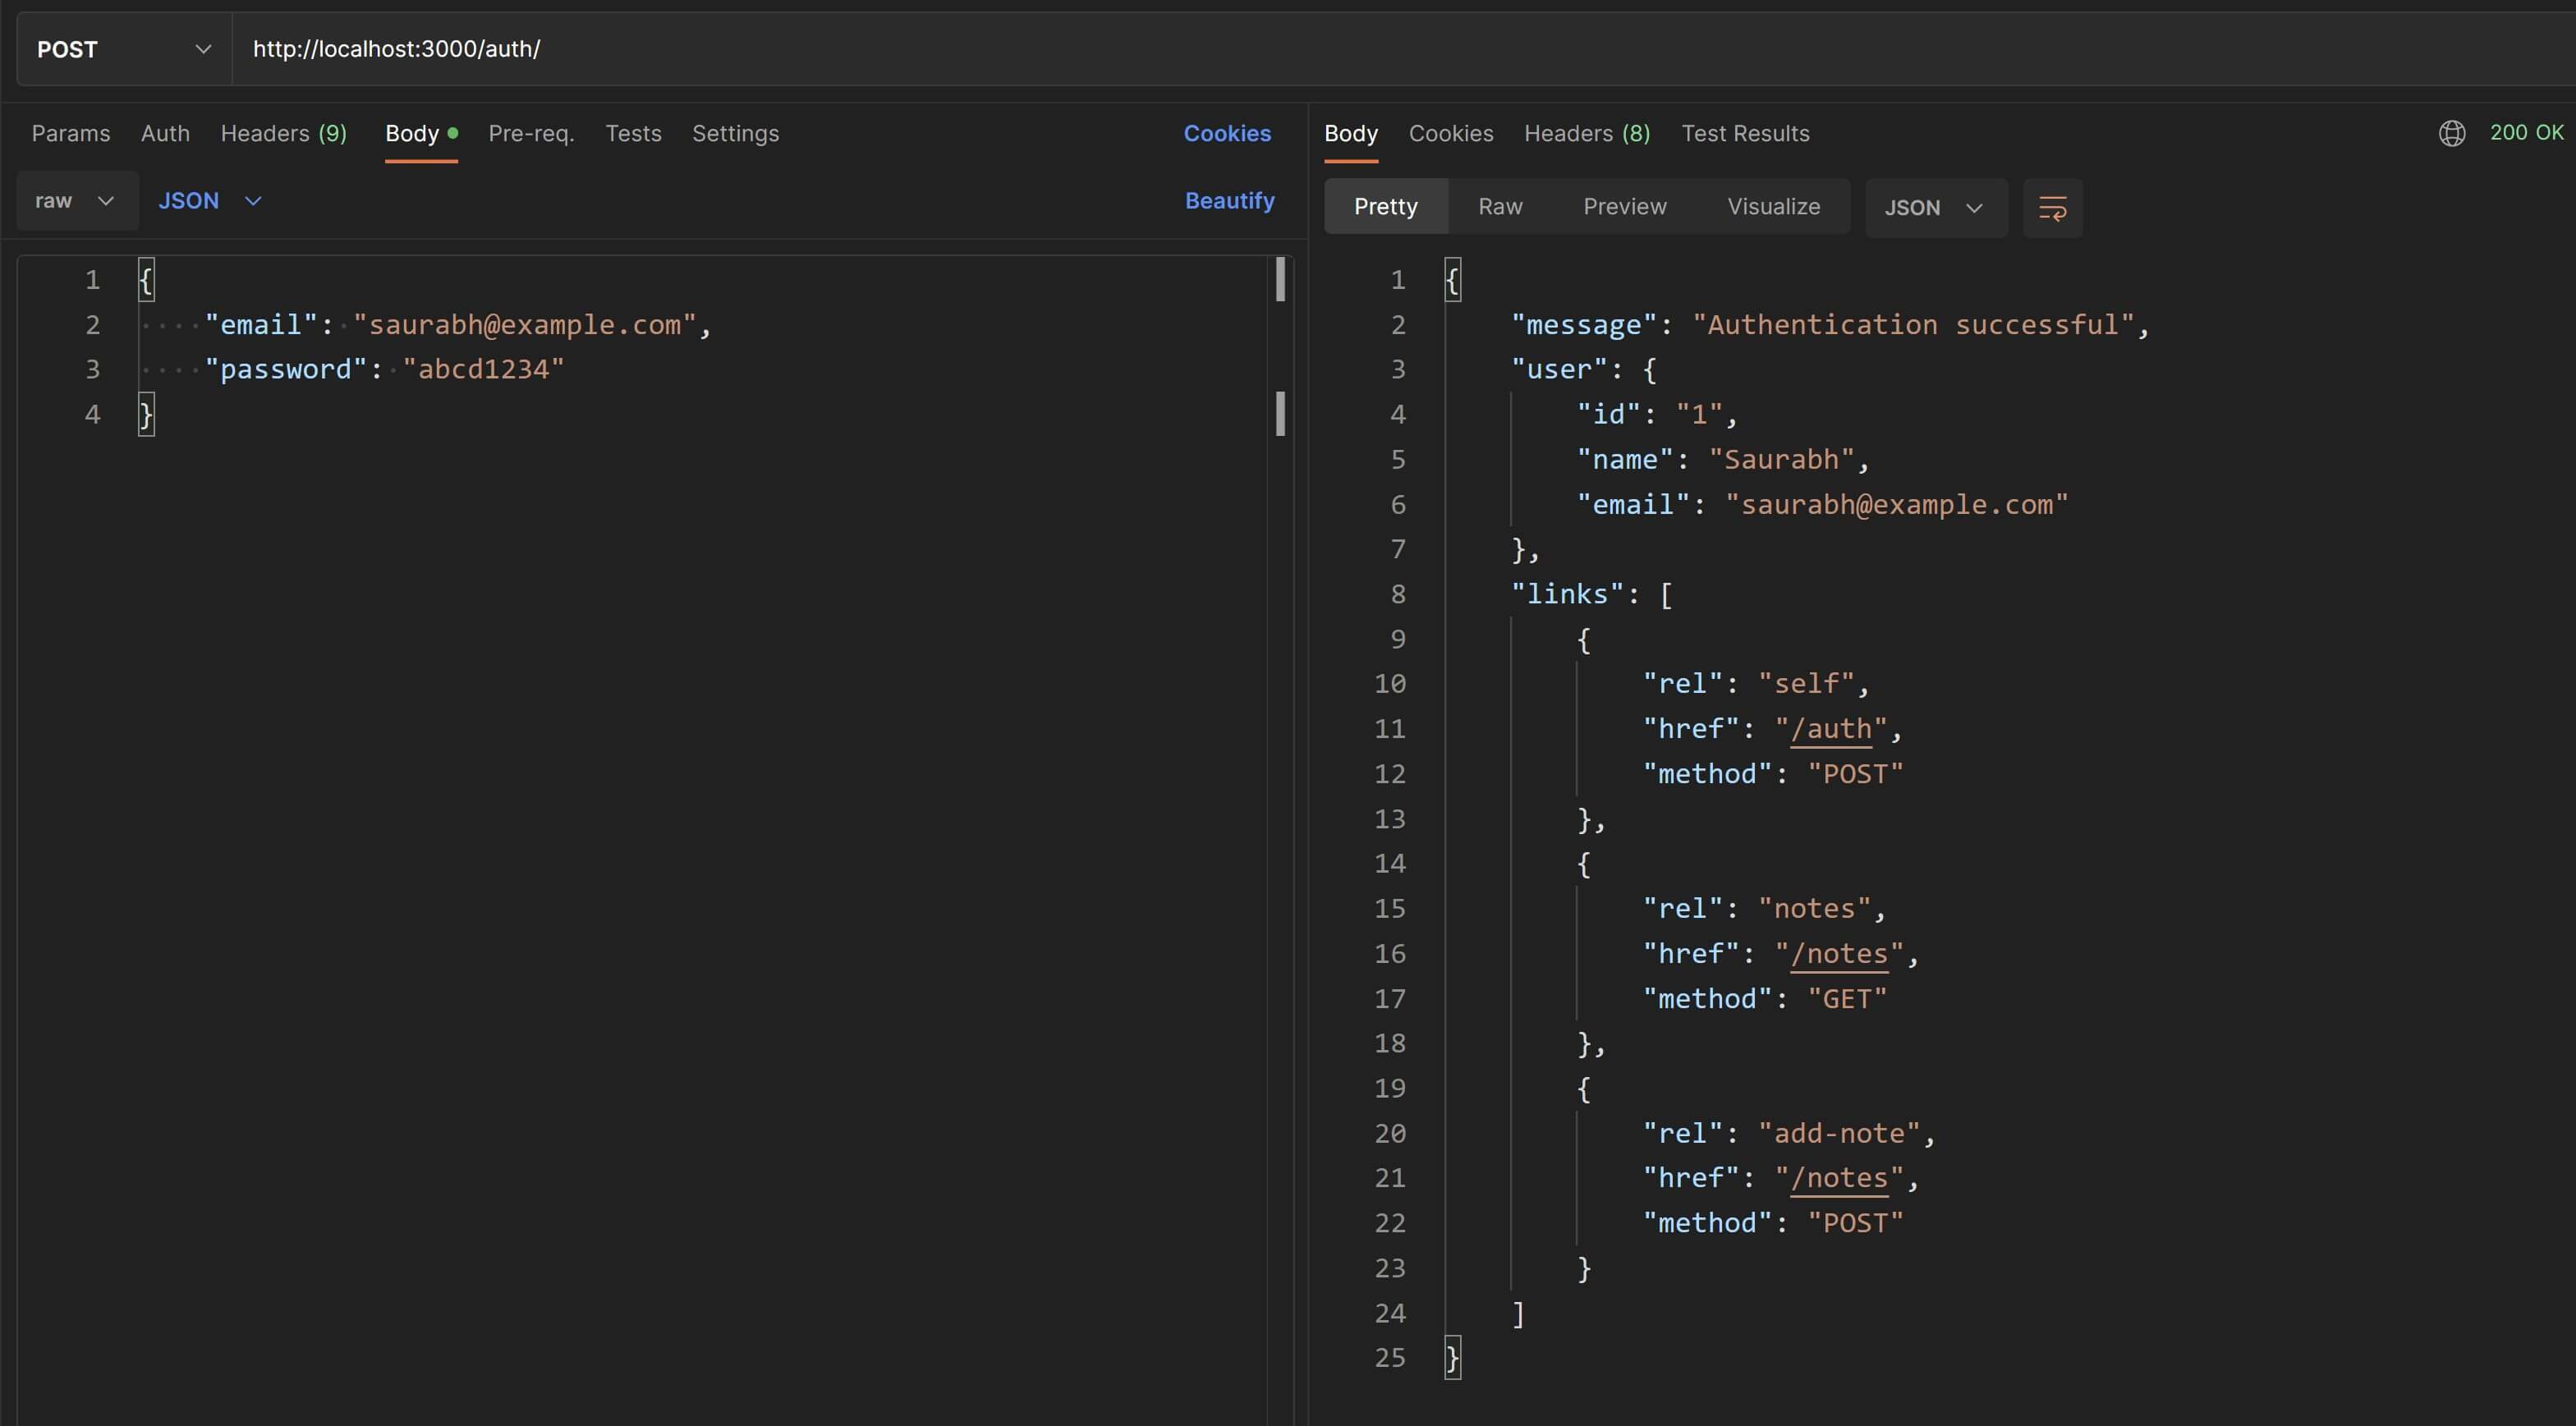
Also check the Headers tab for the value of the X-Access-Token header.
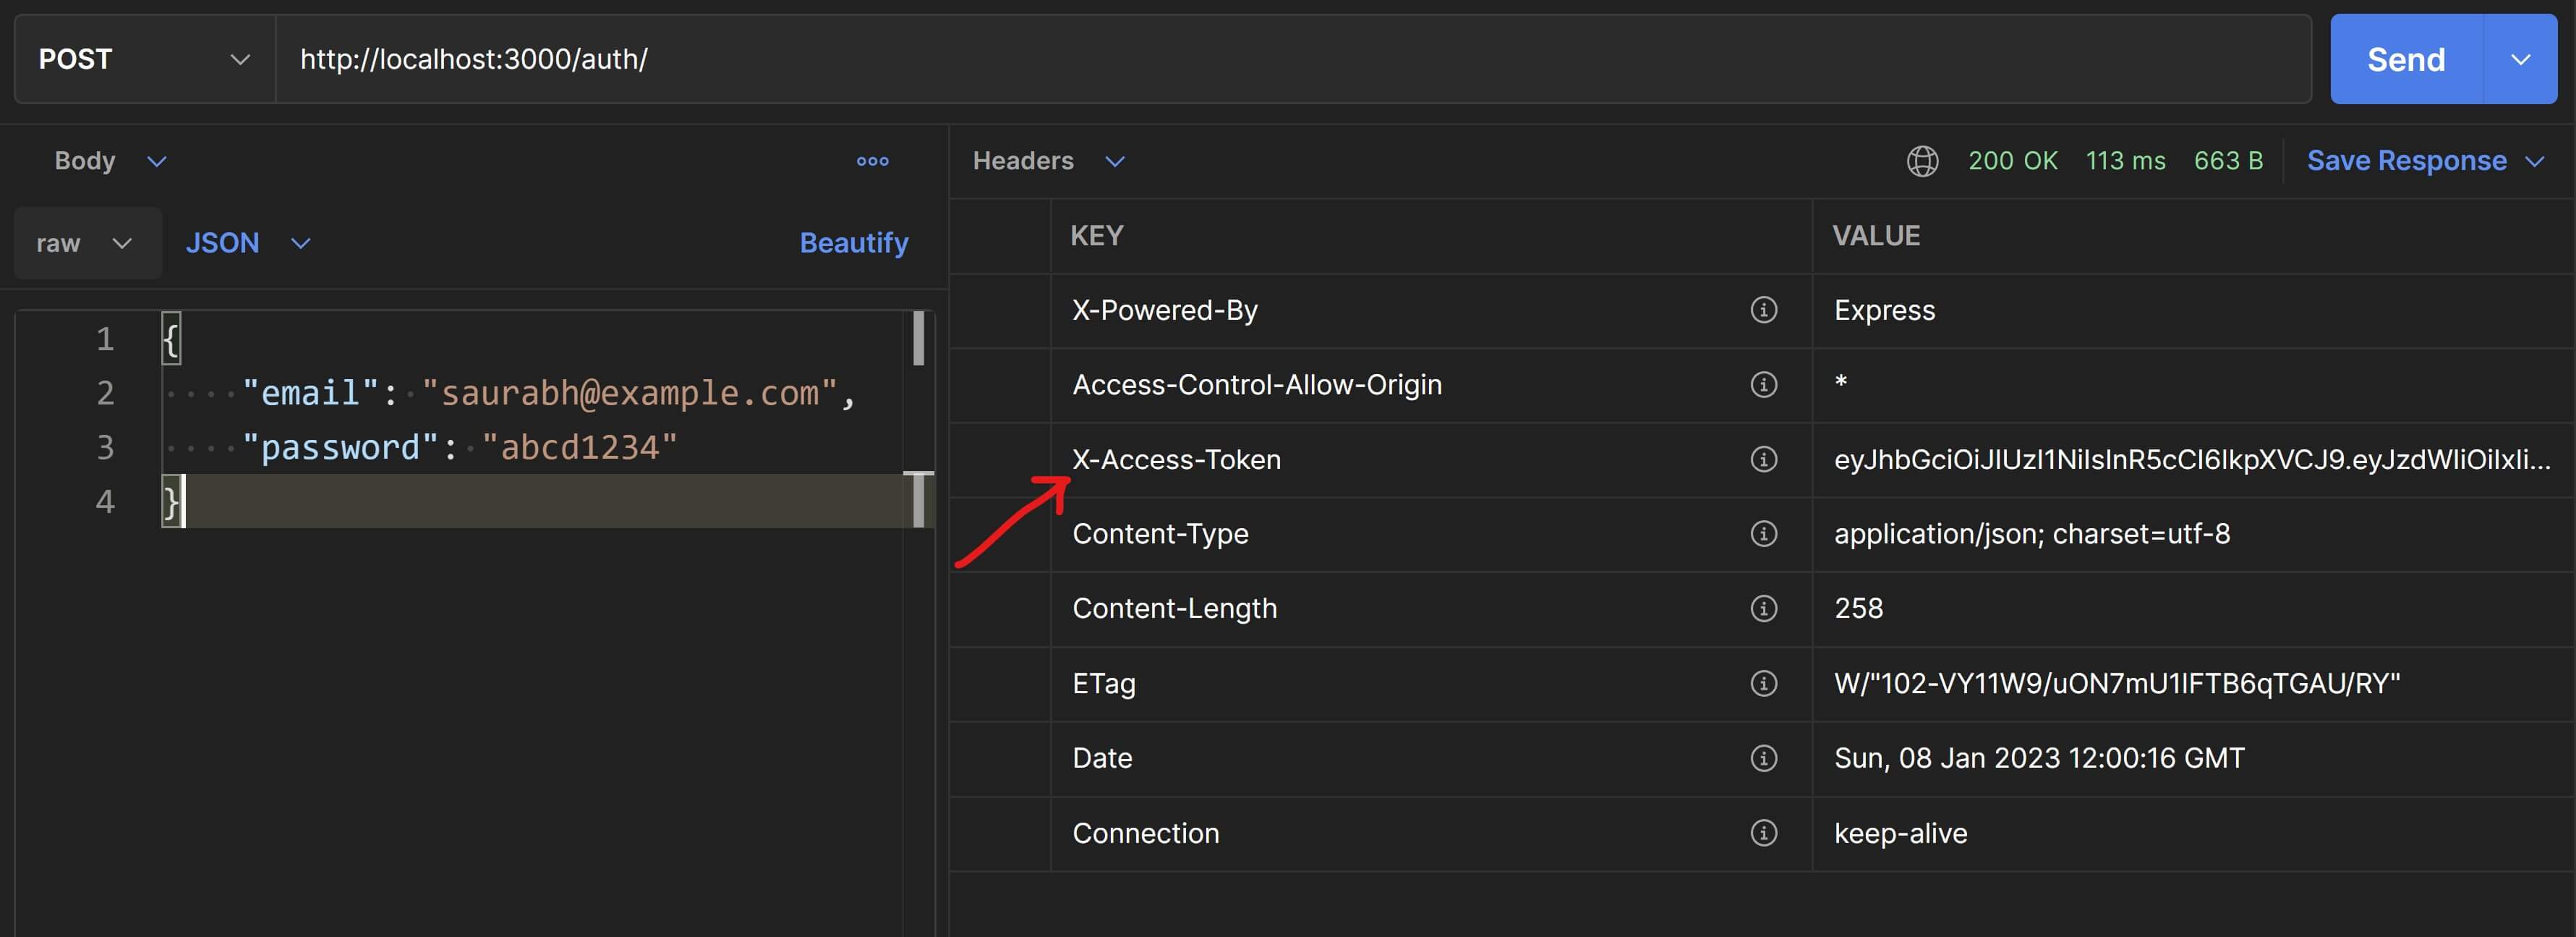
The client will read this auth token from the response header and will send it in the Authorization header as a part of any subsequent API requests. The server upon receiving these requests will check the Authorization header and if it finds a token in there, then it'll verify it.
So let's add some functionality so that the server can verify this token.
This verification step will need to be implemented before the route handler function begins its processing of the request. This sounds like a job for a middleware.
We have already created one middleware before called noteValidation.js and have already discussed what middlewares are and what purpose they serve.
Let's create a new file called auth.js within the middlewares/ folder and this code to it.
const jwt = require( "jsonwebtoken" );
/* This middleware function reads the token value from the `Authorization` header and verifies it. It attaches the token payload into the request object and passes it on to middlewares further up the chain. */module.exports = function verifyToken( req, res, next ) { // read the `Authorization` header. If not provided, return a `401 Not Authorized`. const authHeader = req.header( "Authorization" ); if( !authHeader ) { return res.status(401).send({ "message": "Access denied. No token provided." }); }
// The value will be in the format, `Bearer <token value>`. // Parse the token value by removing the text "Bearer ". const token = authHeader.replace( "Bearer ", "" ); try {
// verify the token const decodedPayload = jwt.verify( token, process.env.TN_JWT_PRIVATE_KEY ); /* In ExpressJS, the `res.locals` object is used to store/expose information that is valid throughout the lifecycle of the request. It is ideal for transferring information between middlewares. So we'll store the decoded payload in `res.locals.user` so that it can be used by middlewares further up the chain. */ res.locals.user = decodedPayload;
// call the next middleware next();
} catch( err ){ // if the token cannot be decoded, send `400 Bad Request` error. return res.status(400).send({ "message": "Access denied. Invalid token." }); }}Let's change our routes to include this new middleware. Replace the entire contents of routes.js with this:
const express = require( "express" );const router = express.Router();// route handlersconst { handleRoot } = require( "./handlers/rootHandler" );const { authenticate } = require( "./handlers/authHandler" );const noteHandlers = require( "./handlers/noteHandlers" );// middlewaresconst verifyToken = require( "./middlewares/auth" );const validateNote = require( "./middlewares/noteValidation" );
// root endpointrouter.get( "/", handleRoot );
router.post( "/auth", authenticate );
// notes or collection endpointsrouter.get( "/notes", verifyToken, noteHandlers.getNotes );router.post( "/notes", verifyToken, noteHandlers.createNote );
// singleton `note` endpointsrouter.get( "/notes/:id", verifyToken, validateNote, noteHandlers.getNote );router.put( "/notes/:id", verifyToken, validateNote, noteHandlers.updateNote );router.patch( "/notes/:id", verifyToken, validateNote, noteHandlers.editText );router.delete( "/notes/:id", verifyToken, validateNote, noteHandlers.deleteNote );
// `PUT` is typically not used with collection resources,// unless you want to replace the entire collection. // which is why we'll treat this as an invalid route.router.put( "/notes", verifyToken, noteHandlers.handleInvalidRoute );
module.exports = router;For singleton endpoints i.e. /notes/{id}, we have two middlewares. The request will first run verifyToken() and if the user is authorized, the control will move on to the next middleware i.e. validateNote(). Only once the request is validated will the control move on to run the route handler function.
For collection endpoints, we only have one middleware i.e. verifyToken().
Let's test these changes in Postman. Try to fetch all notes and you should see an error as in the screenshot below.

Great👍! This means our authorization middleware is working.
Now in order to fetch all notes, we need to include the Authorization header in our request and provide a Bearer <token> as the value of this header. To do this, simply send a GET request to the /auth endpoint with the username and password of the user you wish to login with from data.js. The response will have the token in the header X-Access-Token as demonstrated previously.
Copy this token, keep the method set to GET. Modify the URL in Postman to /notes. Go the Auth tab in the Request Panel and select Bearer Token as the value of the Type field and paste the copied token.
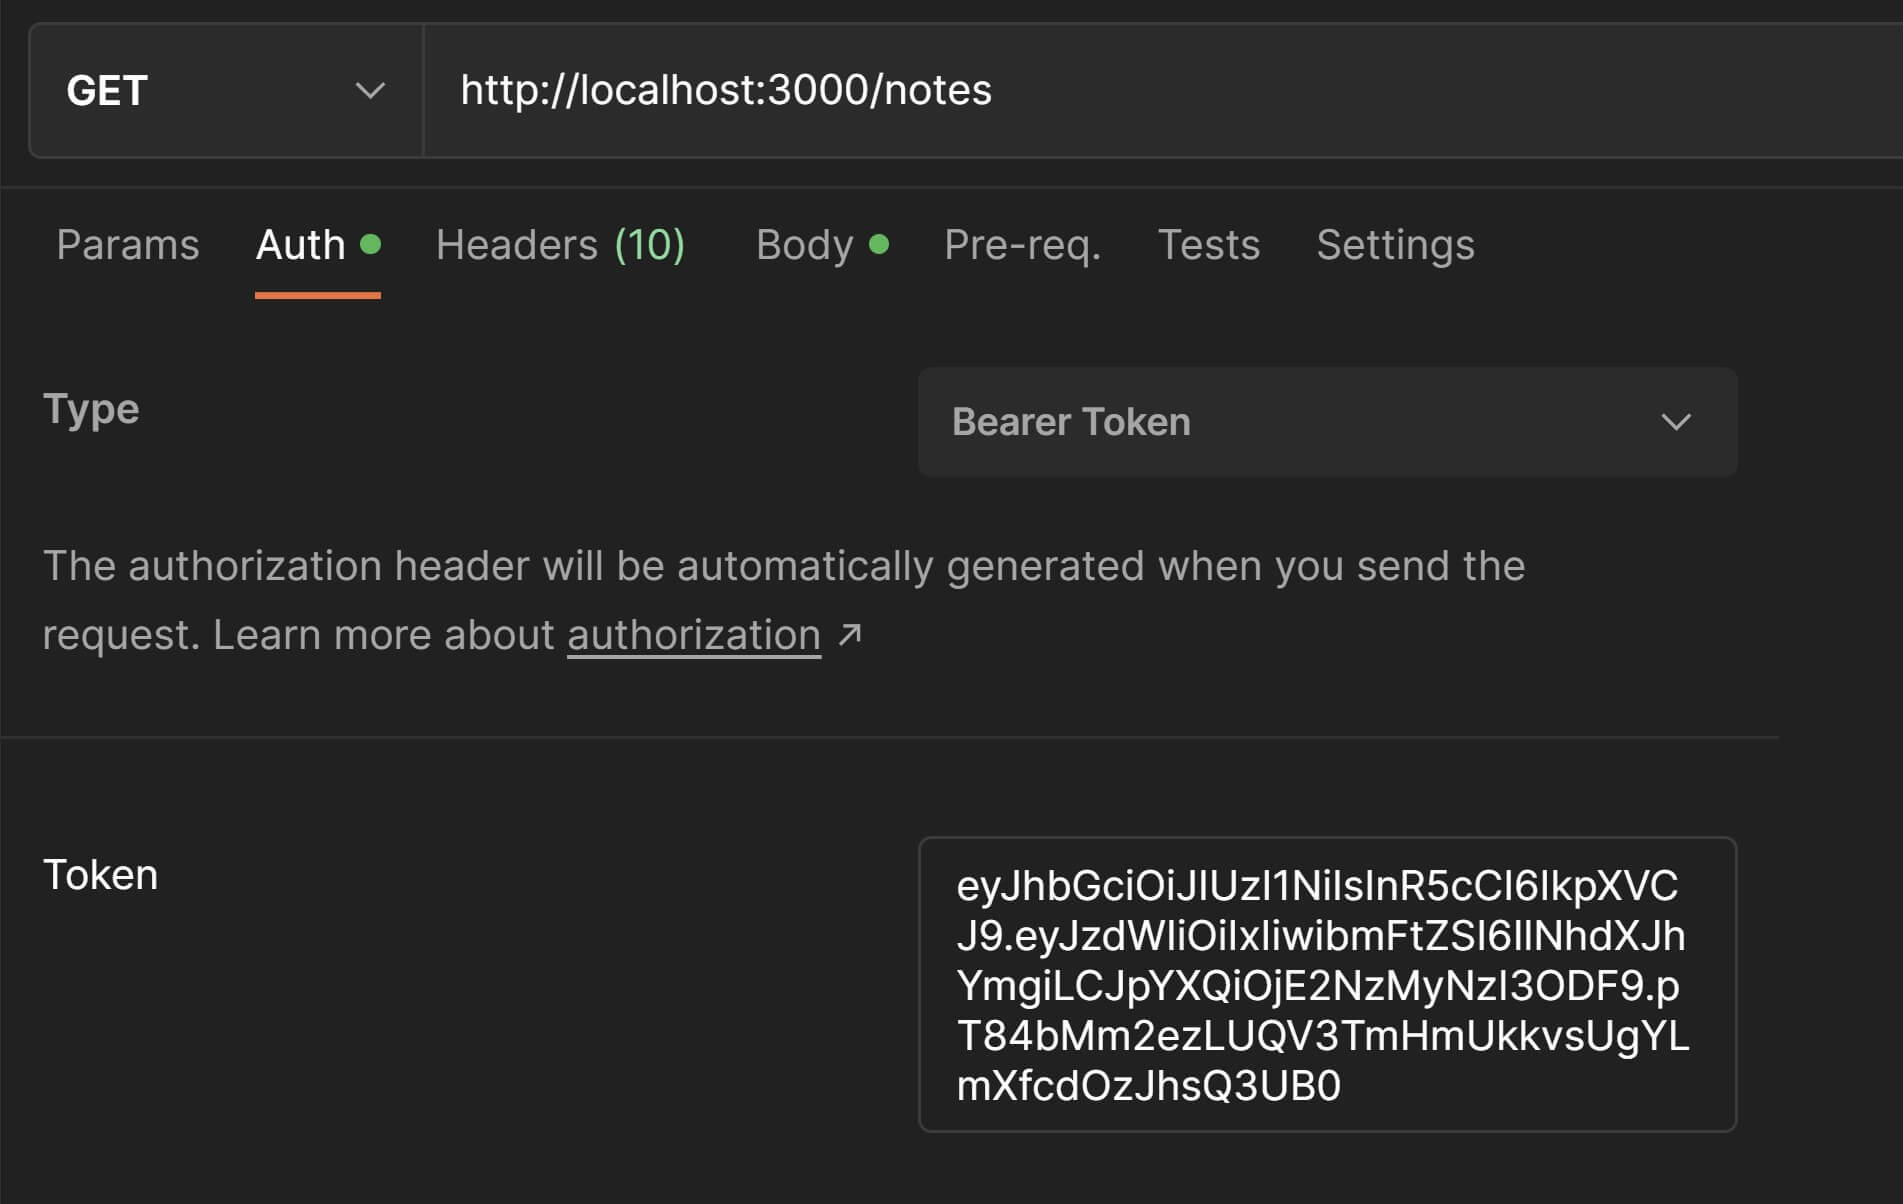
Postman will automatically include this in the request headers as a key-value pair which you can confirm by going to the Headers tab in the Request Panel.
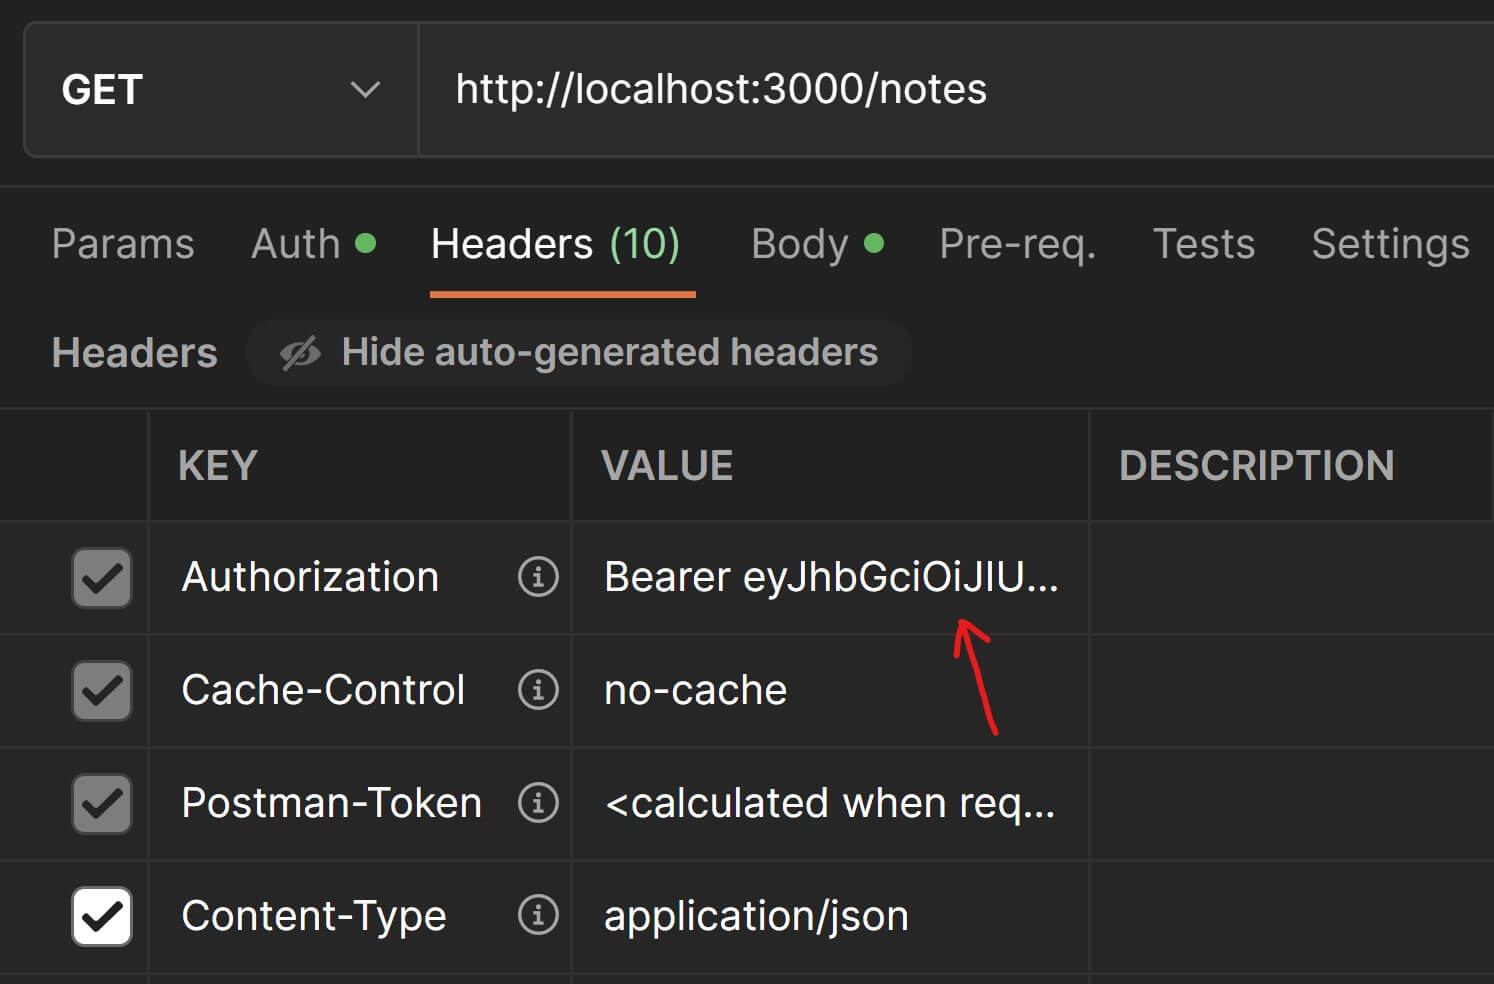
Now hit Send and check the response. You will no longer get the error and will be able to fetch all the notes just like before.
BUT WAIT✋! Right now we're able to fetch all the notes in data.js, even the ones that belong to a different user than the one we have authenticated with. We'll need to make sure that users can only access notes that are associated with them and not someone else's notes.
This is currently true for the getNotes(), getNote() and other singleton resource route handlers which are able to access all notes irrespective of which user they belong to. Let's remedy this quickly.
First, let's include the usersController.js file in noteHandlers.js at the top.
const { getUserById } = require( "../controllers/usersController" );Now go to notesController.js and delete the function definition for getAllNotes() controller function. This function was only required as long as we had not implemented authorization and authentication. We don't need it anymore because we don't want any request to retrieve all notes from our database.
Next, let's replace the call to this deleted function in the getNotes() route handler, with the controller function getNotesByIds(). Replace the function definition for getNotes() with this:
exports.getNotes = ( req, res ) => { // get all info about the user const user = getUserById( res.locals.user.sub );
// get array of note objects from the array of note IDs let responseNotes = notesCtrl.getNotesByIds( user.notes );
// send a `200 OK` response with the note objects in the response payload res.json( hateoasify( responseNotes ) );}If you're wondering what res.locals.user is then it is where the auth.js middleware stores the decoded payload from the authorization token. So res.locals.user.sub is the currently authenticated user's ID.
user.notes is an array of note IDs. The getNotesByIds() controller function maps all these IDs to note objects so that we get an array of note objects back.
Now, change the function definition for the noteValidation.js middleware. Replace the entire contents of the middleware file with this:
const usersCtrl = require( "../controllers/usersController" );const notesCtrl = require( "../controllers/notesController" );
/* This middleware function will perform some common validation steps for single "note" resources such as - Making sure the note exists else throw `404 Not Found`. - Making sure user has access to the note else throw `404 Not Found`.
If all is well, then it will store the entire note object in `res.locals` and make it available for future middlewares.*/module.exports = function validateNote( req, res, next ) { /* Get all the info about the user. Use the `res.locals.user` object to obtain the authenticated and decoded payload from the auth middleware. The payload format is: { "sub": 12345, "name": "John Doe" } */ const userId = res.locals.user.sub, user = usersCtrl.getUserById( userId ); // find the note with the input note ID in the database. // if the note does not exist, `undefined` will be returned. const note = notesCtrl.getNoteById( req.params.id ), noteExists = typeof note !== "undefined";
// the user maybe authenticated but check whether the user // is authorized to access this note. const isAuthorized = usersCtrl.canUserAccessNote( user, req.params.id );
/* If the note does not exist or the user is not authorized to access the note, then throw `404 Not Found`. Why throw a 404 if the note exists but user is not authorized to access it? Because we want to maintain secrecy for protected resources. If the user is not authorized to access a resource, then for all intents and purposes, that resource doesn't exist for that user. */ if( !noteExists || !isAuthorized ) { res.status( 404 ).json({ "message": `Note with ID '${ req.params.id }' does not exist.` }); return; }
// if validation is successful, store the note for future use // in `res.locals.note` and call the next middleware. res.locals.note = note;
// invokes the next middleware next();}Notice the use of the controller function canUserAccessNote() to make sure that the currently authenticated user has access to the singleton note resource endpoint.
Let's test our changes to the getNotes() handler in Postman. You should now see only those notes that belong to the current authenticated user in the response.
Let's try to access a single note belonging to a different user than the authenticated one. I am going to authenticate as saurabh@example.com and send a GET request to /notes/4 which is a note that belongs to a different user.

Sweeeet🤓! Our authorization validation seems to be working quite well.
There are a few final touches left before we can wrap up this section.
The createNote() and deleteNote() handlers till now have used a hardcoded value of 1 as the user ID. Now that we have implemented authentication, let's make this value dynamic.
Replace the existing definition of the handler function createNote() in noteHandlers.js with the one below. The only thing that has changed is that we have replaced the hardcoded user id input to the createNote() controller function with res.locals.user.sub.
exports.createNote = ( req, res ) => { // ExpressJS extracts the note's `text` from the request body and stores // it in `req.body`. If no `text` is provided, return `400 Bad Request`. if( !( "text" in req.body ) ) { return res.status( 400 ).json({ "message": "Invalid request" }); } const { text } = req.body;
// create the new note // The auth middleware stores the authenticated user info in `res.locals.user`. const newNote = notesCtrl.createNote( res.locals.user.sub, text );
// Add the new note URI in the `Location` header as per convention const newNoteURI = `/notes/${ newNote.id }`; res.setHeader( "Location", newNoteURI ); // send success response to the client with status code `201 Created`. // Also include the new note object in the response payload. res.status( 201 ).json( hateoasify( newNote ));}Next, replace the existing definition of the handler function deleteNote() in noteHandlers.js with this:
exports.deleteNote = ( req, res ) => { // delete the note from the database // The auth middleware stores the authenticated user info in `res.locals.user`. // The noteValidation middleware stores the current note in `res.locals.note`. notesCtrl.deleteNote( res.locals.user.sub, res.locals.note );
// send success response to the client res.status( 204 ).send();}I'll leave the testing of these endpoints to you. Just include the authentication token in the request headers and everything else will remain the same.
Boom🎆! The endpoints are secured using authentication and authorization.
Why not change the URI to /users/{uid}/notes/{nid}
Did you notice that even though the notes are now associated with a user, we have not nested our routes and changed them to /users/{uid}/notes/{nid}. This is because we are passing user-identifiers in the Authorization header which is the standard way of passing this information so having the user-identifier in the URI will be redundant.
The only benefit we'll gain by having the /users resource as a part of the path would be improved readability because it'll be obvious by looking at the URI that we are trying to fetch all notes for a particular user. The downside will be a longer URI slug.
My preference will be to not have the redundancy and keep the URI short. But you can use the approach that best suits your project's requirements.
Done✅! We have successfully implemented Authentication and Authorization in the Thunder Notes API using JWT.
If there was no separation between the client and server in our app, we'd authenticate the user and store some account details in session and not have to worry about authenticating this user again at least for the entire duration of the session.
But we've already discussed that REST APIs are Stateless and have no notion of whether an end-user is logged-in or logged-out. In a REST API based client-server relationship, it is the job of the client to manage user sessions.
Our implementation of authentication and authorization is in line with this constraint. We call the
/authservice first and then provide the JWT token as an authentication credential for every subsequent API call.
Congratulations! We have successfully implemented another core REST Constraint: Stateless.
Caching
Caching involves storing a copy of the data fetched from the server in a cache. The next time a client needs the same data, the data is fetched from the cache rather than by making a network request to the server.
Data retrieval from a cache is faster and reduces latency and user-perceived performance. End-users with paid mobile data plans or slower internet speeds benefit from less network requests and by avoiding repeat downloads of large resources. The server also benefits from the reduced workload of requests it needs to serve.
These benefits are the reason why Cacheability is one of the 6 core REST constraints and why API performance also becomes a key consideration while designing a REST API.
Broadly-speaking there are 3 types of Web Caches:
1. Private or Browser Caches
Private caches sit at the client's end and are unique to the end-user. Your browser's cache is a perfect example of a private cache. It only caches data from websites that you visit.
2. Proxy or shared caches
These are public caches that are deployed and managed by ISPs or large corporations. They are not specific to a client or to a server. They cache data from numerous websites for numerous end-users which is why they are shared.
3. Gateway or Reverse-Proxy Caches
These caches are deployed by the folks that manage the servers to reduce load and improve scalability. Just like a private cache sits on the client-end and is unique to the end-user, a gateway cache sits in front of the server and is unique to the application(s) on that server.
In the context of our Thunder Notes API tutorial, we're going to mainly focus on the browser's cache. But for the most part, the same principles will apply to a proxy cache as well.
Cacheable Requests
First of all, let's discuss what kind of requests can be cached.
In most cases, responses from GET requests will be the only candidates for caching.
Technically, responses from POST and PATCH can also be cached under certain conditions but it is very rare.
Responses from PUT and DELETE are never cached. A PUT request on a resource will also invalidate any existing cached data for the same resource.
How to Cache?
Once you have figured out which endpoints to cache, all you need to do is set the right headers while sending the response from the server to the client(the browser in context of this article).
These headers contain caching instructions for the browser and in a way provide answers to the following questions:
- Should I(the browser) cache this response?
- If yes, then for how long should I cache it?
- Can I use the data in the cache without confirmation from the server within the specified time period?
- What should I do when the data in the cache expires or becomes stale?
So you as an API developer need to set cache specific headers in the response such that the browser can get the answers to each of these questions.
What happens if these headers are not specified?
When the API response does not contain any value for these headers, browsers kind of "guess" the answers to those questions and cache what and when it makes sense.
Let's go ahead and check these headers out:
Expires Header
This is the simplest way to tell caches how long a resource is supposed to be cached. The value of this header is an HTTP date values(as shown below) which informs the client that this resource should be considered fresh until the specified date and time beyond which it should be considered stale.
Expires: Sat, 24 Oct 2022 12:40:41 GMTThe biggest drawback of using this header is that if the web server and the cache are in different time zones then the specified date and time can be misconstrued by the cache.
The Cache-Control header was introduced to address the limitations of the Expires header.
Cache-Control Header
This header uses one or more directives to instruct caches on how to cache the API response. These directives are:
max-age directive
This directive indicates the maximum amount of time in seconds during which the data in the cache can be considered fresh. The maximum value is 1 year. Unlike the Expires header value which is an absolute date and time, this value is relative and is unaffected by timezone differences.
For example, the below header instructs browsers to cache the data in the response for 3600 seconds or 1 hour.
Cache-Control: max-age=3600s-max-age directive
This is the same as max-age except it specifically targets shared/proxy caches, hence the "s-" prefix. A shared cache will give more precedence to s-max-age than max-age if both are specified.
For example, when the below header value is specified, browsers will cache the response for 1 minute but shared/proxy caches will cache the same response for 1 hour.
Cache-Control: max-age=60, s-max-age=3600public directive
Indicates that the response can be cached by all kinds of caches like browser, shared/proxy, etc.
Cache-Control: public, max-age=60private directive
Indicates that the response can be cached only by a private cache like a browser and not by a shared/proxy cache.
For example, with the below header value specified, shared/proxy caches will not cache the response but browsers will.
Cache-Control: private, max-age=60no-store directive
Indicates that the response should not be cached at all and any stored copies of it should be deleted right away. This is typically used when the response contains sensitive data like credit card details.
Cache-Control: no-storeno-cache directive
Indicates that the response can be cached but the client must validate its freshness from the server before using the cached version. We'll see how to validate freshness later down below.
Cache-Control: no-cachemust-revalidate directive
Indicates that once the cached data has become stale, it must be validated for freshness from the server and under no circumstances should a stale version of the response be used. This is because in some rare scenarios, the client/browser may choose to use the stale version like for example because of poor network connectivity, so this directive makes sure that that does not happen.
Cache-Control: max-age=3600, must-revalidateproxy-revalidate directive
This is the same as must-revalidate except it only applies to shared or proxy caches.
Cache-Control: s-max-age=60, proxy-revalidateIdeal and Practical Caching scenarios
The HTTP Specification states:
The goal of caching is to eliminate the need to send requests in many cases, and to eliminate the need to send full responses in many other cases. The former reduces the number of network round-trips required for many operations; we use an "expiration" mechanism for this purpose. The latter reduces network bandwidth requirements; we use a "validation" mechanism for this purpose.
The ideal scenario for caching would be that a fresh version of the response exists in the cache(preferrably the local browser cache). This will give us all of the following benefits:
- There will be no network request to the server since the data will be fetched directly from the local browser cache. This means latency will be almost eliminated.
- Reduction in server operational workload as the server won't have to service the request thereby avoiding costly database and I/O operations.
- The client won't need to receive or download the entire API response which means network bandwidth will be saved.
But practically, achieving all of these benefits with every request may not always be possible. Which is why the goal of caching is really to bring at least a few of these benefits to the table if not all of them and it'd still be considered a win.
This brings us to the next topic of discussion which is the Expiration and Validation Models.
Expiration Model
As per this approach, the server specifies a temporal or time-based deadline on the resource using either the Expires header or the max-age directive. The client will use the cached version of the response while the expiration time has not occurred and the response is still fresh.
Once the expiration time has reached, the client has two options, it can make a request to the server and fetch the resource all over again with updated caching instructions OR...it can employ the Validation Model if the stale response in the cache was configured with cache validators.
Validation Model
This model makes use of certain headers called cache validators specified in the API response by the server, to check whether the supposedly stale data in the cache is actually stale or is still fresh.
The ETag and Last-Modified headers are the cache validators that are employed to implement cache validation.
The ETag header
The Entity Tag or ETag header value identifies a specific version of a resouce. If the resource changes, a new ETag value must be generated for it.
The ETag value is simply a string of characters wrapped in double quotes.
ETag: "version1"But it is usually computed as a hash of the response body so everytime the body of the response changes, the ETag value changes with it. So the value typically resembles a cryptic string of characters.
ETag: "2234f35226f4ccbeb37b3c72f0f9f46854cd1eaac77bb1"Furthermore, by default, the ETag is treated as a "strong validator" meaning if the resource has changed in any way then it must have a different ETag value.
But there is a way to specify it as a "weak validator". Weak validation means that the response can change in a very subtle or insignificant way and still have the same ETag value. A weak validator is specified by prepending W/ to the ETag value.
ETag: W/"2234f35226f4ccbeb37b3c72f0f9f46854cd1eaac77bb1"We have seen an example of how the Github API uses weak validation in the response of the users/<username> endpoint in the previous article in this series. If you hit the below URL in your browser and check the response headers, you'll see a weak validator value for the ETag header.
https://api.github.com/users/saurabh-misraWe'll only be using the default/strong validators for our purposes but you can read more about weak and strong validators in case you want to.
The Last-Modified header
As the name suggests, this header's value is the date and time when the resource was last modified on the server. The value is specified in GMT for example:
Last-Modified: Sat, 24 Sep 2022 13:49:00 GMTThe Last-Modified header is considered a weak validator as compared to ETag (for reasons mentioned in this SO thread), which is why more preference is given to the usage of Etag rather than Last-Modified. But it is absolutely fine to use either or even both. The HTTP spec states it's preferrable to send both if possible.
How Expiration and Validation models work?
Let's go over a process flow for understanding how the Expiration and Validation models work in tandem to enable caching of data.
At first, there is no cached data in the local browser cache so the client makes an API call to the server to fetch the data. The server configures a response with expiration headers i.e. Cache-Control: max-age=60 and cache validators i.e. ETag or Last-Modified and sends it to the client.
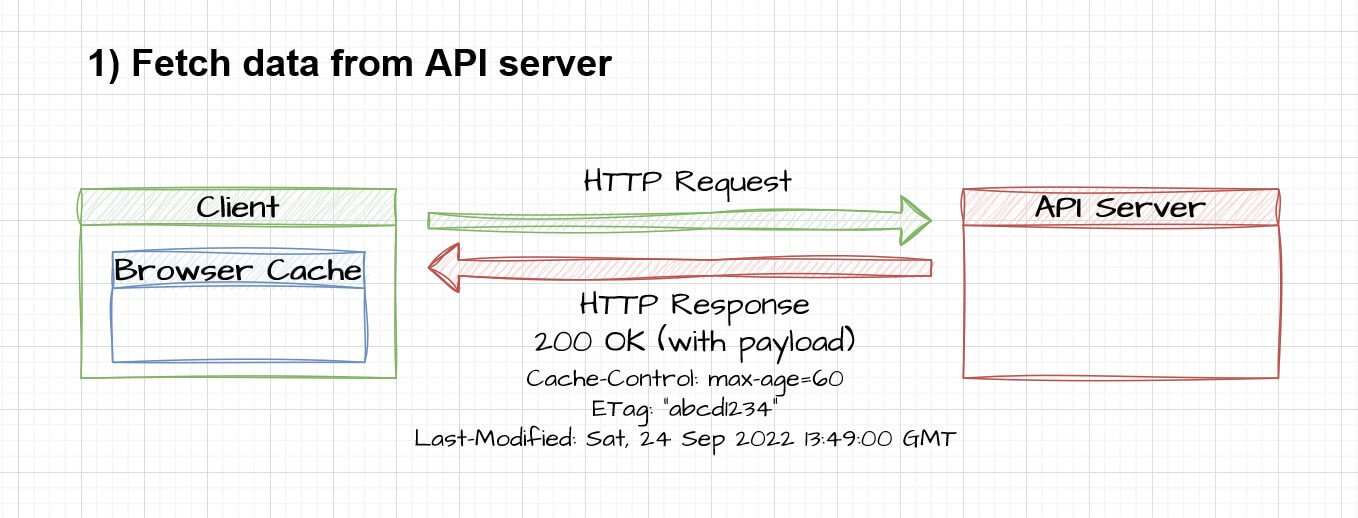
The client reads the caching instructions and caches the response. For future calls to the same API endpoint within a period of 60 seconds, it reaches out to the local browser cache and uses the cached data instead of starting a new request-response cycle with the server.

When the response in the cache becomes stale after 60 seconds, the client normally will need to invoke an API request to the server and fetch the data all over again. But since the server had specified ETag and Last-Modified headers in its initial response, the client invokes a special request with some additional headers with the intent to check whether the cached data is still fresh.
If the Etag was set, the client includes a header called If-None-Match in the request which is set to the same value as that of the ETag header.
If the Last-Modified header was set, the client includes a header called If-Modified-Since in the request which is set to the same value as that of the Last-Modified header.
When the server receives this request, it notices the presence of If-None-Match and If-Modified-Since. The server then re-generates the values for the ETag and Last-Modified headers and matches them with the values from the client request.
For now, let's suppose that these values match. This means that the resource hasn't changed and the data in the cache is still valid. The server skips generating the response body and sends a 304 Not Modified to the client without any payload in the response body ( thus saving network bandwidth) and with updated expiration information. The client re-uses the response from the cache and updates the expiration time for another 60 seconds.
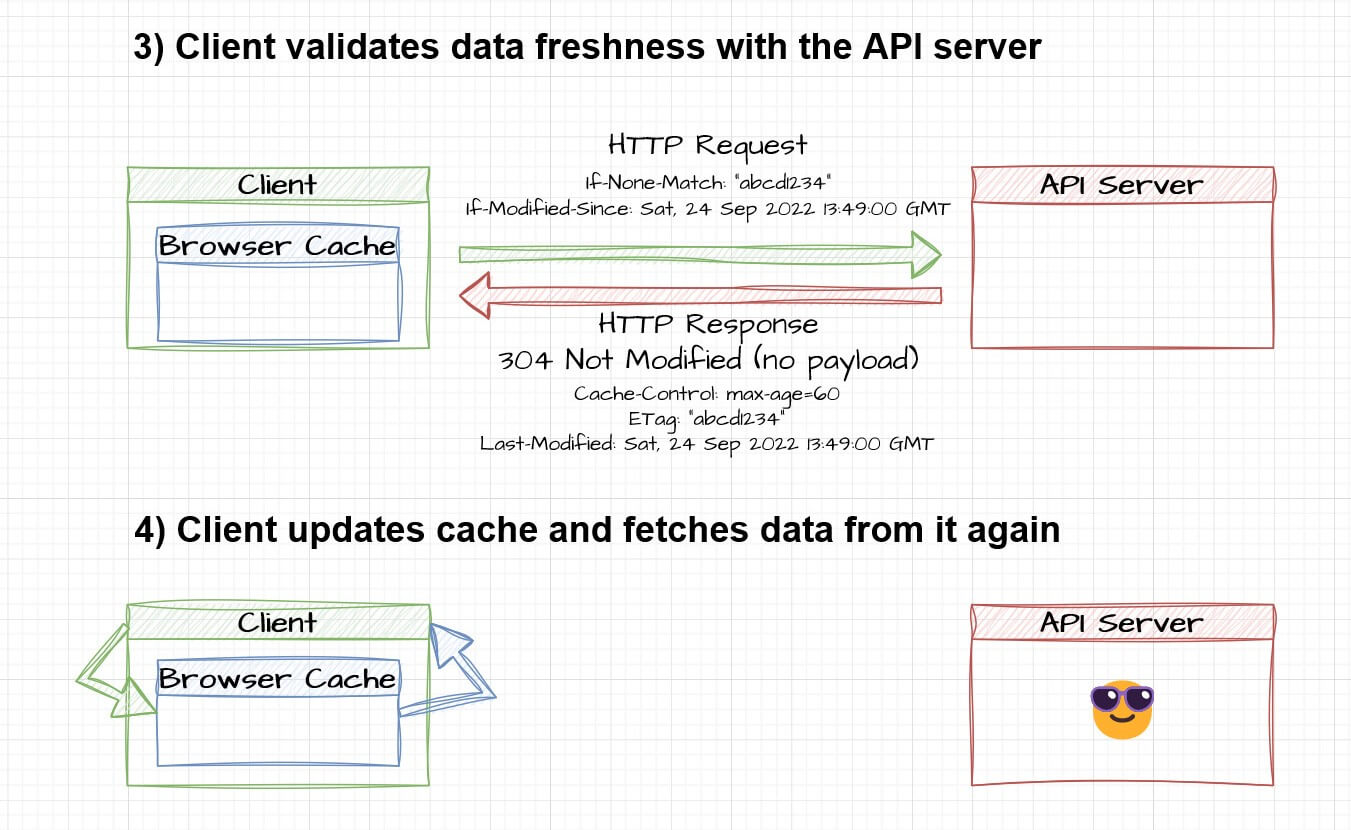
Now suppose that another 60 seconds have passed, the cached data has become stale once again and so the client again sends a request to the server to inquire whether the cached data is still fresh but this time, the resource has changed and the values in If-None-Match and/or Last-Modified-Since from the request do not match the fresh values generated by the server for ETag and Last-Modified headers. The server treats this request like a usual request i.e. it generates the response and sends a 200 OK response to the client with the payload in the response body, cache expiration information and updated ETag or Last-Modified header values. The client upon receiving this response, replaces the stale data in the cache with the fresh version.
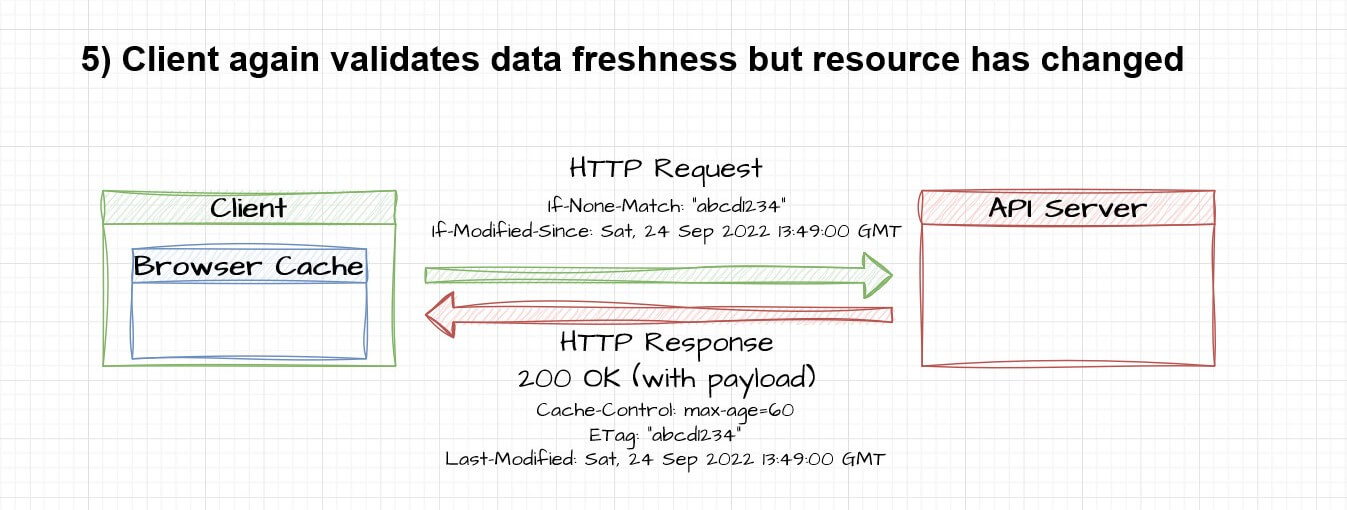
If you're wondering what is the use of the Validation Model when we inevitably have to make a network request to check whether the cached data is valid then remember that as we discussed, we may not be able to gain all the benefits of caching in this case but we still will be able to save network bandwidth by not sending the entire payload from the server to the client and hopefully also avoid some degree of processing on the server. So it is still a win🥇!
Implementing Caching in the Thunder Notes API
It's time to put what we have learnt into practice.
We'll be creating a new API service for retrieiving the user profile info and we're going to cache the response from this API service.
This new endpoint will be represented as:
GET /users/{id}The response from this API endpoint will look like this:
{ "id": "1", "name": "John Doe", "email": "johndoe@example.com", "createdAt": 1664639128609 }Chances are that once a user is registered, this information is rarely going to change. So this response seems like a good candidate for caching.
To start off, create a separate handler file called userHandlers.js within the handlers folder. This file will contain the route handling logic for the new API endpoint. We'll name the route handler function for the new API endpoint as getUserProfile(). Go ahead and paste the below code into the new file and save.
const crypto = require( 'crypto' );const usersCtrl = require( '../controllers/usersController' );
/* This method handles the "GET /users/:id" route. It returns additional user profile information using the basic user identifiers obtained from JWT payload. Since user profile data like name and email rarely change, this method uses HTTP Caching to cache the user profile data. Cache expiration is managed using the `Cache-Control` directive. `ETag` and `Last-Modified` headers handle cache-invalidation.*/exports.getUserProfile = ( req, res ) => { /* Get additional info about the user Use the `res.locals.user` object to obtain the authenticated and decoded payload from the auth middleware. */ const user = usersCtrl.getUserById( res.locals.user.sub ); const { id, name, email, createdAt, updatedAt } = user;
// construct the raw response const response = { id, name, email, createdAt };
// generate ETag from fresh data and set the ETag header. const freshETag = crypto .createHash( 'md5' ) .update( JSON.stringify( response ) ) .digest( 'hex' ); res.setHeader( "ETag", `"${ freshETag }"` );
/* Set the `Cache-Control` header. `private` means private caches like browsers will cache this data but public caches will not. `no-cache` will mandate that caches validate the cached data before using it. `max-age`, in this case, sets the cache to expire after 1 year. `must-revalidate` means caches must not use stale data in caches without validating it first. */ const cacheControl = "private, no-cache, max-age=31536000, must-revalidate"; res.setHeader( "Cache-Control", cacheControl ); // Use the `updatedAt` timestamp as the value for the `Last-Modified` header. res.setHeader( "Last-Modified", new Date( updatedAt ).toUTCString() );
// check whether the `If-None-Match` header sent by the client // in the request matches the `ETag` value we generated above with fresh data. const etagValidationIsSuccessful = req.header( "If-None-Match" ) && ( `"${freshETag}"` == req.header( "If-None-Match" ) );
// check whether the `If-Modified-Since` header sent by the client // in the request matches the `updatedAt` timestamp. const lastModValidationIsSuccessful = req.header( "If-Modified-Since" ) && ( new Date( updatedAt ).toUTCString() == req.header( "If-Modified-Since" ) ); // if the validation is successful, then return // a `304 Not Modified` header without any payload. if( etagValidationIsSuccessful || lastModValidationIsSuccessful ) { return res.status( 304 ).send(); } // if the validation is not successful, // then send the whole payload in the response. res.json( response ); }Let's try to understand what's going on here.
When the browser makes the very first request for accessing the user's profile, this handler function returns a 200 OK response along with the payload i.e. the user's profile info and sets headers for managing cache expiration and validation.
Let's quickly go through the Cache-Control directives we're sending in the response header.
The private directive means the response cannot be cached by shared or public caches but only by private or in-built browser caches.
The no-cache directive makes sure that the browser does not use the cached response without first validating from the server. This is just to make sure that if the user updates any of the fields in the response like his name or email address within the expiration period, then the browser should not display old values for those properties by using stale data from the cache.
The must-revalidate directive is a bit redundant but still makes sure that when the cached data becomes stale, then the browser must validate it from the server.
Lastly, the max-age directive sets the expiration period to 1 year(31536000 seconds) from the point when the response is received by the client.
The function also sets the ETag header value by hashing the response body. The Last-Modified header value is simply sourced from the value of the updatedAt field of the users entity in our JSON database in data.js.
The next time the browser needs to access the same data, it'll first try to validate the freshness of this data from the server by sending a request with the If-None-Match and If-Modified-Since headers set with the values from the ETag and Last-Modified headers respectively.
For this second request, our new route handler function will notice that the request contains the headers If-None-Match and If-Modified-Since. It will generate fresh values for the ETag and Last-Modified headers and compare them with the ones received in the request. If they match or as we'd like to call it, in case of a successful validation, it will not send the full response and instead will send a 304 Not Modified status with an empty response body and with updated values for the Cache-Control, ETag and Last-Modified headers.
The browser upon receiving this 304 Not Modified will update the cache headers in the cached response and will use the cached data.
In case the values received in the request do not match or in case of a failed validation, the function will just behave as if it received the request for the first time meaning it will send the full payload in the response body with 200 OK status and cache expiration and validation headers.
Now let's include this new file in routes.js towards the top.
const { getUserProfile } = require( "./handlers/userHandlers" );And also add the route.
// singleton user endpoint. Good example for Caching.router.get( "/users/:id", verifyToken, getUserProfile );Testing Caching behaviour in the browser
Let's see this new API service in action in a browser. I'm going to be using Mozilla Firefox but you can use any browser as long as it has a Dev Tools option.
First make sure you don't have your browser cache disabled. There should be a setting in the Dev Tools -> Network tab for this.
Next, go to Postman and generate a fresh authentication token.
Paste that token in the code below and then copy-paste this whole code in to the console window of your browser and hit Enter.
// make an AJAX call to the API endpointfetch( "http://localhost:3000/users/1", { method: "GET", headers: { 'Authorization': 'Bearer <jwt token>' } }) // parse the raw response as JSON .then( function( response ){ return response.json(); }) // log the response data on to the console .then( function( data ){ console.log( data ); }) // catch any errors that may happen .catch( function( err ){ console.log( err ); alert( "Uh oh! Something went wrong." ); });
Now check the Network tab. There should be an entry for this request along with request and response headers. The response will be a 200 OK with the expected payload in the response body and you will notice that the response contains Cache-Control, ETag and Last-Modified headers.

Now go back to the Console tab and run the same code once again. Again check the Network tab and check out the second request. You'll notice that the response is a 304 Not Modified instead of a 200 OK with no payload in the response body and there will be an indicator that the response was sourced from the cache instead of from the server.

Also, if you check the request headers for the second request, you'll notice that it'll have headers If-None-Match and If-Modified-Since inserted automatically by the browser. You'll also notice that these request headers are set with the same values as that of the ETag and Last-Modified header values received in the response of the first request.
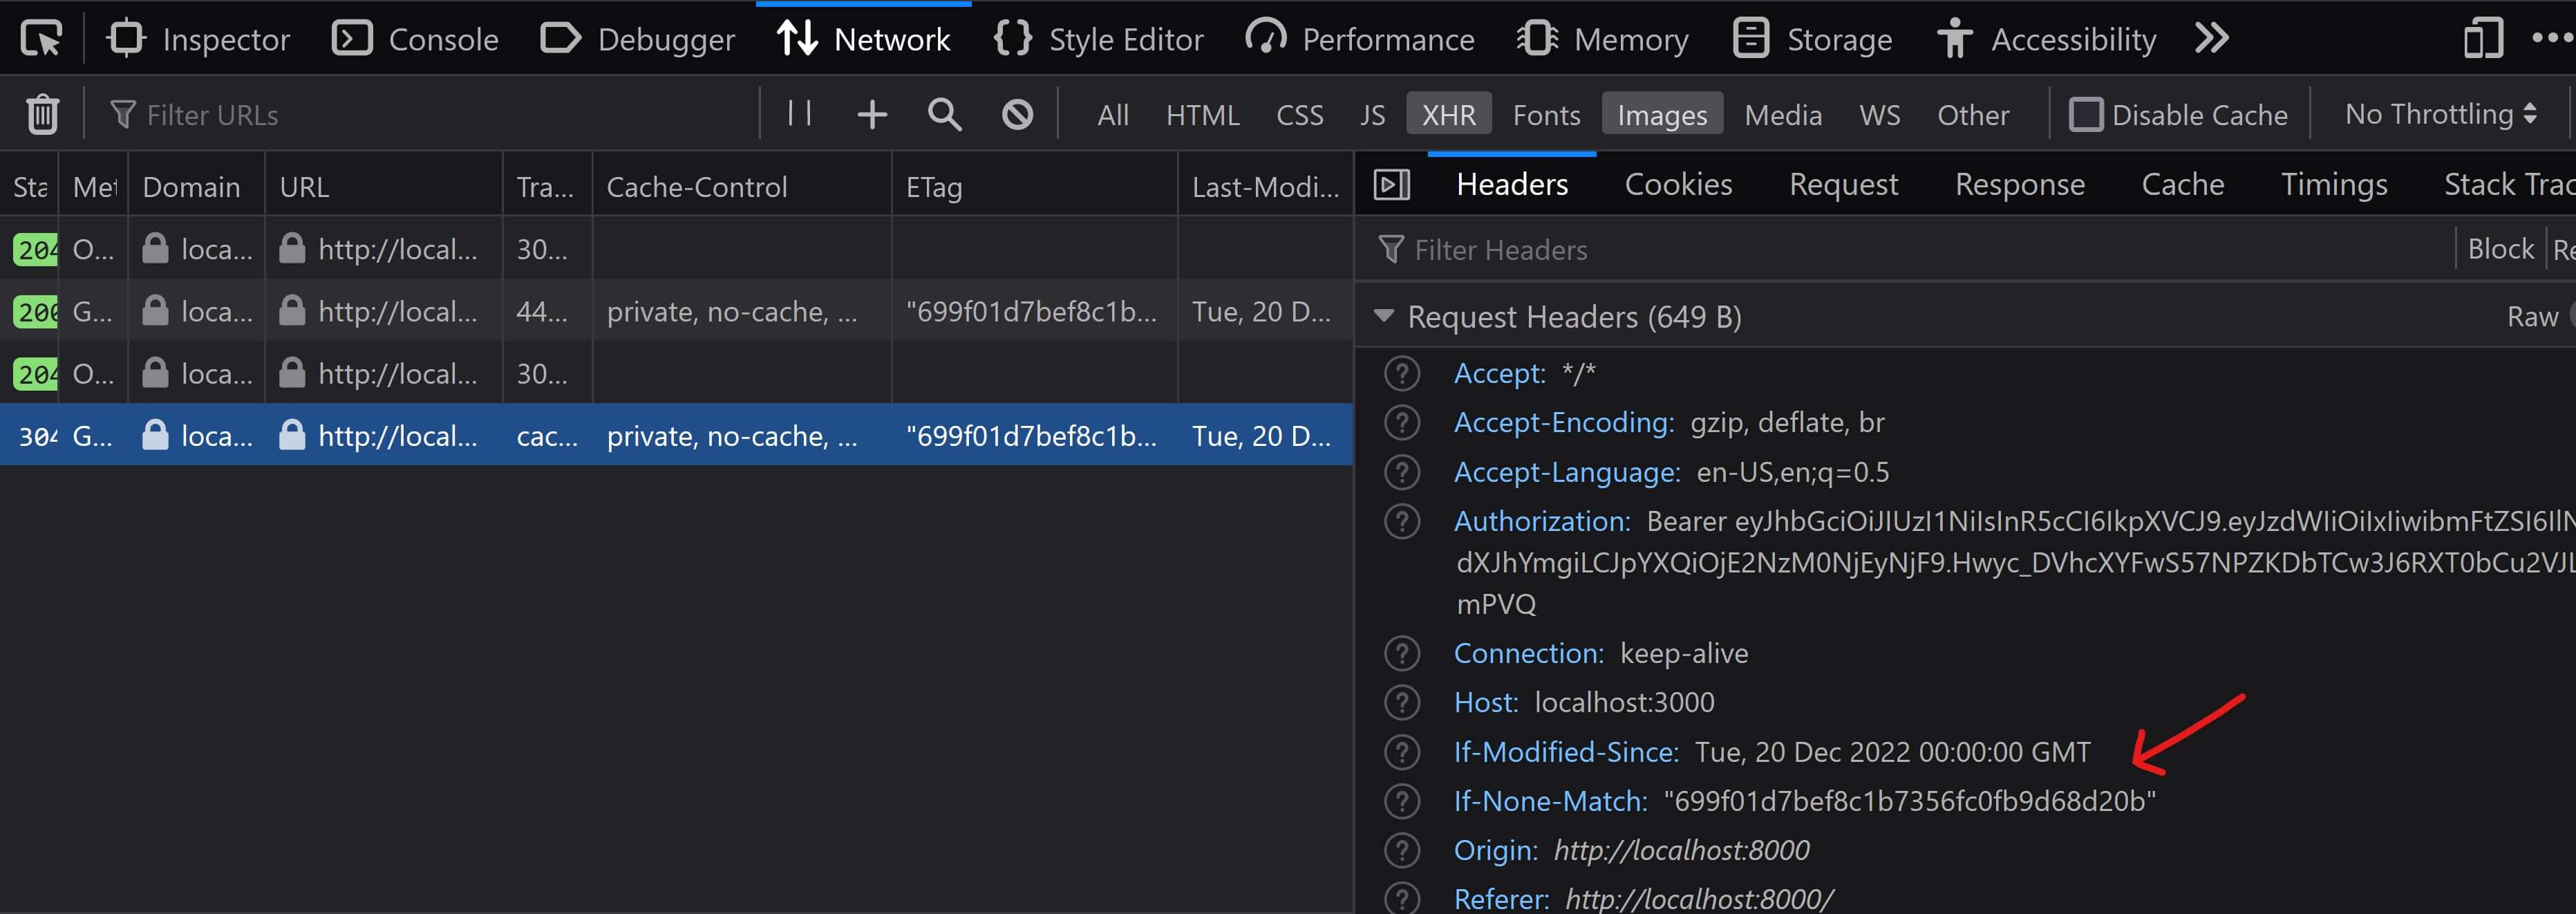
Again, this may not be the most ideal scenario for caching because we do end up making repeat HTTP requests to the API server for validating the cached data but we do save on network bandwidth because on each successful validation, the response is a 304 Not Modified without a payload in the response.
Please note that we'll not be implementing any other routes for creating, updating or deleting users since those concepts are already covered for the
notesresource. Implementing the same endpoints for theusersresource will be redundant since it won't contrbute anything new to this tutorial.
Woo Hoo🙌! We have successfully implemented Caching and covered another core REST constraint in our Thunder Notes API i.e. Cacheability. To recap, so far we have covered 4 out of the 6 REST constraints namely: Client-Server, Uniform Interface, Stateless and now Cacheability.
Layered System
In a simple client-server architecture, there are only two entities at the two ends of an HTTP request-response lifecycle, the client and the server. The client sends the request to the server and the server sends the response back to the client.
But we can have more entities in between the client and the server. We have already seen one such entity which is a Shared Cache. More examples include a Gateway or a Reverse Proxy, load balancers, etc. We can even have more than one type of server for example, our API server can be communicating with a Firebase or MongoDB database instance in the cloud which would mean that the overall application will have a separate API and Database layer.
Each such layer is only aware of the existence of the adjacent layer and nothing beyond that.
This decoupling helps encapsulate and restrict related complexity into individual layers and allows for independent evolution of each layer. The disadvantage of course being that each layer adds to the request latency and affects user-perceived performance. But this can be neutralised by effective caching strategies.
We'll go through a very basic demo of an API involved in a layered system architecture. This demo is going to be separate from our Thunder Notes API because we don't want to unnecessarily complicate things in our main tutorial API.
You'll notice that in your tutorial codebase, adjacent to your thunder-notes and finished-files folders, is a folder called layered-demo. Inside this folder, we have the usual client-server setup. BUT! There are three types of servers: an Authentication server, an API server and a DB server.
Run npm install and then npm start for each of these three project folders. You should have three servers running now:
- The auth server at
localhost:3000 - The API server at
localhost:3001and - The DB server at
localhost:3002
Go ahead and have a look at the app.js files in each of these three folders. Each of these three servers only have a single route definition for the root endpoint which is defined in app.js.
Here is a diagram to give you an overview of the layers involved and their interaction in this demo.

A client request first arrives at the Authentication server. The server expects any request to carry an API KEY in the Authorization header. If the API KEY is present, it forwards the request to the API server other returns a 401 Not Authorized.
Let's send a GET request to the auth server http://localhost:3000 and see what happens.

Since we have not provided an API KEY, the auth server returns a 401 Not Authorized response.
Before we provide an API KEY, lets try to send the same GET request to the API and DB servers and see what happens.


In both cases, you'll notice that the servers return a 403 Forbidden meaning you don't have direct access to these servers. The API server only accepts requests from the Auth Server and the DB server only accepts requests from the API server. This is intentional and we have built a very simply mechanism in the app.js files of the API and DB server projects for this.
Ok now, let's provide a valid API KEY in the request to the Auth Server and see what happens.
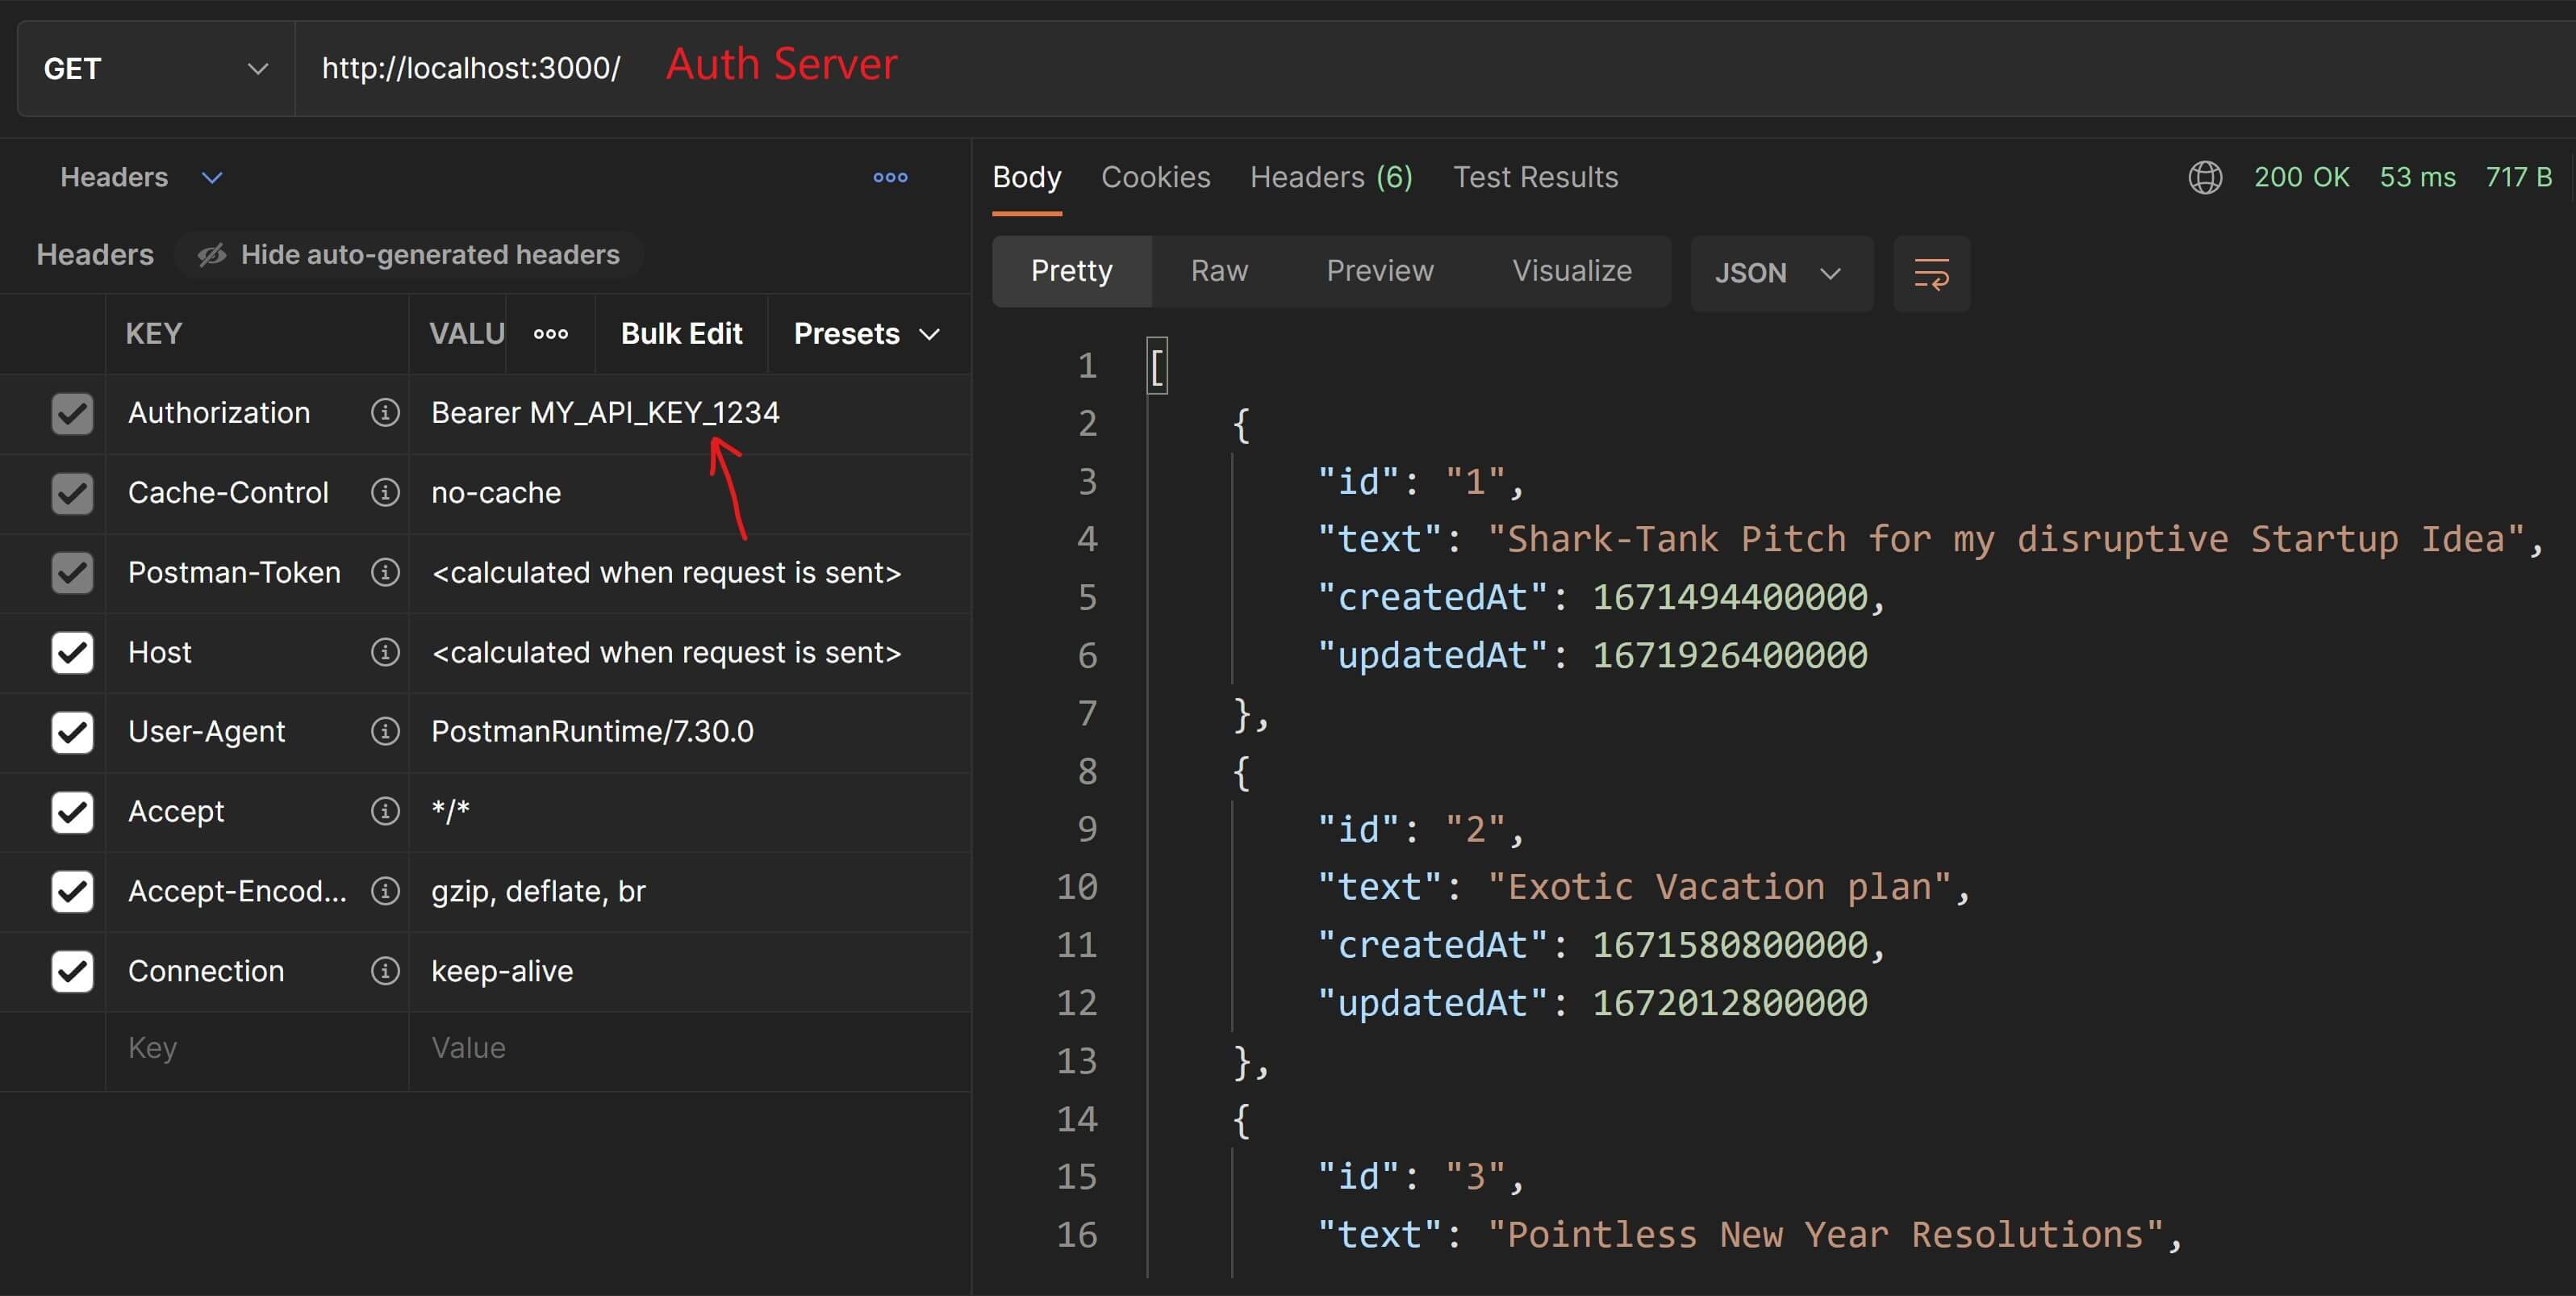
We get a successful response back. The request is sent to the Auth server, then to the API server and then to the DB server. The DB server returns the data to the API server which forwards the response to the Auth server which in turn forwards it to the client.
We are using an NPM package called superagent for making
GETrequests from within our NodeJS and ExpressJS based API.
Awesome🔥! We have covered the implementation of yet another core REST constraint taking our tally to 5 out of 6. Only one more constraint remains which we'll look at next.
Code-on-Demand
While the other 5 architectural constraints are mandatory for an API to be considered truly RESTful, the 6th and final constraint which is Code-on-demand is optional.
This constraint states that in certain situations, the API can send executable code like Java Applets or Javascript to the client that the client can then execute directly.
I'll use the analogy of noodles🍜. Most of the times, API clients want to cook their own noodles in their own way(handle the UI and UX the way they want). But some times, they want ready-to-cook or ready-to-eat noodles which they can consume with minimal to no effort(simple third-party widgets, UI components or services that directly run of the front-end). That is where code-on-demand comes in.
The previous article in this series has a great real-life example of a situation which may require code-on-demand to be implemented in the API along with considerations of the advantages and disadvantages.
Similar to the Layered System demo we saw in the previous section, we'll go through a really simple implementation of Code-On-Demand which will be unrelated to our Thunder Notes API to avoid unnecessary complexity in our main tutorial API.
You'll notice that in your tutorial codebase, adjacent to your thunder-notes and finished-files folders is a folder called cod-demo. This folder contains our demo for this section.
Inside this folder, we have the usual client-server setup.
Do a cd into the "cod-demo/server/" folder and run npm install followed by npm start. This will launch our API server for the demo on http://localhost:3000/.
If you take a look inside the server folder, you'll notice we have an app.js that handles the root endpoint. The handler function instead of returning JSON or plain text is returning JavaScript code in the form of an alert() statement.
app.get( "/", ( req, res ) => { // return some executable JS code in the API response res.setHeader( "Content-Type", "text/javascript" ); res.send( "alert( 'Namaste World!🙏. The JS code behind this alert was sent by the API server and then executed by your browser.' )" );});Now go to the "cod-demo/client/" folder and simply open the index.html in your browser. You'll see an alert dialog like this:
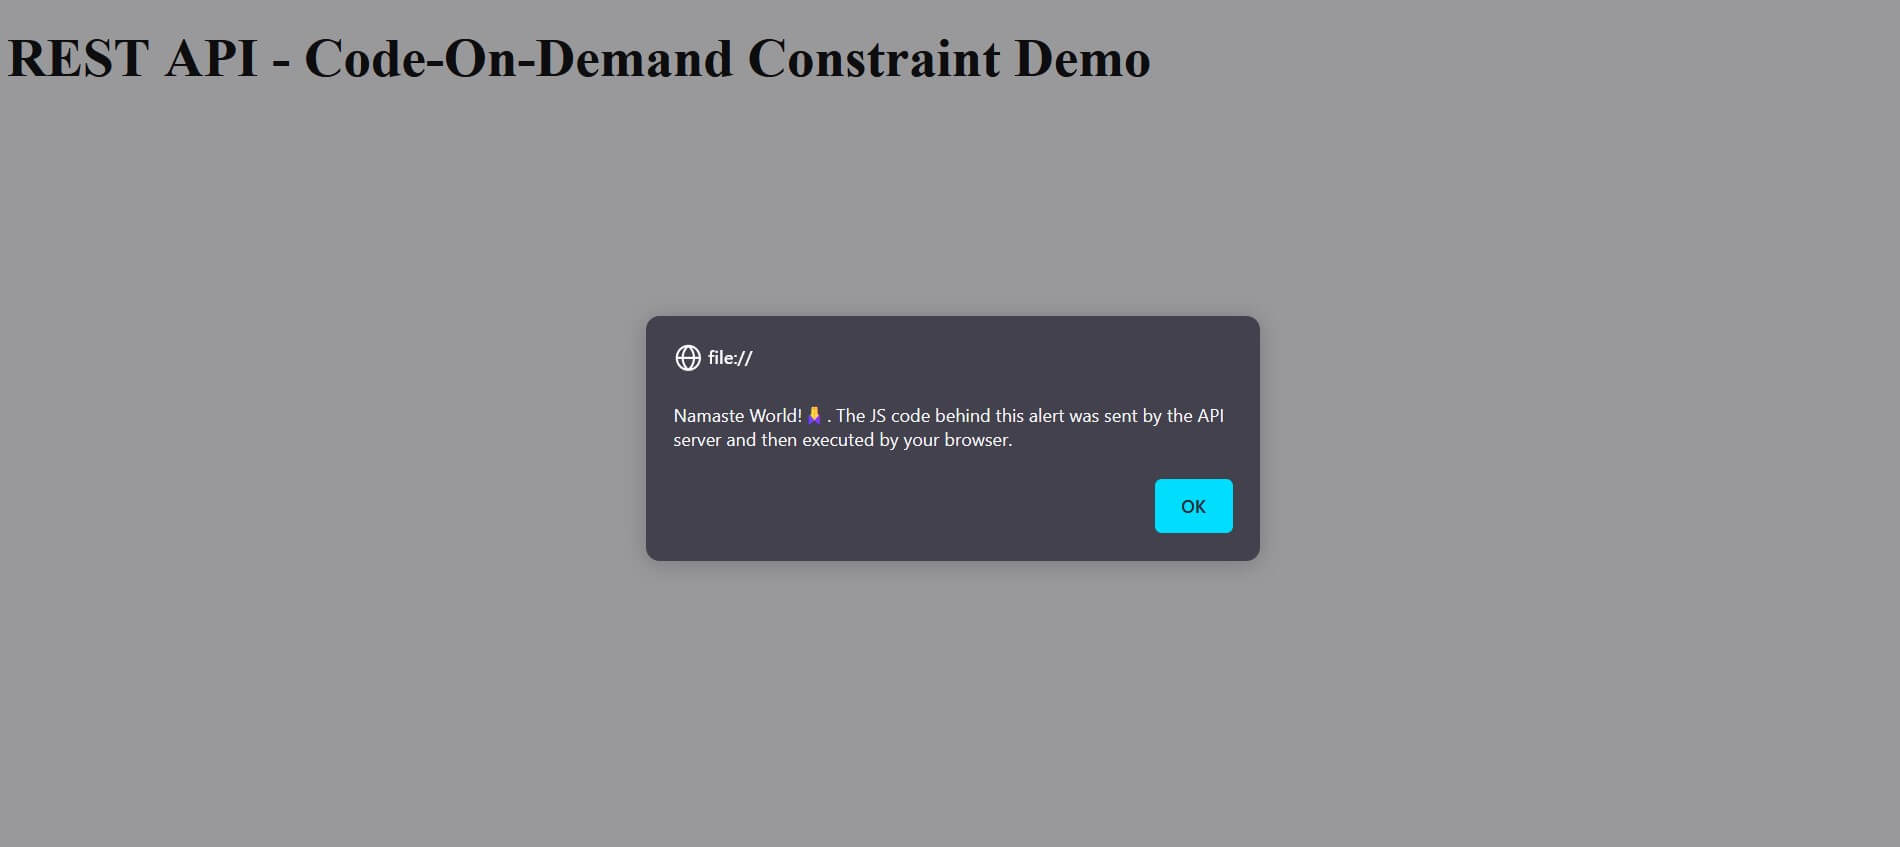
So what just happened?
If you look at the code in index.html, you'll notice that we are making a GET request to the root API endpoint and then evaluating the JavaScript response which executes it and displays the alert() dialog.
// make an AJAX call to the root API endpointfetch( "http://localhost:3000/" ) // parse the raw response into plain text .then( function( response ){ return response.text(); }) // run the executable JavaScript code .then( function( executableJSCode ){ eval( executableJSCode ); }) // catch any errors that may happen .catch( function( err ){ console.log( err ); alert( "Uh oh! Something went wrong." ); });Code-on-demand can be useful if your API intends to provide widgets or similar functionality to your API clients.
BOO YAH🎆🥳🙌!! And just like that, we have covered the implementation of all of the 6 core REST constraints. Kudos to you if you made it this far. We'll cover some more essential topics related to REST APIs next.
Versioning
Before releasing your API, you are of course free to make whatever changes you want to the API without disrupting anything.
But once you have released your API and it is being used by clients and their users, you cannot make changes to the API whenever you wish.
This is where API versioning comes into play.
An effective versioning strategy allows you to make and publish your changes to your API while making sure that these changes do not break existing functionality on the clients' side and also informs them how they can avail the new and improved functionality.
So maybe in the beginning, you designed your API without considering versioning which is fine. But then later down the line, when you want to push bug fixes, new API services and changes to existing API services, then you must consider implementing a versioning strategy into your API.
Let's consider the different strategies for API versioning.
URI Path
The most commonly used and the most straight-forward approach is to include the version in the URI itself.
https://example.com/api/1/messageshttps://api.example.com/v1/messages
https://example.com/api/2/messageshttps://api.example.com/v2/messagesThe biggest pro of this approach is of course, the simplicity.
The biggest con is that it contradicts the basic REST guideline that URIs should only contain resources.
All things considered, this is a pretty viable and perhaps the most widely used approach. As an example of real-life application, Twitter uses this approach for its API.
Query String parameter
Here you can specify the version as a query string parameter.
https://api.example.com/messages?version=1The advantage here is again simplicity but also the fact that you can specify a default value and avoid specifying it in the URL everytime.
Accept header
If you want to keep your URLs clean, then the next best thing to do is include the version information in your headers.
The Accept header is one option.
Accept: version=1
Accept: application/vnd.com.example.messages+json;version=1
Accept: application/vnd.com.example.messages-v2+json
Accept: application/vnd.com.example.messages.v2+jsonCustom Header
If the format of the Accept header seems confusing and you want something more specific to the context of versioning the API, you can always use custom HTTP headers.
X-Accept-Version: 1.0
X-API-Version: 2.0The Github API uses this approach for versioning. It uses a custom header named X-GitHub-Api-Version.
When do we need to up-version our API?
It's important to understand when you should consider upgrading the API to a newer version because up-versioning involves a lot of overhead. You have to deprecate the previous API, inform clients and give them a conservative ultimatum before completely shutting down the previous version.
An API needs to be up-versioned when you make breaking changes.
These changes include:
- Adding new required input(s) to existing API services
- Changing the name of a property in the response. For example
fnametofirstname - Removing a property from the response
Changes such as adding new API services or adding non-mandatory input parameters to existing ones usually do not constitute breaking changes and may not require an upgrade to the version number.
Good job👍! We're done with learning about versioning REST APIs. Let's move on the next topic of discussion.
Pagination
Pagination is basically splitting a large result set into manageable chunks or pages that can be processed and presented one at a time.
The most obvious example would be Google's search results page which splits the search results into pages and shows you the most relevant results on the first page and at the bottom, displays links to browse to other pages.
Your Twitter feed or Youtube home page recommendations are other examples that may not display page numbers but load more tweets or videos as you scroll down.
Why?
API designers need to implement pagination when dealing with large result sets. This helps in reducing the workload on the server, keeps the API performant and improves scalability and also reduces network bandwidth as less data needs to be transmitted.
Let's have a look at the most common approaches for paginating your API services. All of these approaches use query string parameters appended to the URI to specify pagination specific instructions.
Offset-based or Page-based Pagination
This is the most common and simplest of all the approaches. It uses two query string parameters limit and offset. You can name them whatever you like but the idea is that limit denotes the maximum number of records in a single page and offset means the number of records to skip.
For example:
https://api.example.com/messages?limit=10&offset=20This URI instructs the server to skip the first 20 messages and then return a maximum of 10 messages.
This approach also intuitively falls in line with SQL database queries that can be constructed as follows:
SELECT * FROM tblMessages ORDER BY created_at DESCLIMIT 10OFFSET 20;You can also use a parameter like page instead of offset and derive the offset value from page and limit.
https://api.example.com/messages?limit=10&page=3The main disadvantage of the offset approach is slow performance when the offset value is large, something like 1000000 because in these cases, the query has to iterate through these many records to skip them before it can select the required number of records.
Another disadvantage is that if new records are added to the result set while the current page is being viewed, the next page may contain duplicate records from the first page. For example, say suppose you're scrolling through messages. You're on the first page with 10 messages and while you're looking at these 10 messages, 10 new messages are added to the result set. Now when the second page is fetched, you'll see the same 10 messages from the first page.
When should you use this approach?
This approach is ideal when you want the user to be able to jump to any page like for example in Google Search Results.
Cursor-based or Keyset or Seek Pagination
This is a bit more complicated than offset but widely-used approach for pagination.
The idea here is to select a certain number of records that fall after or before a certain key value. The last item for the current page provides the value of the key for the next page. Either the client can send this key value to the server to fetch the next page or the API can provide a HATEOAS-based URI in the first response that the client can directly use to fetch the next page without worrying about the key value.
Since each page depends upon the previous one, the trade-off of this approach is that we cannot skip to any arbitrary page and can only paginate sequentially. This is why this approach is ideal for apps that implement infinite scrolling for example, your Twitter feed or Youtube home page recommendations, etc.
This approach typically uses either creation or updation timestamps or unique database identifiers as the key values. Let's look at both these sub-types below:
Time-based keyset pagination
Let's consider an example for the entity messages. It would be intuitive to think of the UI displying the most recent messages and then loading more pages or more messages as we scroll down.
This means that the result set will be sorted in descending order on the creation timestamp.
The first page won't really have any key value specified. It'd simply be:
https://api.example.com/messages?limit=10For fetching the next page of 10 records, we'll have to extract the key value of the 10th item in the current page. Let's suppose that the creation timestamp of the 10th item in the current page is 2022-10-15T00:00:00. The client's intention with the second request will be to fetch a set of 10 records that have been added before(since the result set is sorted in descending order) this creation timestamp key value. The URI for fetching the second page will look like:
https://api.example.com/messages?limit=10&created_before=2022-10-15T00:00:00For a SQL database, you can run the following query to get results for the requested page:
-- 1st pageSELECT * FROM messagesORDER BY created_at DESCLIMIT 10
-- 2nd pageSELECT * FROM messagesWHERE created_at < '2022-10-15T00:00:00'ORDER BY created_at DESCLIMIT 10The benefit here is that the key value is used in WHERE conditions in the corresponding database queries. So it works well when the key offsets a large number of rows because the database can actually skip those many rows unlike in offset pagination where it has to iterate through all of them.
A concern with this approach is that the timestamp is not unique and can be the same for more than one messages or entities. This can cause some messages to be skipped with the conditions in the WHERE clause
message9 // 2022-10-14T00:00:00 // page 1message10 // 2022-10-15T00:00:00 // page 1 ( last item )message11 // 2022-10-15T00:00:00 // skipped ( same timestamp as message10 )message12 // 2022-10-15T00:00:00 // skipped ( same timestamp as message10 )message13 // 2022-10-16T00:00:00 // page 2 message14 // 2022-10-16T00:00:00 // page 2This is a rare but plausible scenario. It can be avoided by using high resolution timestamps.
Cursor-based Keyset Pagination
In this approach, a cursor refers to a unique and immutable pointer to a specific element in the data set which serves as the key value for keyset pagination. The ID of a database table is a good candidate for a cursor. This is very similar to the time-based keyset approach with the only difference being that we are using a unique ID instead of a technically-not-so-unique timestamp as the key.
For example, let's suppose we have a simple integer ID in a database table. The first request will simply be:
https://api.example.com/messages?limit=10The client gets the ID of the last item of the current page and sends that value as the cursor value for fetching the next page.
https://api.example.com/messages?limit=10&cursor=12For a SQL database, you can run the following query to get results for the requested page:
-- 2nd pageSELECT * FROM messagesWHERE id > 12ORDER BY idLIMIT 10Opaque cursors
It is kind of a standard practice to encode your cursors using Base64 encoding and make them opaque. This hides implementation details such as whether you are using an integer ID or a UUID or maybe a custom value for the cursor.
So for example, this URI uses the original UUID from the database table as the cursor value.
https://api.example.com/entities?limit=10&cursor=8a26de37-00f2-4d4b-9166-95c76e0b1d0eWe can base64-encode this value and the URI would appear as:
https://api.example.com/entities?limit=10&cursor=OGEyNmRlMzctMDBmMi00ZDRiLTkxNjYtOTVjNzZlMGIxZDBlThe Slack API uses Base64-encoded cursors because their cursor values(before encoding) look something like this:
user:W07QCRPA4The LHS denotes the entity name and RHS denotes the id value so in this case the RHS denotes the user ID. Base64-encoding this value keeps it compact and hides implementation detail.
This also gives them the flexibility to use this same strategy to convert their offset-based paginated API services into cursor-based by using cursor values as:
offset:10Real-life examples of pagination strategies
There is no one-size fits all solution here. You should choose the approach that best suits the needs of your project or team or personal preferences. There are lots of enterprise-level applications out there that make use of either one or more than one or all of these approaches.
1. Github's REST API uses page-based pagination with the URL params as per_page and page.
https://api.github.com/search/code ?q=addClass+user%3Amozilla &per_page=50 &page=22. Atlassian's Confluence REST API uses offset-based pagination with the URL params as limit and start.
http://localhost:8080/confluence/rest/api/space/ds/content/page?limit=5&start=53. The Twitter API documentation states that they use cursor-based keyset pagination using a pagination_token URL parameter.
https://api.twitter.com/2/users/2244994945/tweets ?tweet.fields=created_at &max_results=100 &start_time=2019-01-01T17:00:00Z &end_time=2020-12-12T01:00:00Z &pagination_token=7140k9The Slack API Team has written a wonderful article about how they started out with Offset-based pagination but then gradually moved on to Cursor-based pagination. They also mention a few services that still use time-based keyset and offset-based pagination.
Pagination with HATEOAS
So far we have seen how we can use query-string parameters to implement the different pagination approaches. But remember what we learnt in the HATEOAS section about the REST API being browseable just like a web page. Your entire API design should resonate this notion and pagination is no different.
Instead of letting clients figure out the next value for the offset or page or cursor parameters, we'll include links to relevant pages in the API response for the current page.
Here is a sample API response of the 5th page of a dummy data-set that uses page-based pagination.
{ ... ... "links": { "self": "https://api.example.com/messages?limit=10&page=5", "first": "https://api.example.com/messages?limit=10&page=1", "prev": "https://api.example.com/messages?limit=10&page=4", "next": "https://api.example.com/messages?limit=10&page=6", "last": "https://api.example.com/messages?limit=10&page=10" }}The client can use these links to easily navigate from one page to another without worrying about the next key or offset value to be used.
We can also make this dynamic and omit certain pagination properties when they not applicable any more.
For example, if the client makes the request for the last page, then the next and the last properties can be omitted from the response.
{ "links": { "self": "https://api.example.com/entities?limit=10&page=10", "first": "https://api.example.com/entities?limit=10&page=1", "prev": "https://api.example.com/entities?limit=10&page=9", }}The client will notice the absence of these properties and realize that the data-set has reached the last page and accordingly design the UI to reflect this scenario.
Implementing Pagination in the Thunder Notes API
To better understand pagination, we'll implement it for the GET /notes API endpoint using page-based pagination.
First, let's create a new file called paginationController.js and place it inside the controllers folder. Add the below content to it.
/* Calculates and returns the value of the last page given an array of items and the limit value. For example, if there are 30 items in the array and the limit is 10, then the function will return 3.*/const getLastPage = ( arrItems, limit ) => Math.ceil( arrItems.length / limit );
/* Returns a subset of an array of items that fall within the current page along with the value of the last page.*/exports.paginate = ( arrItems, page, limit ) => { const lastPage = getLastPage( arrItems, limit );
// calculate the minimum and maximum index of the items for the current page const minIndex = page == 1 ? 0 : ( ( page - 1 ) * limit ); const maxIndex = page == lastPage ? ( arrItems.length - 1 ) : ( page * limit ) - 1;
// Filter out items that do not fall between the minimum and maximum index const paginatedResults = arrItems.filter( ( item, index ) => index >= minIndex && index <= maxIndex );
return { paginatedResults, lastPage }}You can read the comments to better understand the purpose of each of the methods in the above file.
In noteHandlers.js, include this new file at the top.
const { paginate } = require( "../controllers/paginationController" );Now replace the existing handler function getNotes() with this new version.
exports.getNotes = ( req, res ) => { // get all info about the user const user = getUserById( res.locals.user.sub );
// Initialize params for pagination. // This makes sure that we set defaults if these are not included in the URI. const params = { limit: req.query.limit || 2, page: req.query.page || 1 };
// validate query-string params if( isNaN( params.limit ) || isNaN( params.page ) || params.limit < 0 || params.page < 0 ) { return res.status( 400 ).json({ "message": "Invalid request" }); }
// get array of note objects from the array of note IDs let responseNotes = notesCtrl.getNotesByIds( user.notes );
// paginate the results so that only results in the // current page are included in the response const paginationInfo = paginate( responseNotes, params.page, params.limit ); responseNotes = paginationInfo.paginatedResults; params.lastPage = paginationInfo.lastPage;
// add links for HATEOAS and return the response JSON res.json( hateoasify( responseNotes, params ) );}Let's discuss the changes. The handler expects two pagination related query-string params called limit and page. If these are not included in the URI, then we set default values for them. What this means is that even if the client does not intend to use pagination, we still constrain our result-set. This is a common practice that real-life APIs employ to reduce the amount of data that they need to send in the response by default.
We then use the paginate() controller function that we just added so that only the notes for the current page are included in the response.
And then finally, we pass params to the hateoasify() controller function.
We'll need to modify the definition for hateoasify() in hateoasController.js to accept this new input argument.
exports.hateoasify = ( response, params ) => { const isCollection = Array.isArray( response );
return isCollection ? hateoasifyNotes( response, params ) : hateoasifyNote( response );}Since we forward the params input argument to hateoasifyNotes(), we'll have to change its definition as well but before we do that, let's add a new function to hateoasController.js.
/* This function takes different params related to pagination, filtering and sorting as inputs and concatenates them into a complete query-string ready to be used in a URL. For example, if I call `generateQueryString( "foo", 10, 2, "updatedAt", "desc" )`, this function will return the string: "?q=foo&limit=10&page=2&sort=updatedAt&order=desc" */function generateQueryString( limit, page, filter, sort, order ){ const arrQueryParams = [];
if( filter && filter != "" ) { // since the search string can contain user-entered text, // make sure to URL-encode it. arrQueryParams.push( `q=${ encodeURIComponent( filter ) }` ); }
if( limit ) { arrQueryParams.push( `limit=${ limit }` ); }
if( page ) { arrQueryParams.push( `page=${ page }` ); }
if( sort ) { arrQueryParams.push( `sort=${ sort }` ); }
if( order ) { arrQueryParams.push( `order=${ order }` ); }
// convert the array to a list(string) delimited by "&". return arrQueryParams.length ? `?${ arrQueryParams.join( "&" ) }` : "";}This is kind of a utility function that will take in our limit and page parameters and generate a query-string like ?limit=10&page=2. This function will also cater to filtering and sorting parameters as we'll see later.
Now let's make that change we discussed to hateoasifyNotes(). We'll add the new input argument params and then use it to create HATEOAS links in the response namely first, prev, next and last.
function hateoasifyNotes( responseNotes, params ) { const { limit, page, lastPage } = params;
// Add a `links` array to each individual note object within the collection. // The `self` URI can be used to fetch more info about the note. responseNotes.forEach( n => { n.links = [{ rel: "self", href: `/notes/${ n.id }`, method: "GET" }] });
// Add a "links" array for the entire collection of notes. const links = [ { rel: "self", href: `/notes${ generateQueryString( limit, page ) }`, method: "GET" }, { rel: "add-note", href: "/notes", method: "POST" } ];
// Add pagination links `first`, `prev`, `next` and `last` to the `links` array. // Don't include `first` and `prev` in the `links` array for the 1st page. if( page > 1 ) { links.push({ rel: "first", href: `/notes${ generateQueryString( limit, 1 ) }`, method: "GET" }); links.push( { rel: "prev", href: `/notes${ generateQueryString( limit, page-1 ) }`, method: "GET" }); } // Don't include `next` and `last` in the `links` array for the last page. if( page < lastPage ) { links.push({ rel: "next", href: `/notes${ generateQueryString( limit, parseInt( page ) + 1 ) }`, method: "GET" }); links.push({ rel: "last", href: `/notes${ generateQueryString( limit, lastPage ) }`, method: "GET" }); }
return { notes: responseNotes, links };}We're done with the implementation and now let's head over to Postman and give these changes a spin.
For our testing we'll use the first user i.e. saurabh@example.com. That user has 3 notes associated with it. The default value for limit is set to "2", which means the complete response will be split into two pages. Send a GET request to the /notes endpoint without defining any query string parameters for pagination. The defaults will kick in and will return a response like in the screenshot below:
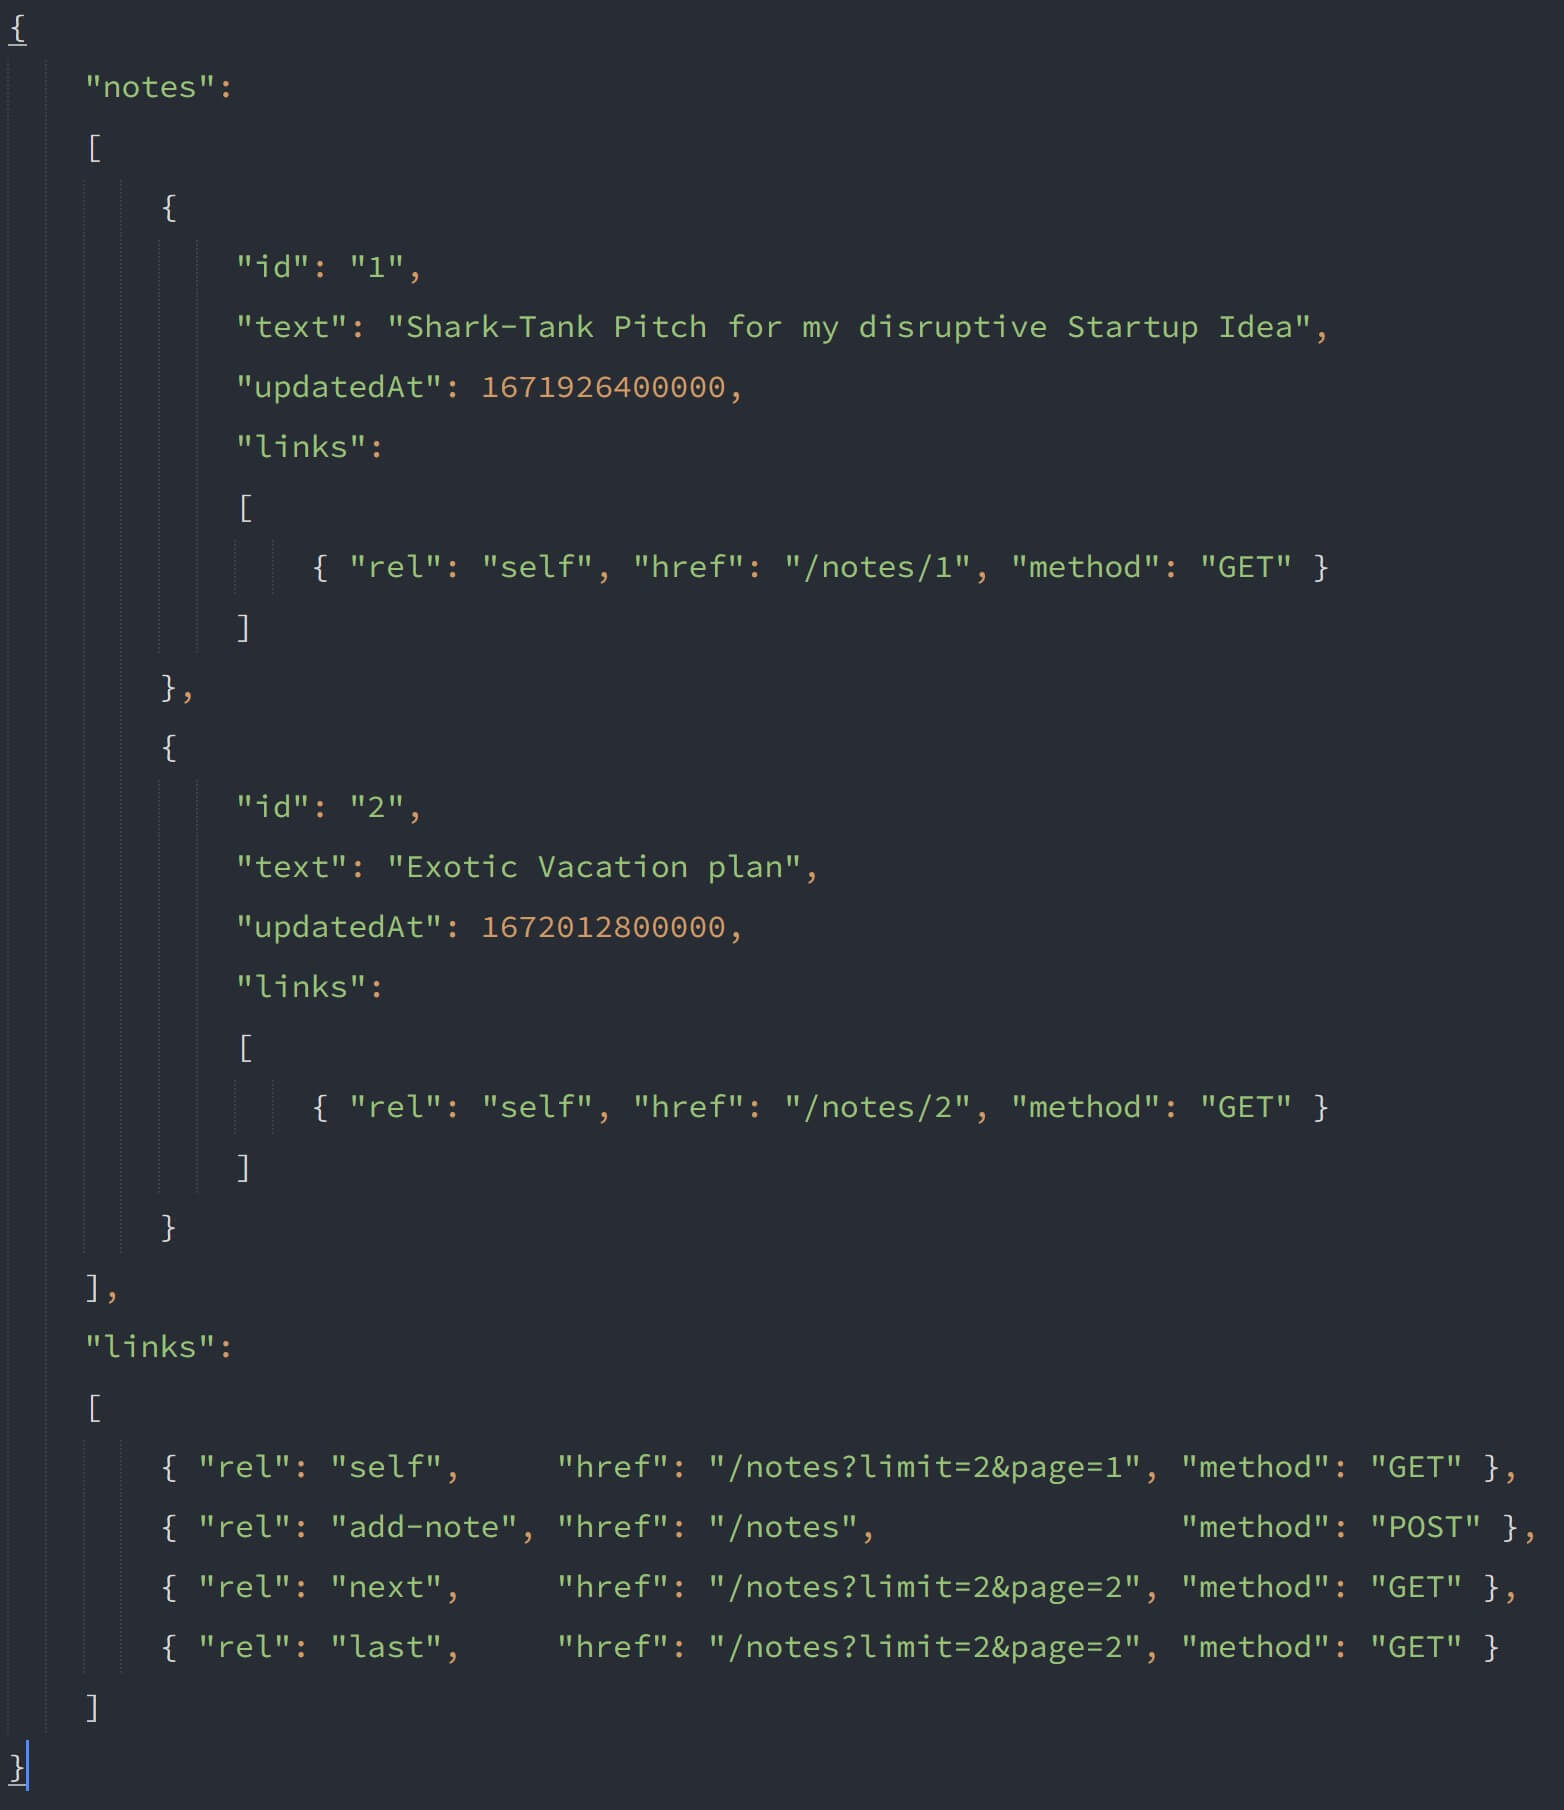
The response will also contain a link to the second page in the next and last properties in the links array so if you hit either one of those, you'll receive the second page response with the last note in it.
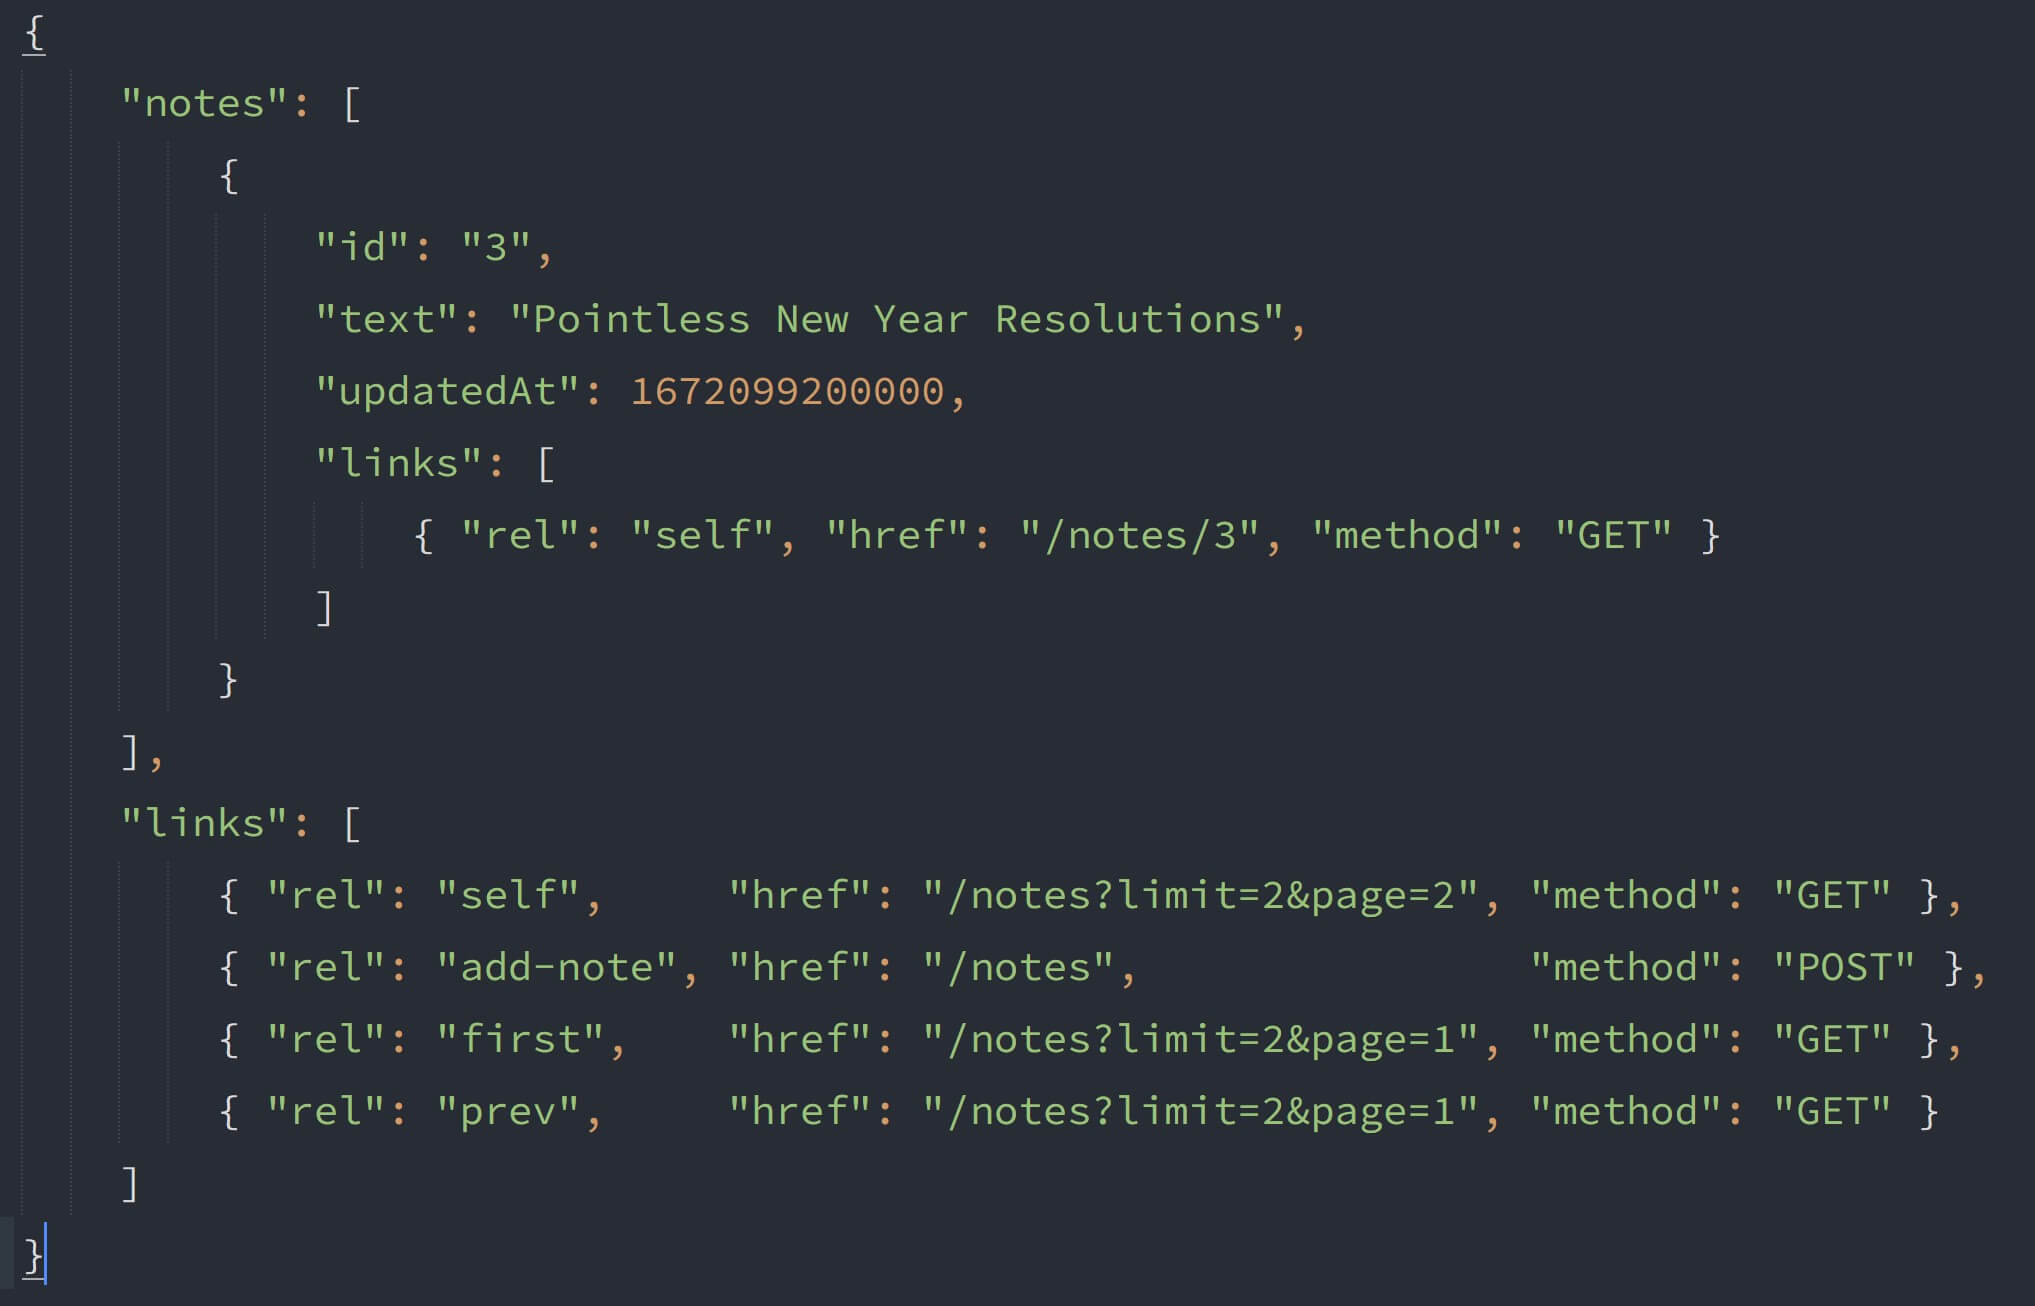
Also notice how the next and last properties are omitted from the response for the last page. The same thing happens for the first and prev properties on the first page.
Wonderful🌟! We're done with pagination. I hope this section helped you gain a better understanding of what pagination is, the various options for implementing pagination at your disposal and how to implement it in your next REST API project.
Searching and Filtering
Just like searching or filtering through a collection of entities is a key concept in any application, it is also a key feature of APIs. Any real-life REST API will almost certainly need to expose options to its clients to search or filter collections.
Similar to pagination, filtering is also typically implemented by using query-string params.
For example, you may want to filter messages and view only archived messages.
GET https://api.example.com/messages?status=archivedOr maybe you just want to perform a generic search through all messages for a particular search term.
GET https://api.example.com/messages?search_term=restYou can technically also put these filtering options in the request body and make a
POSTrequest but you will lose the benefits of bookmarking and caching which is why as much as possible you should always try to implement searching and filtering using theGETHTTP verb.
Filtering is an area where we find a lot of customizations in implementation. Different API providers implement filtering in their own way and their doesn't seem to be a standard way of doing things so let's just see a few examples of real-life implementations of filtering.
Slack
Slack's Search Messages API uses a query-string param called query for generic searching through messages.
https://slack.com/api/search.messages?query=restGithub
Github uses a more involved approach to filtering in its Search API that uses a query-string parameter called q which in turn uses keywords and qualifiers to construct a search query.
For example, to return all "open" issues, labelled as "bug" across repos using the primary language as "python" containing the search term "windows", we'd use the below URI:
https://api.github.com/search/issues?q=windows+label:bug+language:python+state:openNotice the use of delimiters + and : to construct a single string which is then assigned to the query-string param q.
Stripe
The Stripe API also uses a complicated filtering and searching mechanism using "fields", "operators" and "values". These are all URL-encoded and fed to a query-string param value called query.
For example, here is how we can search for charges using the Stripe API:
curl https://api.stripe.com/v1/charges/search \ -u sk_test_4eC39HqLyjWDarjtT1zdp7dc: \ --data-urlencode query="amount>999 AND metadata['order_id']:'6735'" \ -GThe corresponding URI would look like:
https://api.stripe.com/v1/charges/search ?query=amount%3E999%20AND%20metadata%5B'order_id'%5D%3A'6735'Implementing Searching/Filtering in the Thunder Notes API
Let's implement a simple searching mechanism in our notes app for the GET /notes endpoint.
We'll be using a query-string param called q whose value will be a search term and we'll check whether the content of our notes contains this search term.
Replace the existing getNotes() request handler with the one below:
exports.getNotes = ( req, res ) => { // get all info about the user const user = getUserById( res.locals.user.sub );
// Initialize params for filtering and pagination // This makes sure that we set defaults if these are not included in the URI. const params = { q: req.query.q || "", limit: req.query.limit || 2, page: req.query.page || 1 };
// validate query-string params if( isNaN( params.limit ) || isNaN( params.page ) || params.limit < 0 || params.page < 0 ) { return res.status( 400 ).json({ "message": "Invalid request" }); }
// get array of note objects from the array of note IDs let responseNotes = notesCtrl.getNotesByIds( user.notes );
// filter notes by performing a text search responseNotes = notesCtrl.filterNotes( responseNotes, params.q );
// paginate the results so that only results in the // current page are included in the response const paginationInfo = paginate( responseNotes, params.page, params.limit ); responseNotes = paginationInfo.paginatedResults; params.lastPage = paginationInfo.lastPage;
// add links for HATEOAS and return the response JSON res.json( hateoasify( responseNotes, params ) );}Let's go over the changes. You'll notice we have added another property to the params object with value of the query-string param q and set it to blank by default.
Secondly, before paginating the notes, we call the filterNotes() controller function which filters the user's notes as per the search term.
Next we need to make changes to hateoasifyNotes() to include this param q in the links in the response.
Replace hateoasifyNotes() with the new definition below.
function hateoasifyNotes( responseNotes, params ) { const { q, limit, page, lastPage } = params;
// Add a `links` array to each individual note object within the collection. // The `self` URI can be used to fetch more info about the note. responseNotes.forEach( n => { n.links = [{ rel: "self", href: `/notes/${ n.id }`, method: "GET" }] });
// Add a "links" array for the entire collection of notes. const links = [ { rel: "self", href: `/notes${ generateQueryString( limit, page, q ) }`, method: "GET" }, { rel: "add-note", href: "/notes", method: "POST" } ];
// Add pagination links `first`, `prev`, `next` and `last` to the `links` array. // Don't include `first` and `prev` in the `links` array for the 1st page. if( page > 1 ) { links.push({ rel: "first", href: `/notes${ generateQueryString( limit, 1, q ) }`, method: "GET" }); links.push( { rel: "prev", href: `/notes${ generateQueryString( limit, page-1, q ) }`, method: "GET" }); } // Don't include `next` and `last` in the `links` array for the last page. if( page < lastPage ) { links.push({ rel: "next", href: `/notes${ generateQueryString( limit, parseInt( page ) + 1, q ) }`, method: "GET" }); links.push({ rel: "last", href: `/notes${ generateQueryString( limit, lastPage, q ) }`, method: "GET" }); }
return { notes: responseNotes, links };}You'll notice we are extracting the value of q from the params object. We are then passing q to every invocation of generateQueryString(). Doing this makes sure we include q in the query-string of the HATEOAS links in the response.
Let's test this out in Postman. We'll authenticate with the first test user and create a new note with the text Diet Plan by sending a POST request to /notes like this:
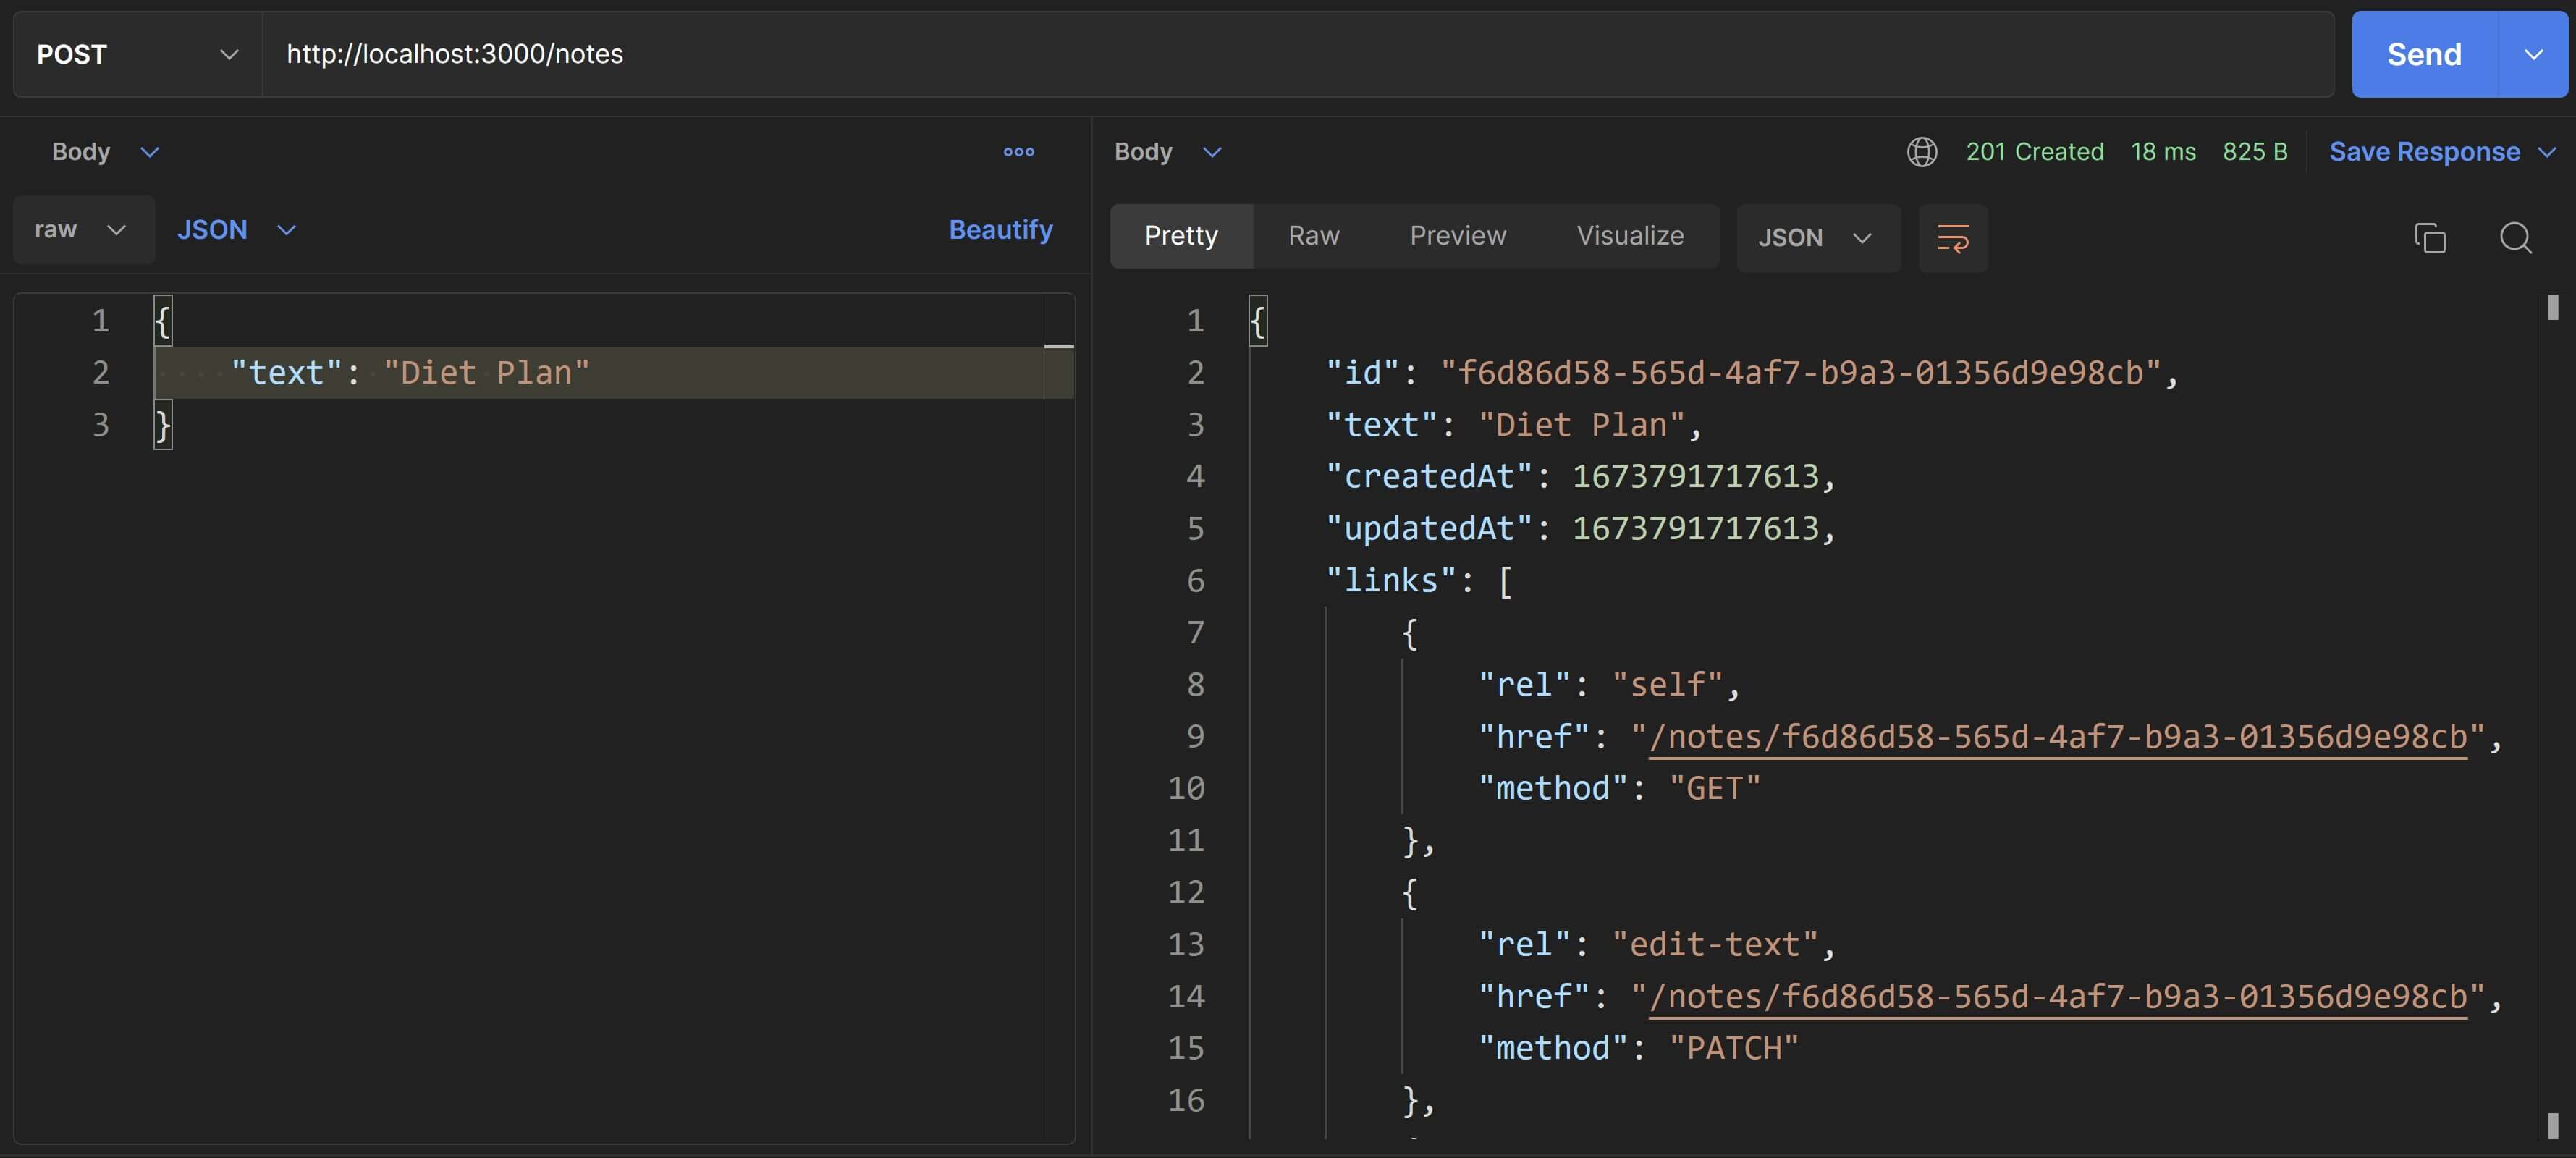
Now, send a GET request to /notes?q=plan and check the response. It will contain two notes, the existing one and the new one you just added as seen in the below screenshot.
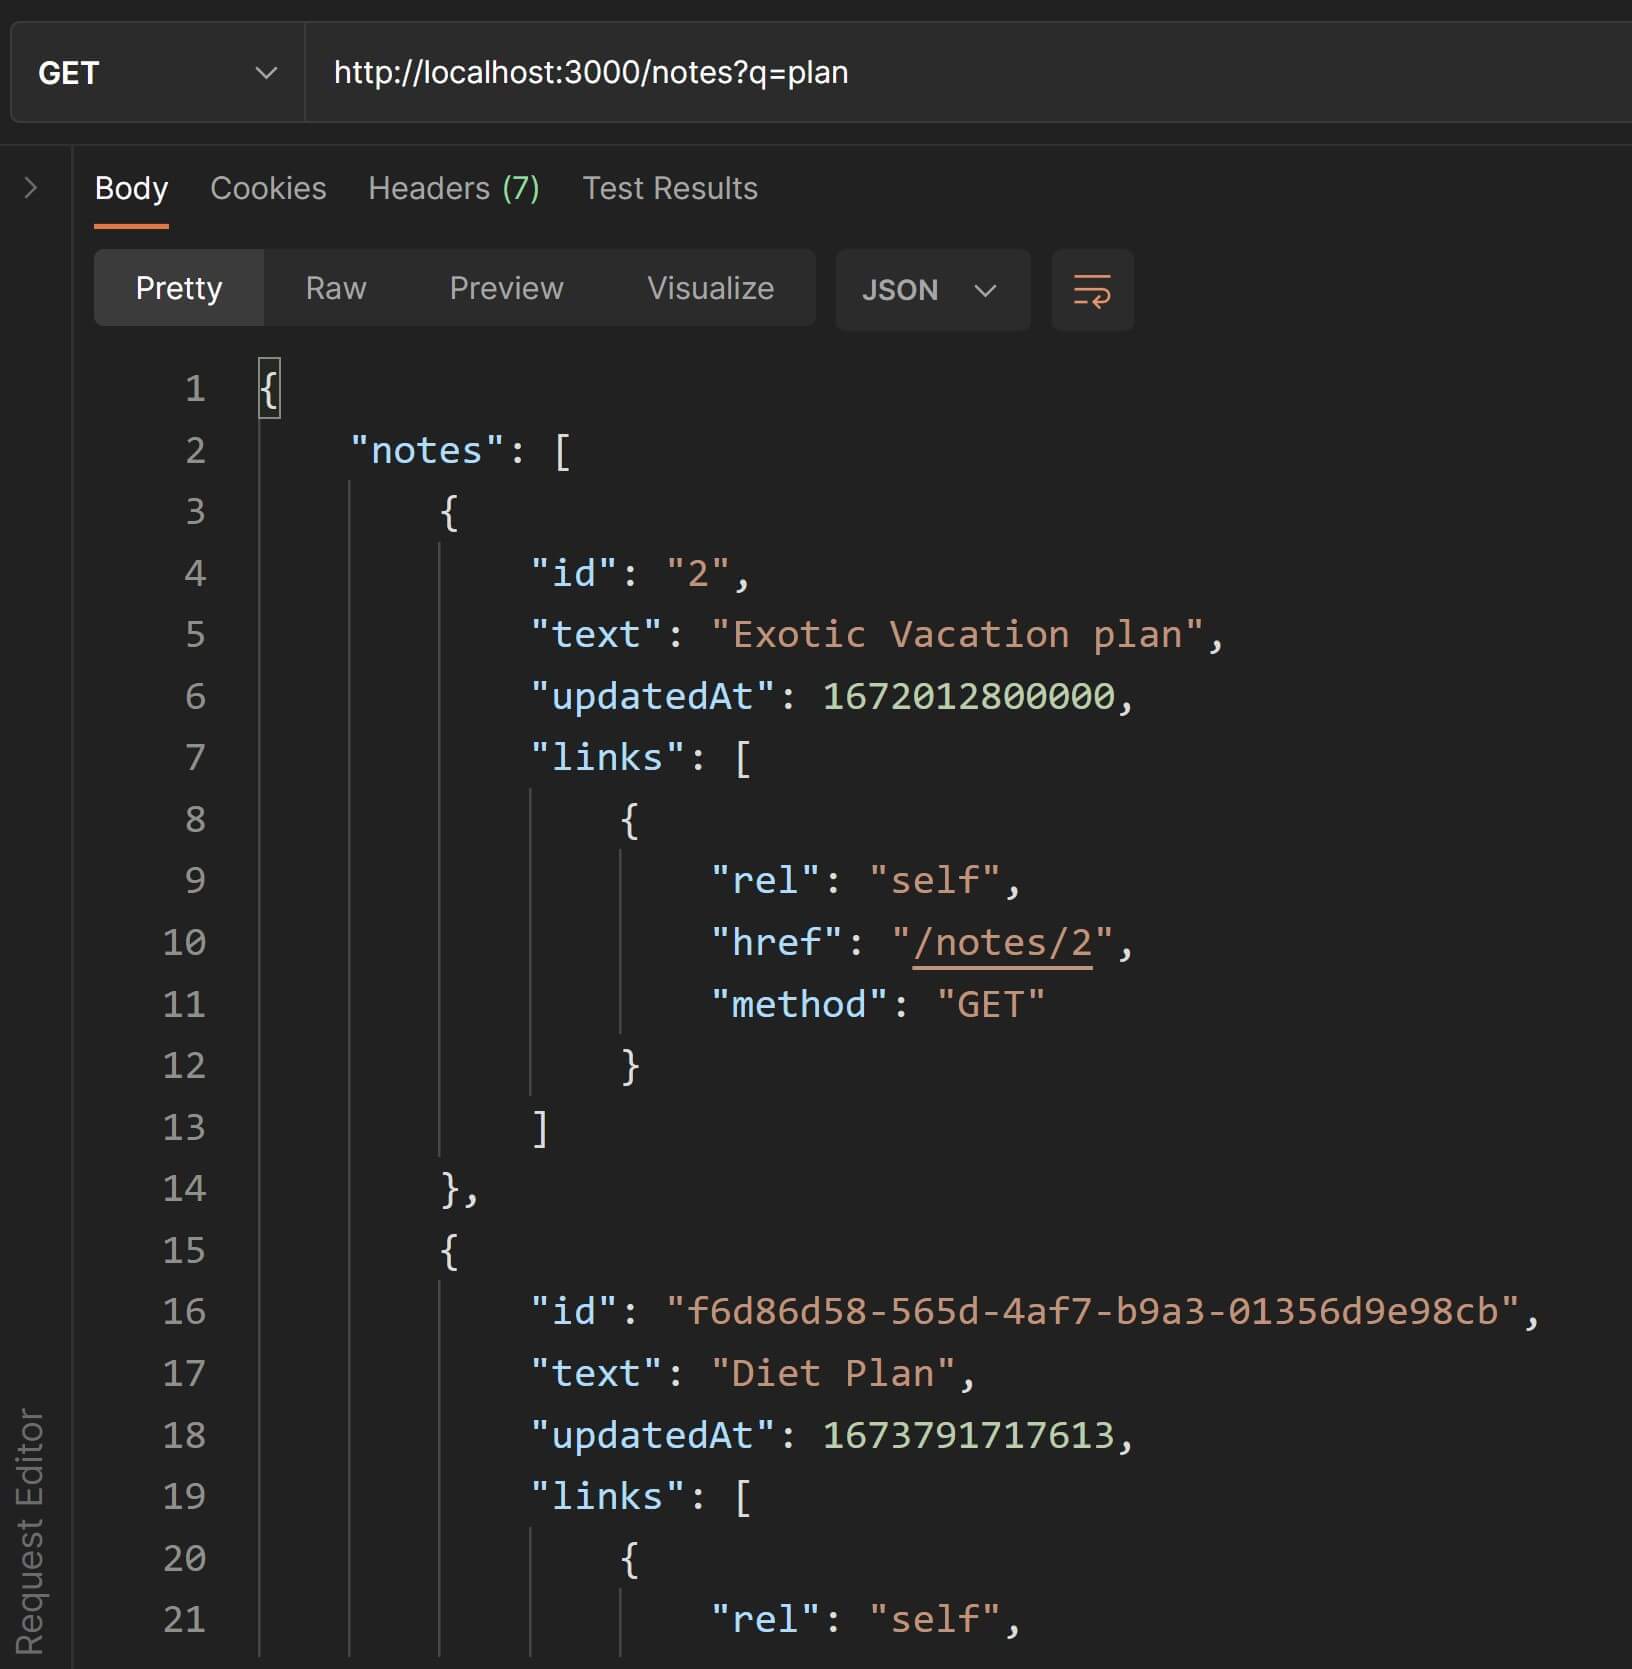
You can even combine this with pagination by adding limit and page params. Change the URI to /notes?q=plan&limit=1&page=2. This time you'll get only the new note you added like in the screenshot below:
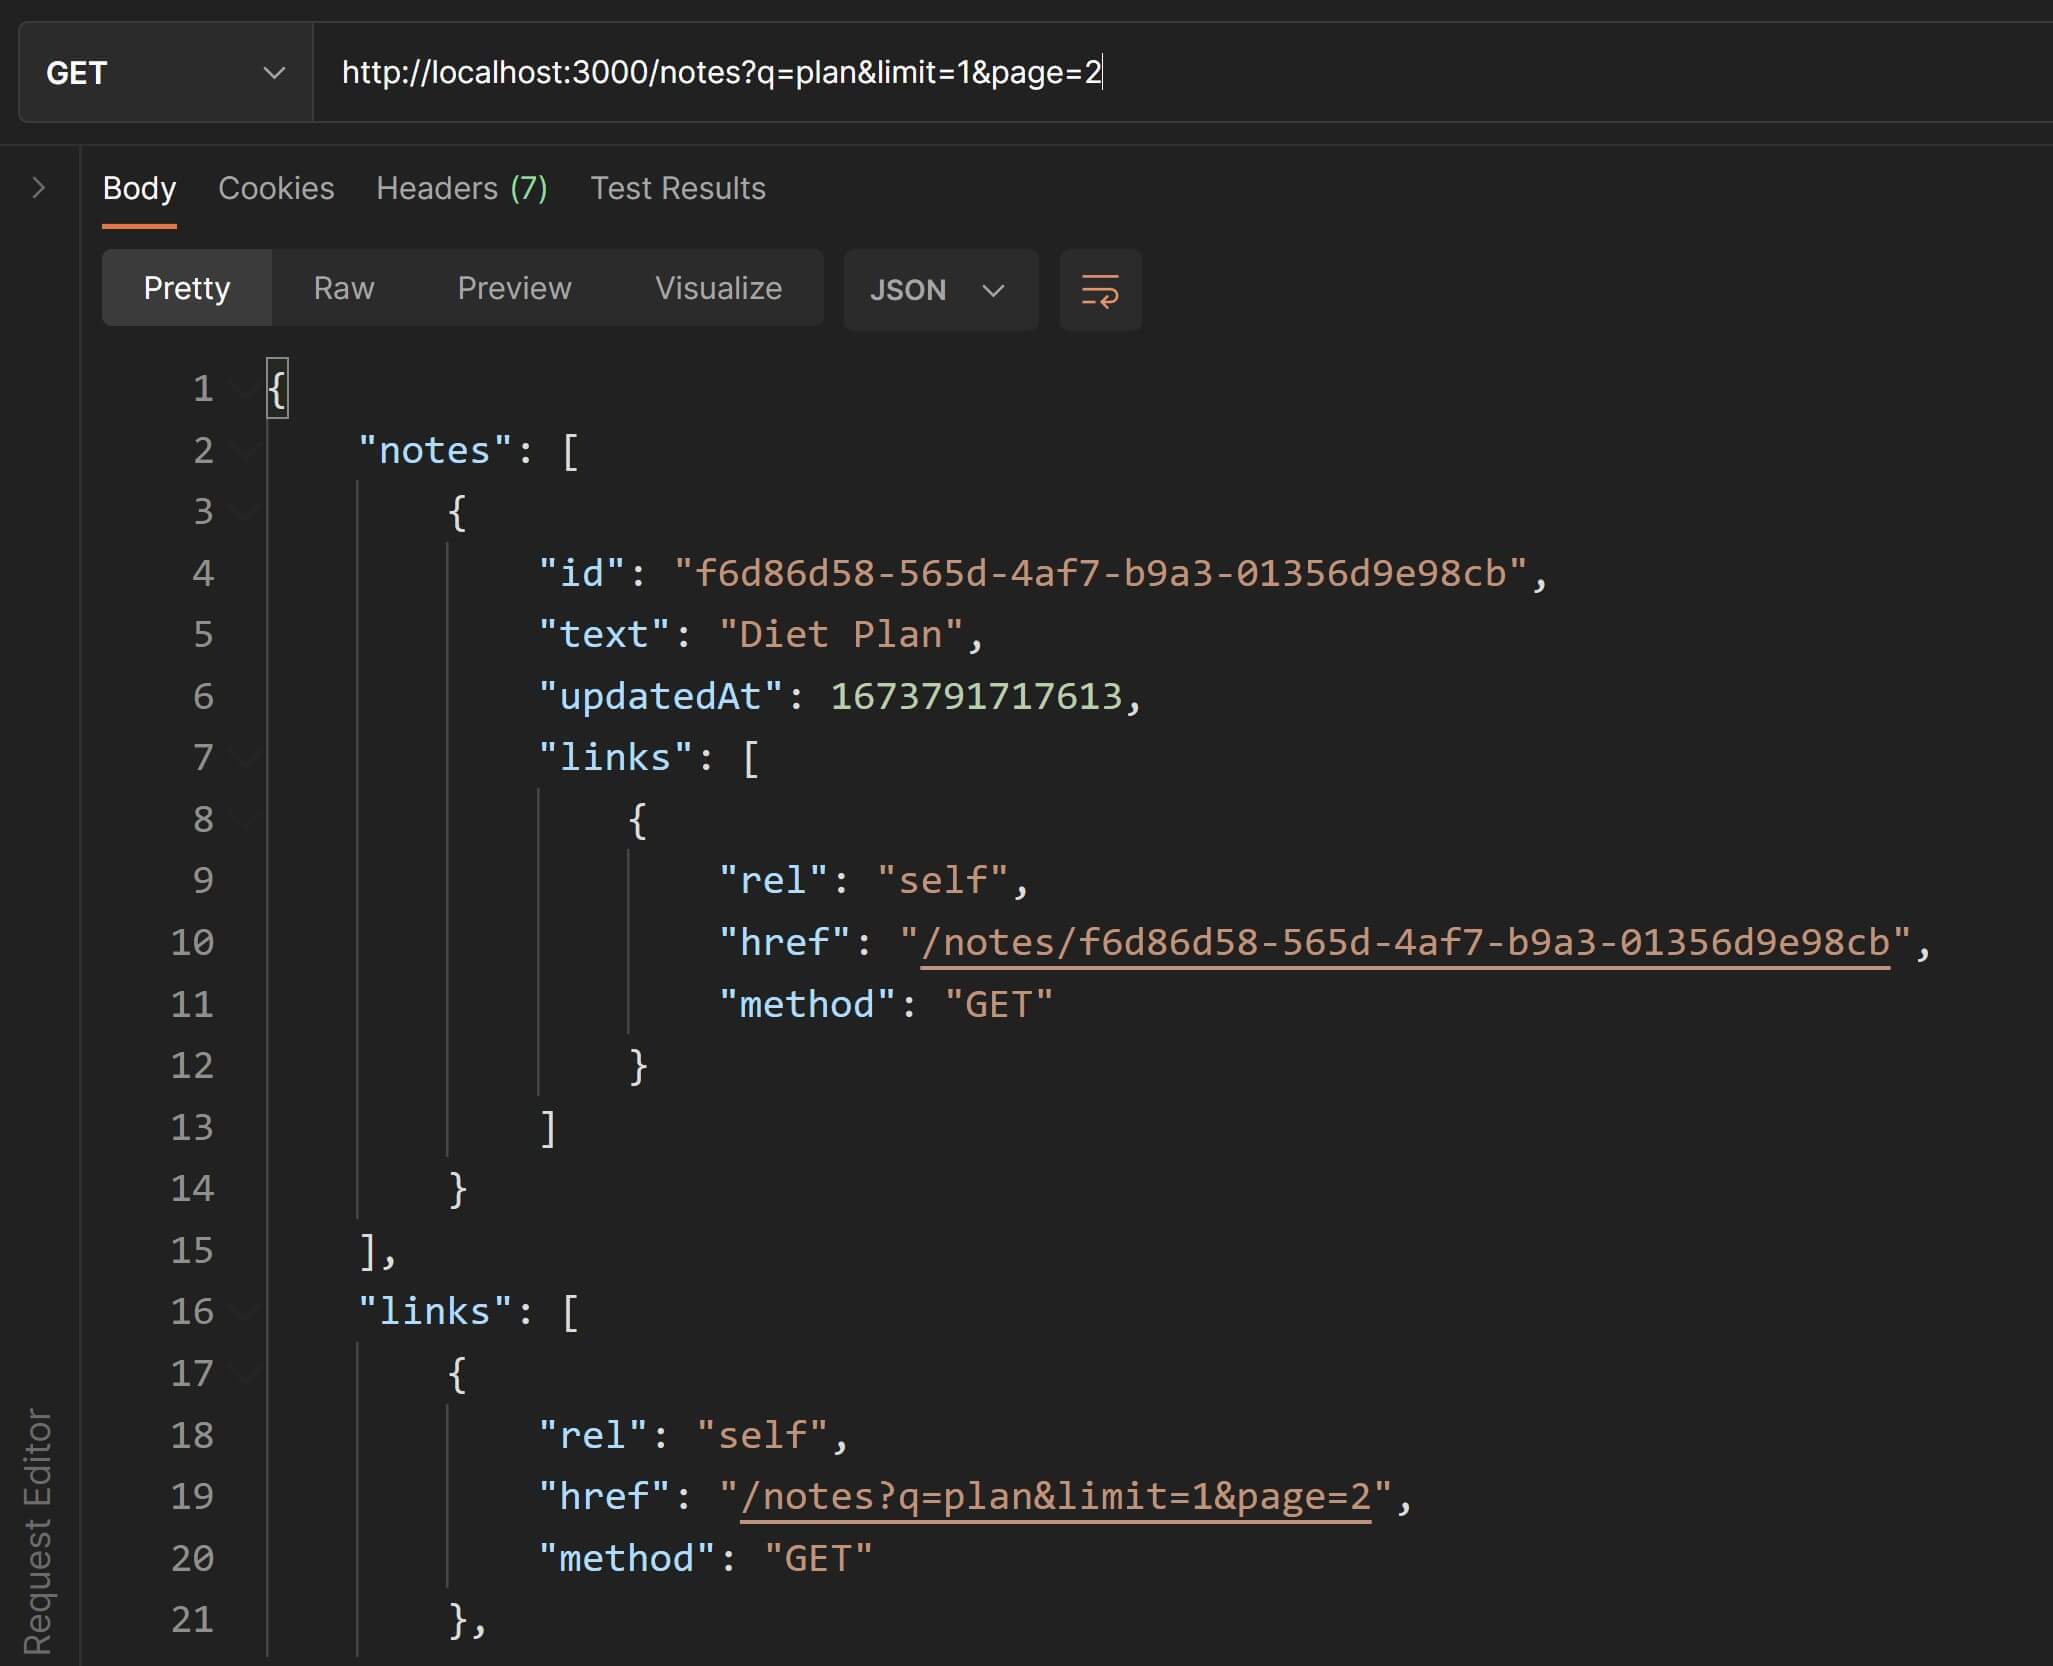
Woo Hoo😎! We have successfully implemented searching/filtering in our Thunder Notes API.
Sorting
Another key feature of any real-life API is to enable its clients to sort the response by a field and in a direction that best suits their own needs.
For example, in the Thunder Notes API, the clients may need to sort the /notes resource by the date they were last updated either in ascending or descending order depending upon the customers' preferences.
Just like pagination and filtering, sorting is also typically implemented using query-string parameters.
Let's look at a few examples of how the big names out there have implemented sorting in their REST APIs.
Slack
Slack's Search Messages API uses two query-string params called sort and sort_dir. The former specifies which field to perform the sort on and the latter specifies the direction i.e. whether ascending or descending.
It is not mandatory to allow sorting on all the fields in the result set but just the ones that are required and make sense. For example, Slack's Search API only allows sorting on the score and timestamp fields.
The endpoint to search messages sorted by timestamp and in ascending order will look like:
https://slack.com/api/search.messages?sort=timestamp&sort_dir=ascGithub
Github's Search API uses the same simple approach to sorting as Slack using the sort and order query-string parameters.
For example:
?sort=created&order=ascWix
Wix's API allows sorting List endpoints using the sort.fieldName and sort.order query-string parameters.
For example, to sort by last name in descending order, you'd use a query-string like this:
?sort.fieldName=info.name.last&sort.order=DESCThis query-string is then parsed to extract the sorting instructions by the API.
The Wix API also provides more involved sorting capabilities with Query endpoints where sorting instructions are included in the request body and sent in a POST instead of a GET request.
{ "query": { "sort": { "fieldName": "info.name.last", "order": "ASC" } }}Multiple columns
You can implement sorting on multiple columns also. Here are some examples of how this can be implemented in the query-string.
One way could be to use the same sort and order parameters but specify multiple columns and corresponding directional values as a comma-separated string. In the below example, the intention is to sort by price in ascending order and then by rating in descending order.
/products?sort=price,rating&order=asc,descAnother way could be to form name-value pairs in the format <field>:<direction> and assign them to a single query-string parameter called sort.
/products?sort=price:asc,rating:descImplement Sorting in the Thunder Notes API
We'll be making use of two query-string parameters called sort and order for implementing sorting in our tutorial API. sort will indicate the field to be used for sorting and order will determine the direction of the sort.
Let's make changes to the getNotes() handler function first. Replace the existing definition with this new one.
exports.getNotes = ( req, res ) => { // get all info about the user const user = getUserById( res.locals.user.sub );
// Initialize params for filtering, searching, sorting and pagination. // This makes sure that we set defaults if these are not included in the URI. const params = { q: req.query.q || "", limit: req.query.limit || 2, page: req.query.page || 1, sort: req.query.sort || "updatedAt", order: req.query.order || "asc" };
// validate query-string params if( isNaN( params.limit ) || isNaN( params.page ) || params.limit < 0 || params.page < 0 || ![ "updatedAt", "createdAt" ].includes( params.sort ) || ![ "asc", "desc" ].includes( params.order ) ) { return res.status( 400 ).json({ "message": "Invalid request" }); }
// get array of note objects from the array of note IDs let responseNotes = notesCtrl.getNotesByIds( user.notes );
// filter notes by performing a text search responseNotes = notesCtrl.filterNotes( responseNotes, params.q );
// paginate the results so that only results in the // current page are included in the response const paginationInfo = paginate( responseNotes, params.page, params.limit ); responseNotes = paginationInfo.paginatedResults; params.lastPage = paginationInfo.lastPage;
// sort on the "createdAt" or "updatedAt" fields in either "asc" or "desc" order responseNotes = notesCtrl.sortNotes( responseNotes, params.sort, params.order );
// add links for HATEOAS and return the response JSON res.json( hateoasify( responseNotes, params ) );}Similar to pagination, we first initialize the params object and include the new sort and order parameters and set defaults for when they have not been specified.
We also do a little bit of validation to make sure that sort and order params carry proper values otherwise we return a 400 Bad Request.
Next, we call the sortNotes() controller function to sort the notes after filtering and pagination.
Now, we need to make sure that hateoasifyNotes() also includes these new parameters in the response links. Go ahead eplace the existing definition of hateoasifyNotes() with this new one.
function hateoasifyNotes( responseNotes, params ) { const { limit, page, lastPage, q, sort, order } = params;
// Add a `links` array to each individual note object within the collection. // The `self` URI can be used to fetch more info about the note. responseNotes.forEach( n => { n.links = [{ rel: "self", href: `/notes/${ n.id }`, method: "GET" }] });
// Add a "links" array for the entire collection of notes. const links = [ { rel: "self", href: `/notes${ generateQueryString( limit, page, q, sort, order ) }`, method: "GET" }, { rel: "add-note", href: "/notes", method: "POST" } ];
// Add pagination links `first`, `prev`, `next` and `last` to the `links` array. // Don't include `first` and `prev` in the `links` array for the 1st page. if( page > 1 ) { links.push({ rel: "first", href: `/notes${ generateQueryString( limit, 1, q, sort, order ) }`, method: "GET" }); links.push( { rel: "prev", href: `/notes${ generateQueryString( limit, page-1, q, sort, order ) }`, method: "GET" }); } // Don't include `next` and `last` in the `links` array for the last page. if( page < lastPage ) { links.push({ rel: "next", href: `/notes${ generateQueryString( limit, parseInt( page ) + 1, q, sort, order ) }`, method: "GET" }); links.push({ rel: "last", href: `/notes${ generateQueryString( limit, lastPage, q, sort, order ) }`, method: "GET" }); }
return { notes: responseNotes, links };}Similar to filtering, we first extract the value of sort and order from params and then include them as inputs to every invocation of generateQueryString().
Let's test these changes in Postman. We'll first start with testing the validation for sort and order params.
Send a GET request to /notes?sort=abc. Our validation makes sure that the sort param can only be set to either createdAt or updatedAt which is why you'll receive a 400 Bad Request response like this:

You can perform a similar test for validating the order param.
Now that our validations are working, let's test out our happy-path scenario. Having authenticated with the first test user, send a GET request to /notes?limit=3&sort=updatedAt&order=desc. The limit has been set to 3 so that all the notes for the user are returned right on the first page. Notice that the response will include notes sorted from newest to oldest, which is a different order than what we have been seeing till now.
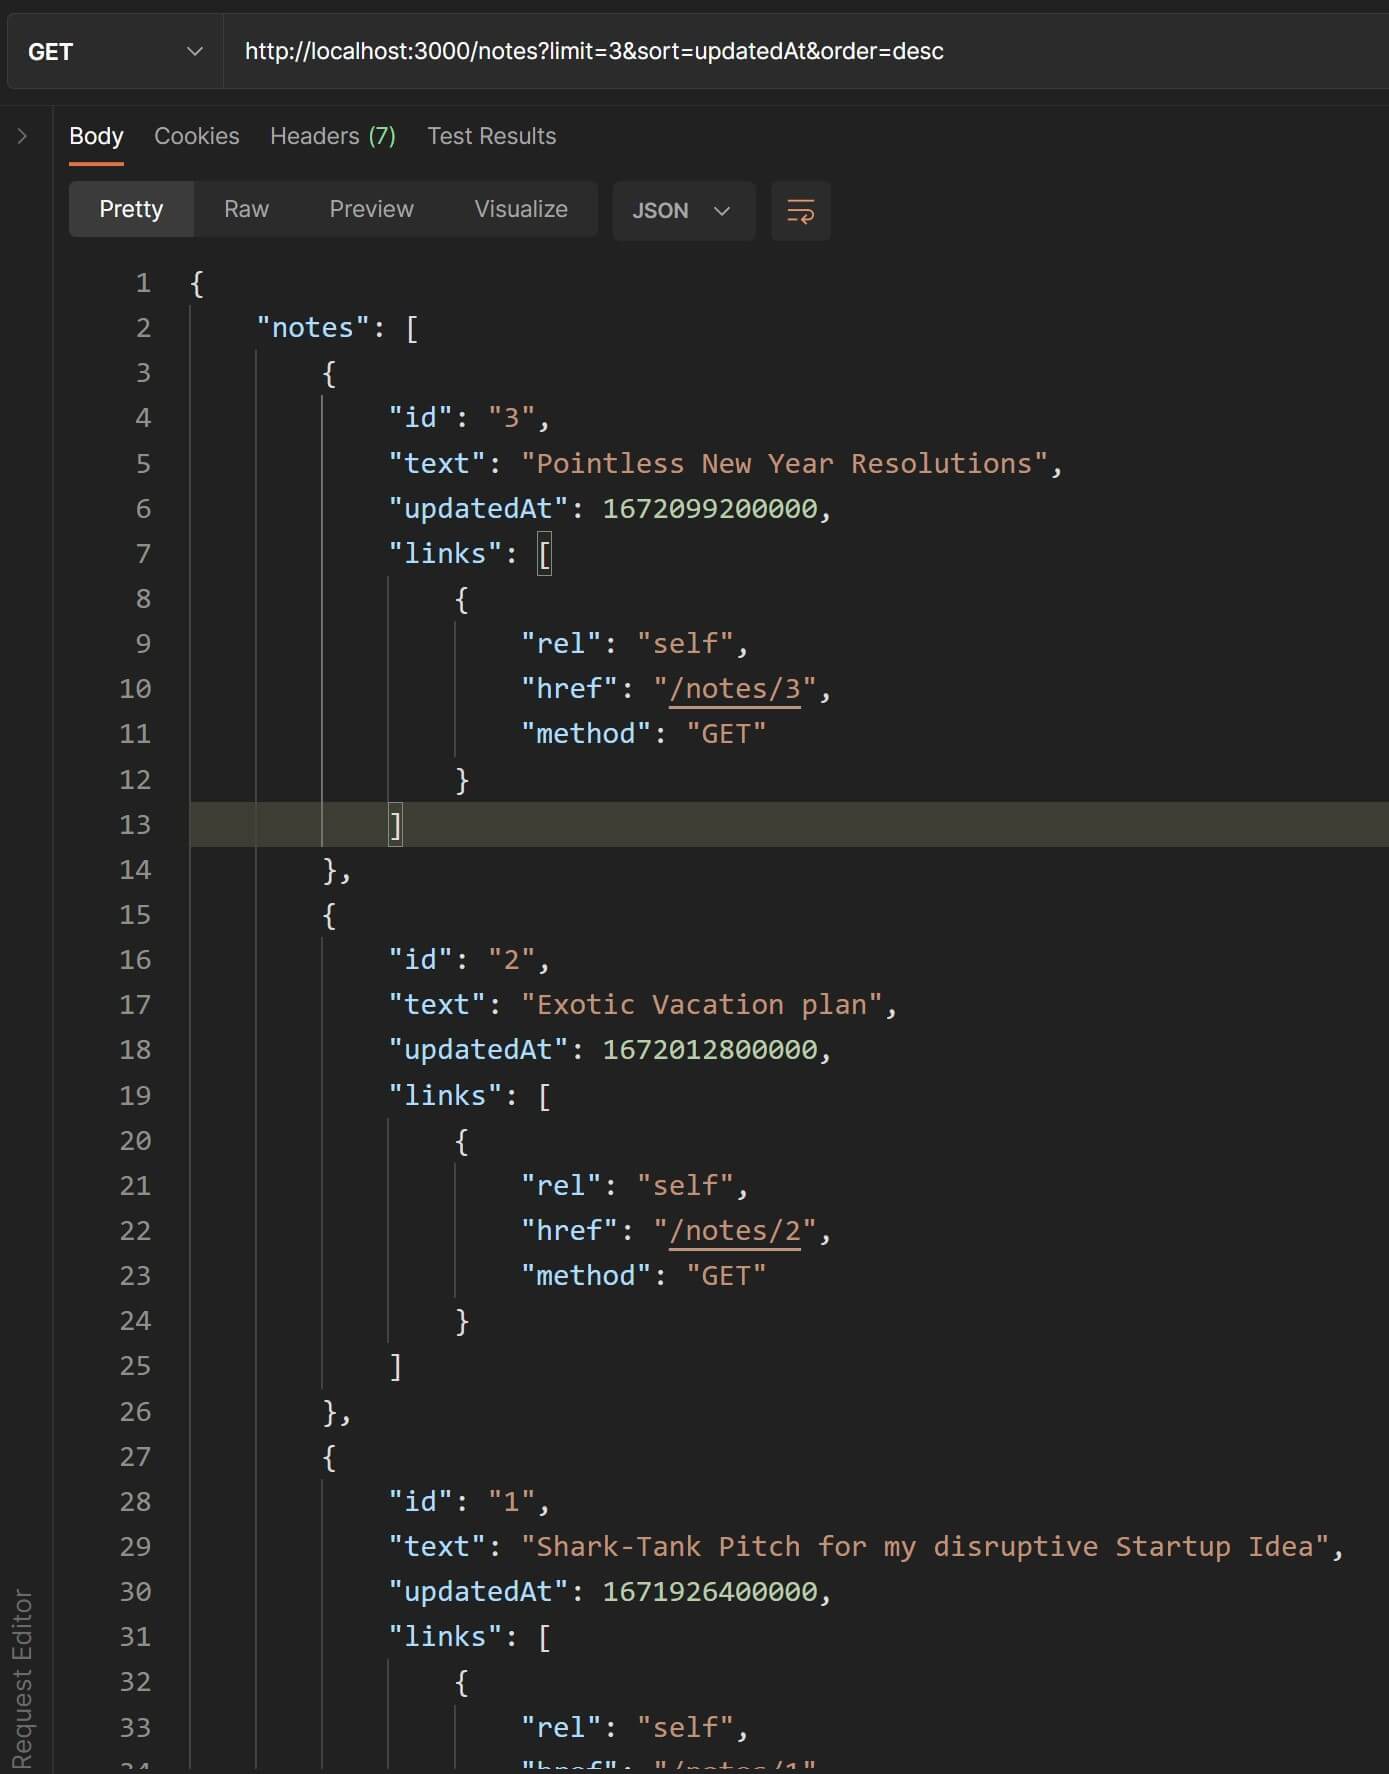
And that's a wrap🌯!
Cue the victory music✌️🎶!!!
Blast some confetti🎊!!!
Cuz we've finally reached the end of this tutorial!!!
I know I know...this was possibly the longest article you've ever read because it was for sure the longest article I've ever written.
Kudos to you for your commitment and focus towards upgrading your knowledge of REST APIs👏👏👏👏 . You're AWESOME😎!(just like me😏...)
I hope you got loads of value from this tutorial and now feel confident about building your very own REST APIs.
I'll leave you with a quote from the creator of the REST architecture himself, Roy Fielding, where he mentions that adhering to REST architectural guidelines ensures that our APIs stand the test of time and remain independent, relevant, functional, performant and robust for years and years. This will hopefully further reinforce your new found commitment towards adhering to these guidelines and priciples in your REST API design.
Software design on the scale of decades: Every detail is intended to promote software longevity and independent evolution. Many of the constraints are directly opposed to short-term efficiency. Unfortunately, people are fairly good at short-term design, and usually awful at long-term design.